Understanding data iteration with v-for
To loop over HTML elements in Vue, you use the v-for loop directive directly on the target elements. When Vue renders the component, it will iterate the target to use and render the data being parsed into the directive, with the same concept as a normal JavaScript for loop.
Basic iteration using v-for
The basic syntax of v-for is as follows:
v-for="(item, index) in items" :key="index"
The preceding syntax example indicates that we are iterating through a list of items. We have access to a single item and its appearance index in the list in each iteration. :key is a required attribute, acting as the unique identifier of each iterating element rendered for the Vue engine to keep track.
When the key or item content changes, either programmatically or due to user interactions, the Vue engine triggers an update of the changed item on the UI. If you have multiple loops in one component, you should randomize the key attribute with extra characters or context-related strings to avoid key duplication conflicts.
There are various use cases for this direction. One straightforward use case is to perform anonymous loops, in which you can define a number, X, as a symbolic list, and the loop will iterate that X times. This can be handy in situations in which you strictly control the number of iterations you want or render some placeholder content.
In the following example, we see an anonymous loop in which the total iterations are 2 and we define key with a loop-1 prefix:
<template>
<div v-for="n in 2" :key="'loop-1-' + n">
    {{ n }}
</div>
<template>
You can also use template literals (with `` backticks) to compute strings without +:
<template>
<div v-for="n in 5" :key="`loop-2-${n}`">
    {{ n }}
</div>
<template>
The output of the preceding code in both approaches should look as follows

Figure 1.18 – Output of anonymous loops example
Now that we have covered how to handle basic loops by using v-for, we will utilize this function in the next exercise.
Exercise 1.05 – using v-for to iterate through an array of strings
In this exercise, we are going to create an anonymous loop using Vue’s v-for directive. This will be familiar to those who have used for or forEach loops in JavaScript before.
To access the code file for this exercise, refer to https://github.com/PacktPublishing/Frontend-Development-Projects-with-Vue.js-3/tree/v2-edition/Chapter01/Exercise1.05.
Perform the following steps to complete the exercise:
- Use the application generated with
npm init vue@3as a starting point, or within the root folder of the code repository, navigate into theChapter01/Exercise1.05folder by using the following commands in order:> cd Chapter01/Exercise1.05/ > yarn
- Run the application using the following command:
yarn dev
- Open the exercise project in VS Code (by using
code .command within the project directory) or your preferred IDE. - Create a new Vue component file named
Exercise1-05.vuein thesrc/componentsdirectory. - Inside
Exercise1-05.vue, we compose a new component with an<h1>element to render the static title ofLooping through arrays, and an<ul>element containing an empty<li>tag:<template> <h1>Looping through arrays</h1> <ul> <li></li> </ul> </template>
- In the
scriptsection, let’s add asetupattribute to thescripttag. Then, let’s declare an array ofinterestscontaining some strings as follows:<script setup> const interests = ['TV', 'Games', 'Sports'] </script>
- Now, let’s go back to the
templatesection and add thev-fordirective on the<li>tag to iterate throughinterests. For each iteration, we get a combination of(item, index)from the interests, in whichitemoutputs the string of the array, andindexis the loop index. We map thekeyattribute toindex, and display the value ofitemas shown in the following code block:<template> <h1>Looping through arrays</h1> <ul> <li v-for="(item, index) in interests" :key="index">{{ item }}</li> </ul> </template> - Go to
https://localhost:3000. The following output is as follows:

Figure 1.19 – Output of iterating through an array of strings
In this exercise, we learned how to iterate through a specific array of strings, outputting the string value or index of an array. We also learned that the key attribute needs to be unique to avoid DOM conflicts and forces the DOM to re-render the component properly.
Next, let’s experiment with iterating a collection of objects.
Iterating through an array of objects
In most practical scenarios, we work with data as objects, especially when iterating through an array of objects. Vue makes it easy to control various data states through its directive syntax. Like iterating through an array of strings, the directive syntax remains the same:
v-for="(item, index) in items" :key="index"
The item you receive is now an Object, with various properties. You can bind each property using what you have learned so far to display its value. For example, assume in item, we will have id, title, description, and another array, characteristics, containing some strings. We can display the title and description information for each item like so:
<template>
  <ul>
    <li v-for="(item, index) in items" :key="item.id">
      <h2>{{ item.title }}</h2>
      <span>{{ item.description }}</span>
    </li>
  </ul>
</template>
Note here we don’t use an index as the key; instead, we use id as the unique identifier for key. It is considered a more secure approach to use id or any other unique identifier and we also don’t need to include index in the syntax in this case since we don’t use it.
Since characteristics is an array, we display its values by using a v-for directive again for characteristics. You don’t have to use the same name, item, that the syntax example shows. Instead, you can give it a different name depending on how you want your variable to be.
In the following example, we use str for each element in the item.characteristics array:
<template>
  <ul>
    <li v-for="item in items" :key="item.id">
      <h2>{{ item.title }}</h2>
      <span>{{ item.description }}</span>
      <ul>
          <li v-for="(str, index) in item.characteristics"
           :key="index">
             <span>{{ str }}</span>
          </li>
      </ul>
    </li>
  </ul>
</template>
And in the script section, we define items as follows:
<script setup>
const items = [{
  id: 1,
  title: "Item 1",
  description: "About item 1",
  characteristics: ["Summer", "Winter", "Spring", "Autumn"]
}, {
  id: 2,
  title: 'Item 2",
  description: 'About item 2",
  characteristics: ["North", "West", "East", "South"]
}]
</script>
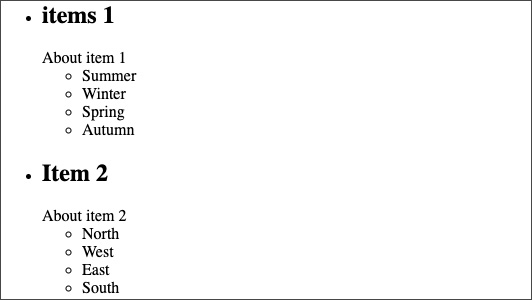
The preceding code will output as shown in Figure 1.20:

Figure 1.20 – Output of iterating through an array of object items
Understanding how to loop through collections of objects with v-for is essential and useful for handling data, especially with external data. In the next exercise, you will combine v-for and v-if to display a list of objects conditionally.
Exercise 1.06 – using v-for to iterate through an array of objects and using their properties in v-if conditions
In this exercise, we will be controlling a Vue data array and iterating through the objects inside of it.
To access the code file for this exercise, refer to https://github.com/PacktPublishing/Frontend-Development-Projects-with-Vue.js-3/tree/v2-edition/Chapter01/Exercise1.06.
Let’s start the exercise by performing the following steps:
- Use the application generated with
npm init vue@3as a starting point, or within the root folder of the code repository, navigate into theChapter01/Exercise1.06folder by using the following commands in order:> cd Chapter01/Exercise1.06/ > yarn
- Run the application using the following command:
yarn dev
- Open the exercise project in VS Code (by using the
code .command within the project directory) or your preferred IDE. - Create a new Vue component file named
Exercise1-06.vuein thesrc/componentsdirectory. - Inside
Exercise1-06.vue, create an array of data objects,interests, as local data. Each interest contains atitlestring and afavoritesarray of strings:<script setup> const interests = [ { title: "TV", favorites: ["Designated Survivor", "Spongebob"], }, { title: "Games", favorites: ["CS:GO"], }, { title: "Sports", favorites: [], }, ]; </script> - In
template, we loop overinterestsand display thetitlefor eachitemin theinterestsarray:<template> <div> <h1>Looping through array of objects</h1> <ul> <li v-for="(item, n) in interests" :key="n"> {{ item.title }} </li> </ul> </div> </template> - Go to
https://localhost:3000and the output of the preceding code will be as follows:

Figure 1.21 – You should now see a list of titles in the browser
- Let’s create a second
v-forloop to iterate through afavoriteslist for eachitem. Note that we use different names –favandm– for our nested loop:<template> <div> <h1>Looping through array of objects</h1> <ul> <li v-for="(item, n) in interests" :key="n"> {{ item.title }} <ol> <li v-for="(fav, m) in item.favorites" :key="m"> {{ fav }}</li> </ol> </li> </ul> </div> </template>
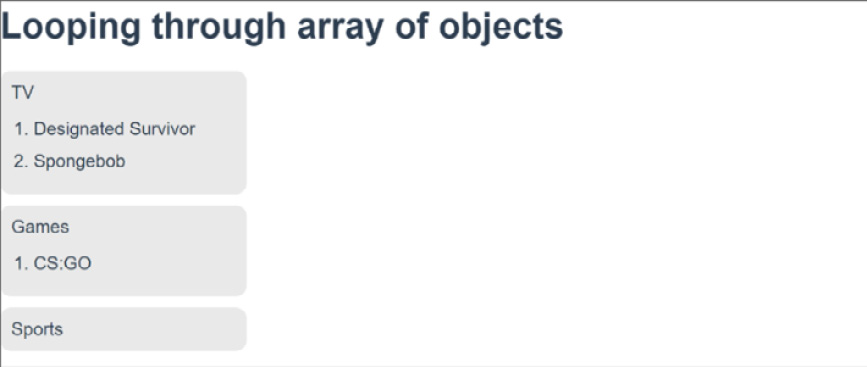
Figure 1.22 displays an output where looping is performed through an array of objects:

Figure 1.22 – Nested ordered list detailing your favorites
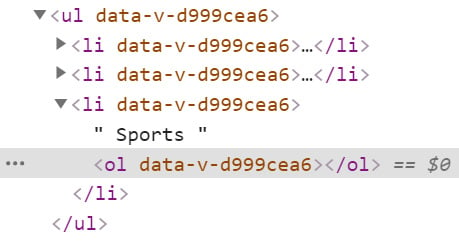
- When inspecting the DOM elements (press Ctrl + F12 or open Developer Tools), you can see there are some empty elements as in Figure 1.23. This is because the Vue engine still renders the
<ol>element even thoughfavoritesis an empty array:

Figure 1.23 – Displaying empty DOM elements in your virtual DOM
- Now, we need to hide that empty
<ol>element after applying it. We will check whether thefavoritesarray is empty (length > 0) and then display the ordered list HTML element. Let’s add av-ifdirective to<ol>with theitem.favorites.length >0condition:<ol v-if="item.favorites.length > 0"> <li v-for="(fav, m) in item.favorites" :key="m"> {{ fav }} </li> </ol>
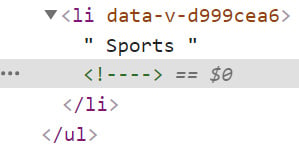
This won’t make a difference to the visuals of your page, but when you inspect the DOM tree in your browser, you’ll notice an HTML comment in dev mode that allows you to understand where a v-if statement might be false. When you build for production, these HTML comments won’t be visible in your DOM tree:

Figure 1.24 – Output displaying no HTML comment in production builds
In this exercise, we have iterated through complex arrays of objects, outputting the nested keys for these objects and controlling the view state of DOM elements based on length conditions.
Next, let’s experiment with iterating through a keyed collection (or Object).
Iterating through a keyed collection (Object)
We can generally use v-for for looping through any iterative data collection type. Object in JavaScript is a key-value data collection, and we can iterate through its properties using v-for.
The syntax example is like the previous syntax example for arrays of objects and strings, with a tiny difference. Here, we change the naming convention from (item, index) to (value, key), in which key is the object’s property, and value is that key property’s value. Vue also exposes one more parameter – index – to indicate that property’s appearance index in the target object. Thus, the syntax now becomes the following:
v-for="(value, key, index) in obj"
Here, obj is our target object to iterate.
For example, assume we have the following object named course, which contains a title, a description, and the name of the lecturer(s):
<script setup>
const course = {
  title: 'Frontend development with Vue',
  description: 'Learn the awesome of Vue',
  lecturer: 'Maya and Raymond'
}
</script>
In our template, we iterate through the course’s properties and output their value in the <index>.< key > : <value> format as shown in the following code block:
<template>
  <ul>
    <li v-for="(value, key, index) in course" :key="key">
      {{index}}. {{key}}: {{value}}
    </li>
  </ul>
</template>
The output will be as shown in Figure 1.25:

Figure 1.25 – Iterating and displaying values of the course’s properties
Looping through the properties of an object is also a joint development practice. It is the same concept as winding through any keyed collection type, such as a hash-map (mapping according to key), lookup dictionary (it is also an object), and so on. Since the syntax stays consistent between both array and object iteration, it helps reduce the need for refactoring or data conversion.
Next, you will practice how to write basic looping for Object properties.
Exercise 1.07 – using v-for to loop through the properties of Object
In this exercise, we will be controlling a Vue data object and iterating through the properties inside of it.
To access the code file for this exercise, refer to https://github.com/PacktPublishing/Frontend-Development-Projects-with-Vue.js-3/tree/v2-edition/Chapter01/Exercise1.07.
Let’s start the exercise by performing the following steps:
- Use the application generated with
npm init vue@3as a starting point, or within the root folder of the code repository, navigate into theChapter01/Exercise1.07folder by using the following commands in order:> cd Chapter01/Exercise1.07/ > yarn
- Run the application using the following command:
yarn dev
- Open the exercise project in VS Code (by using the
code .command within the project directory) or your preferred IDE. - Create a new Vue component file named
Exercise1-07.vuein thesrc/componentsdirectory. - Inside
Exercise1-07.vue, let’s composeinformationfor the local data within<script setup>as follows:<script setup> const information = { title: "My list component information", subtitle: "Vue JS basics", items: ["Looping", "Data", "Methods"], } </script> - In the
<template>section, we will loop throughinformationand display the values of its properties:<template> <div> <div v-for="(value, key) in information" :key="key"> {{key}}: {{ value }} </div> </div> </template> - Go to
https://localhost:3000and the output will be as follows:

Figure 1.26 – Output using v-for on the information object
- Note that Vue renders the value for items, which is an array of strings, the same as how we declared using JavaScript. To render it in a better format, we use the built-in JavaScript
toString()function to export all the elements’ values into a string with comma separation automatically:<template> <div> <div v-for="(value, key) in information" :key="key"> {{key}}: {{ value.toString() }} </div> </div> </template> - The final output will render the list as follows:

Figure 1.27 – Output using v-for and toString() on values
Understanding iterations (or loops) is key to not only working with Vue but also with JavaScript in general. Now that we have covered how to handle loops by using the v-for directive and the importance of the key property for proper reactivity enhancement, we will explore how to use, write, and trigger methods in a component.


