Search icon CANCEL
Subscription
0
Cart icon
Your Cart (0 item)
Close icon
You have no products in your basket yet
Save more on your purchases! discount-offer-chevron-icon
Savings automatically calculated. No voucher code required.
Arrow left icon
Explore Products
Best Sellers
New Releases
Books
Videos
Audiobooks
Learning Hub
Newsletter Hub
Free Learning
Arrow right icon
timer SALE ENDS IN
0 Days
:
00 Hours
:
00 Minutes
:
00 Seconds
Arrow up icon
GO TO TOP
FL Studio Cookbook

You're reading from   FL Studio Cookbook Over 40 recipes to help you master the art of music production with FL Studio

Arrow left icon
Product type Paperback
Published in Jun 2014
Publisher Packt
ISBN-13 9781849694148
Length 286 pages
Edition 1st Edition
Arrow right icon
Author (1):
Arrow left icon
Shaun Friedman Shaun Friedman
Author Profile Icon Shaun Friedman
Shaun Friedman
Arrow right icon
View More author details
Toc

Table of Contents (14) Chapters Close

Preface 1. Configuring FL Studio FREE CHAPTER 2. Using Browser 3. Working with the Step Sequencer and Channels 4. Building Your Song 5. Using the Playlist 6. Using the FL Studio Mixer and Recording Audio 7. Sampling Using Edison 8. Exporting and Rendering Your Project 9. Humanizing Your Song 10. Recording Automation 11. Rewiring Reason to FL Studio A. Your Rights as a Composer and Copyrights Index

Exporting an MP3 or WAV file


Exporting your finished song as an MP3 or WAV file is the final step to hearing your song play back in your car, entertainment systems, phone, tablet, any music media device, or even hearing it while it streams online.

Getting ready

In order to export your song as an MP3 or WAV file, you will want to have some type of data in your FL Studio Playlist.

How to do it…

  1. Highlight the data in your FL Studio playlist by pressing Ctrl + A. This will select all of the patterns and data in your playlist, as shown in the following screenshot:

    Fig 8.1

  2. Select FILE from the main FL Studio window, hover your mouse on Export, and select MP3 file…, as shown in the following screenshot:

    Fig 8.2

  3. It will then bring up the Save As box, where you can name your file and specify the exact place you want it to appear on your computer. You will then click on Save.

  4. The rendering box will then appear as shown in the following screenshot. Click on Start to start rendering.
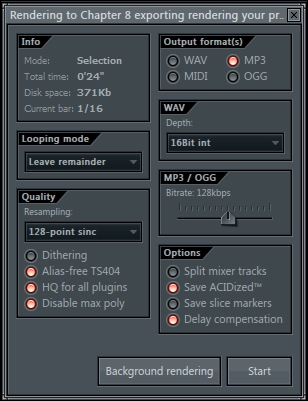
    Fig 8.3

  5. You will then see...

lock icon The rest of the chapter is locked
Register for a free Packt account to unlock a world of extra content!
A free Packt account unlocks extra newsletters, articles, discounted offers, and much more. Start advancing your knowledge today.
Unlock this book and the full library FREE for 7 days
Get unlimited access to 7000+ expert-authored eBooks and videos courses covering every tech area you can think of
Renews at $19.99/month. Cancel anytime
Banner background image