Search icon CANCEL
Subscription
0
Cart icon
Your Cart (0 item)
Close icon
You have no products in your basket yet
Save more on your purchases! discount-offer-chevron-icon
Savings automatically calculated. No voucher code required.
Arrow left icon
Explore Products
Best Sellers
New Releases
Books
Videos
Audiobooks
Learning Hub
Newsletter Hub
Free Learning
Arrow right icon
timer SALE ENDS IN
0 Days
:
00 Hours
:
00 Minutes
:
00 Seconds
Arrow up icon
GO TO TOP
Design Made Easy with Inkscape

You're reading from   Design Made Easy with Inkscape A practical guide to your journey from beginner to pro-level vector illustration

Arrow left icon
Product type Paperback
Published in Apr 2023
Publisher Packt
ISBN-13 9781801078771
Length 360 pages
Edition 1st Edition
Concepts
Arrow right icon
Author (1):
Arrow left icon
Christopher Rogers Christopher Rogers
Author Profile Icon Christopher Rogers
Christopher Rogers
Arrow right icon
View More author details
Toc

Table of Contents (21) Chapters Close

Preface 1. Part 1: Finding Your Way Around
2. Chapter 1: The Inkscape Interface FREE CHAPTER 3. Chapter 2: Moving and Styling Shapes 4. Chapter 3: Drawing Shapes with the Shape Tools 5. Chapter 4: Automatic Shape Alignment in Inkscape 6. Chapter 5: Node Editing – Modifying Your Shapes with Nodes and Curves 7. Part 2: Advanced Shape Editing
8. Chapter 6: Fast Shape Editing with Path Operations and the Shape Builder Tool 9. Chapter 7: Using Text in Inkscape 10. Chapter 8: Advanced Shading and Coloring 11. Chapter 9: Clips and Masks 12. Chapter 10: Automation with Clones and Linked Files 13. Part 3: Inkscape’s Power Tools
14. Chapter 11: Organization Using Layers 15. Chapter 12: Live Path Effects 16. Chapter 13: Filters and Extensions 17. Chapter 14: Vectorizing with Trace Bitmap 18. Chapter 15: Document Properties, Pages, Exporting, and Printing 19. Index 20. Other Books You May Enjoy

The Tool bar and Tool control bar

These two go hand in hand. The tools are on the left, and the controls for the tools are at the top. When you choose a tool from the bar on the left, the Tool control bar will display all the options for that tool. For example, if you choose the Star and Polygon tool, the Tool control bar area displays the number of points, whether it’s a star or a polygon, and even the rounding of the points! Changing to the Text tool shows all the various fonts, letters, line and character spacing, and so on.

When the Star and Polygon tool is selected, the Tool control bar shows options for the tool, such as how many corners the star has, as shown in the following screenshot:
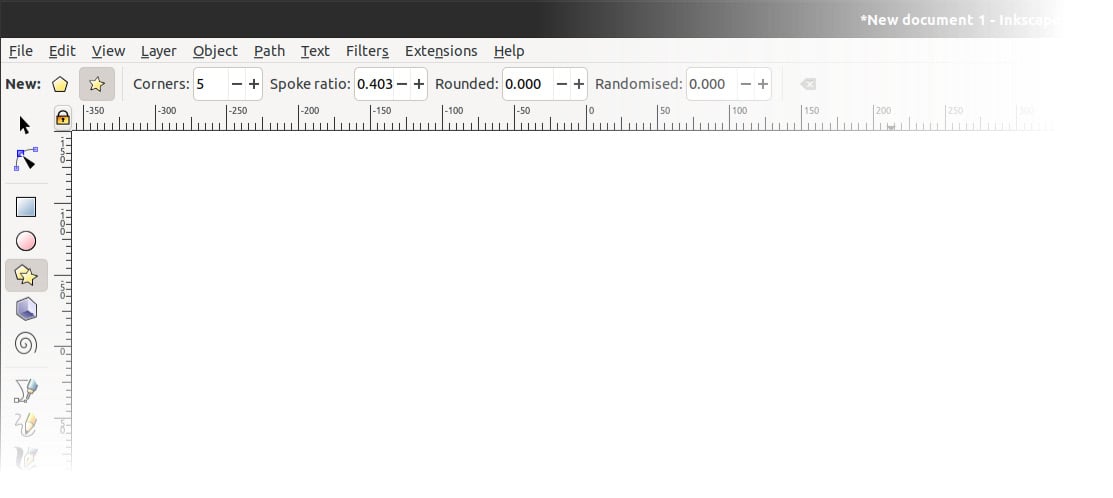
Figure 1.12 – The Star and Polygon tool

Figure 1.12 – The Star and Polygon tool

Double-clicking on a tool in the Tool bar will bring up options for that tool (see Figure 1.13), including Last used style, which you’ll probably want to turn on so that Inkscape remembers the fill color and stroke thickness of the last shape you drew, the last font you used for text, and so on. Double-clicking a tool brings up the Preferences dialog for that tool:
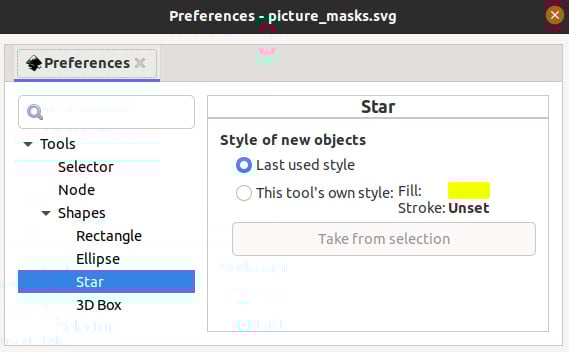
Figure 1.13 – Star tool Preferences dialog

Figure 1.13 – Star tool Preferences dialog

We’ll be exploring the various options for each of these tools in detail in the next chapters, but for now, let’s move on to the main event – the Desk and Page areas.

You have been reading a chapter from
Design Made Easy with Inkscape
Published in: Apr 2023
Publisher: Packt
ISBN-13: 9781801078771
Register for a free Packt account to unlock a world of extra content!
A free Packt account unlocks extra newsletters, articles, discounted offers, and much more. Start advancing your knowledge today.
Unlock this book and the full library FREE for 7 days
Get unlimited access to 7000+ expert-authored eBooks and videos courses covering every tech area you can think of
Renews at $19.99/month. Cancel anytime
Banner background image