Search icon CANCEL
Subscription
0
Cart icon
Your Cart (0 item)
Close icon
You have no products in your basket yet
Save more on your purchases! discount-offer-chevron-icon
Savings automatically calculated. No voucher code required.
Arrow left icon
Explore Products
Best Sellers
New Releases
Books
Videos
Audiobooks
Learning Hub
Newsletter Hub
Free Learning
Arrow right icon
Arrow up icon
GO TO TOP
WiX: A Developer's Guide to Windows Installer XML

You're reading from   WiX: A Developer's Guide to Windows Installer XML If you‚Äôre a developer needing to create installers for Microsoft Windows, then this book is essential. It‚Äôs a step-by-step tutorial that teaches you all you need to know about WiX: the professional way to produce a Windows installer package.

Arrow left icon
Product type Paperback
Published in Oct 2010
Publisher Packt
ISBN-13 9781849513722
Length 348 pages
Edition 1st Edition
Tools
Arrow right icon
Toc

Table of Contents (18) Chapters Close

WiX: A Developer's Guide to Windows Installer XML
Credits
About the Author
About the Reviewer
Preface
1. Getting Started FREE CHAPTER 2. Creating Files and Directories 3. Putting Properties and AppSearch to Work 4. Improving Control with Launch Conditions and Installed States 5. Understanding the Installation Sequence 6. Adding a User Interface 7. Using UI Controls 8. Tapping into Control Events 9. Working from the Command Line 10. Accessing the Windows Registry 11. Controlling Windows Services 12. Localizing Your Installer 13. Upgrading and Patching

Viewing the MSI database


I mentioned before that an MSI file is really a sort of relational database. WiX does all the work of creating tables, inserting rows, and matching up keys in this database. However, as we progress through the rest of the book, I encourage you to explore how it looks behind the scenes. For example, we discussed the File and Component elements. Sure enough, there are two tables called File and Component in the MSI that contain the definitions you've set with your XML markup. To get inside the installer, you'll need a tool called Orca.

Orca.exe

Once you've compiled your project in Visual Studio, you'll have a working MSI package that can be installed by double-clicking it. If you'd like to see the database inside, install the MSI viewer, Orca.exe. Orca is provided as part of the Windows SDK and despite the icon of a whale on the shortcut, stands for One Really Cool App. You can find versions of the SDK at Microsoft's Windows Development Center website:

http://msdn.microsoft.com/en-us/windows/bb980924.aspx

After you've installed the SDK (specifically, the .NET tools that are included), you can find the installer for Orca—Orca.msi—in the Microsoft SDKs folder in Program Files. On my machine, it can be found in C:\Program Files\Microsoft SDKs\Windows\v7.0\Bin.

Install Orca and then right-click on your MSI file and select Edit with Orca.

Orca lets you view the database structure of your installer. This can be a big help in troubleshooting problems or just to get a better idea about how different elements work together. Following is a screenshot of the Component database:
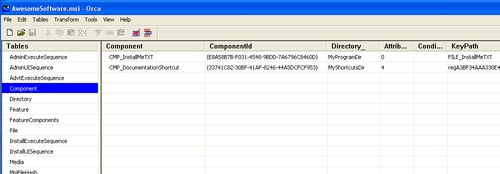
If you wanted to, you could edit your MSI package directly with Orca. This is helpful when learning or trying out different concepts. You'll need to know exactly which tables and rows to modify. Sometimes, though, you'll be able to just change a single value and check its effect.

You have been reading a chapter from
WiX: A Developer's Guide to Windows Installer XML
Published in: Oct 2010
Publisher: Packt
ISBN-13: 9781849513722
Register for a free Packt account to unlock a world of extra content!
A free Packt account unlocks extra newsletters, articles, discounted offers, and much more. Start advancing your knowledge today.
Unlock this book and the full library FREE for 7 days
Get unlimited access to 7000+ expert-authored eBooks and videos courses covering every tech area you can think of
Renews at $19.99/month. Cancel anytime
Banner background image