Search icon CANCEL
Subscription
0
Cart icon
Your Cart (0 item)
Close icon
You have no products in your basket yet
Save more on your purchases! discount-offer-chevron-icon
Savings automatically calculated. No voucher code required.
Arrow left icon
Explore Products
Best Sellers
New Releases
Books
Videos
Audiobooks
Learning Hub
Newsletter Hub
Free Learning
Arrow right icon
timer SALE ENDS IN
0 Days
:
00 Hours
:
00 Minutes
:
00 Seconds
Arrow up icon
GO TO TOP
Unlock Your Creativity with Photopea

You're reading from   Unlock Your Creativity with Photopea Edit and retouch images, and create striking text and designs with the free online software

Arrow left icon
Product type Paperback
Published in Jul 2024
Publisher Packt
ISBN-13 9781801816649
Length 478 pages
Edition 1st Edition
Arrow right icon
Author (1):
Arrow left icon
Michael Burton Michael Burton
Author Profile Icon Michael Burton
Michael Burton
Arrow right icon
View More author details
Toc

Table of Contents (21) Chapters Close

Preface 1. Part 1: Getting Started With Photopea FREE CHAPTER
2. Chapter 1: Taking Your Design and Editing to the Next Level with Photopea 3. Chapter 2: Creating and Working with Image Editing Documents in Photopea 4. Chapter 3: Navigating and Utilizing the Workspace 5. Chapter 4: Layer Management: Creating, Organizing, and Applying Advanced Features 6. Chapter 5: Understanding Selection Fundamentals 7. Part 2: Digital Imaging, Design Techniques, and Other Software
8. Chapter 6: Color Theory and Application 9. Chapter 7: Using and Creating Brushes 10. Chapter 8: Photo Retouching Techniques 11. Chapter 9: Exploring Advanced Image Compositing Techniques 12. Chapter 10: Text Fundamentals and Styling in Photopea 13. Chapter 11: Pre-Designed Templates, Extra Effects, and Features Overview 14. Part 3: Drawing Figures, Creating a Logo, and Other Features
15. Chapter 12: Advanced Color Techniques 16. Chapter 13: Bonus: How to Draw and Paint a Figure and Character 17. Chapter 14: Bonus: How to Create a Logo 18. Chapter 15: Tips, Tricks, and Best Practices 19. Index 20. Other Books You May Enjoy

Organizing layers

Organizing Layers will allow our workflow to run more smoothly, save time, and make photo editing more enjoyable:

  1. Next, I opened the brown rectangle image called Fig 4.6 brown Rectangle and place it into the 4.Mountains Border document as a Layer.
  2. Right-click the mouse over the brown rectangle to convert it to a rasterized Layer. You can either go to Layer Menu, Arrange, Send to Back, or just drag the Fig 4.6 brown Rectangle layer below Mountains photo. See Figure 4.6:
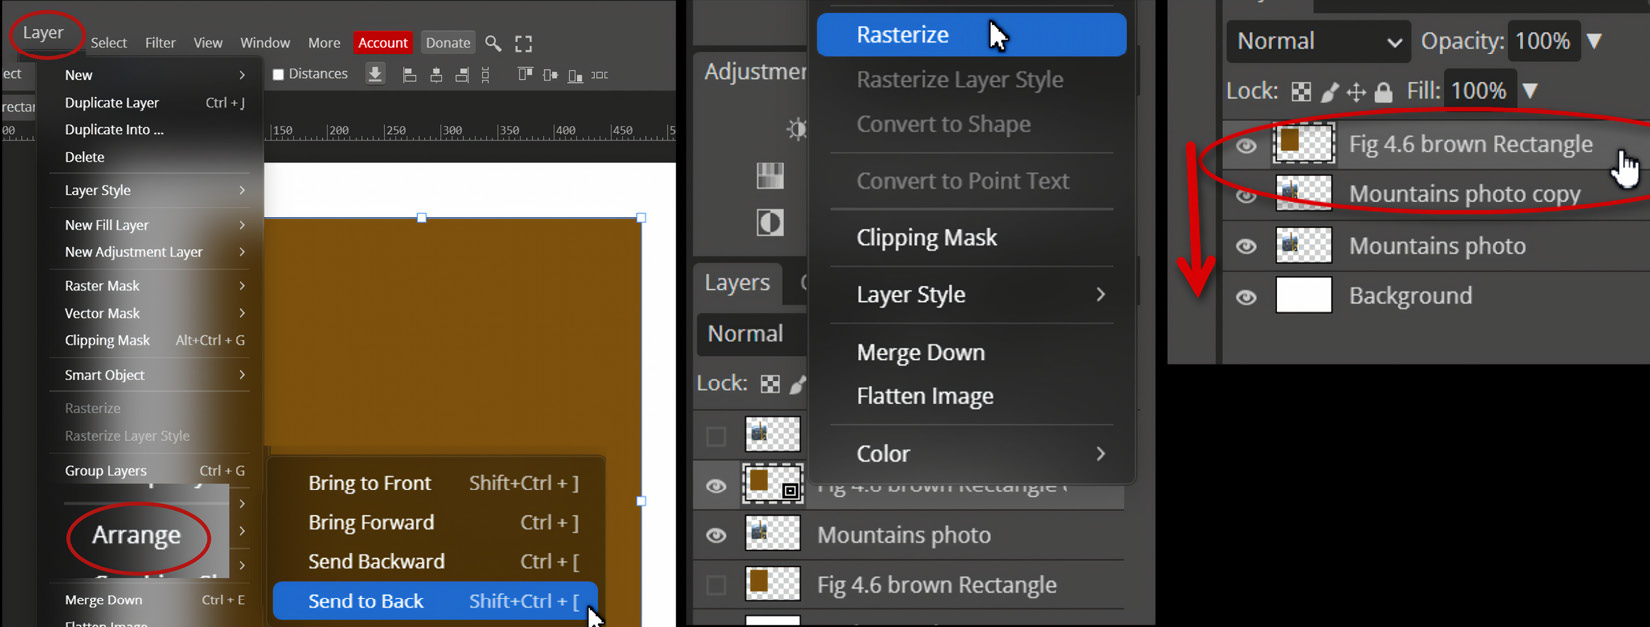
Figure 4.6 – Convert rectangle to raster layer and send to back of Mountains photo

Figure 4.6 – Convert rectangle to raster layer and send to back of Mountains photo

The brown rectangle acts as a border around Mountains photo (see Figure 4.7):
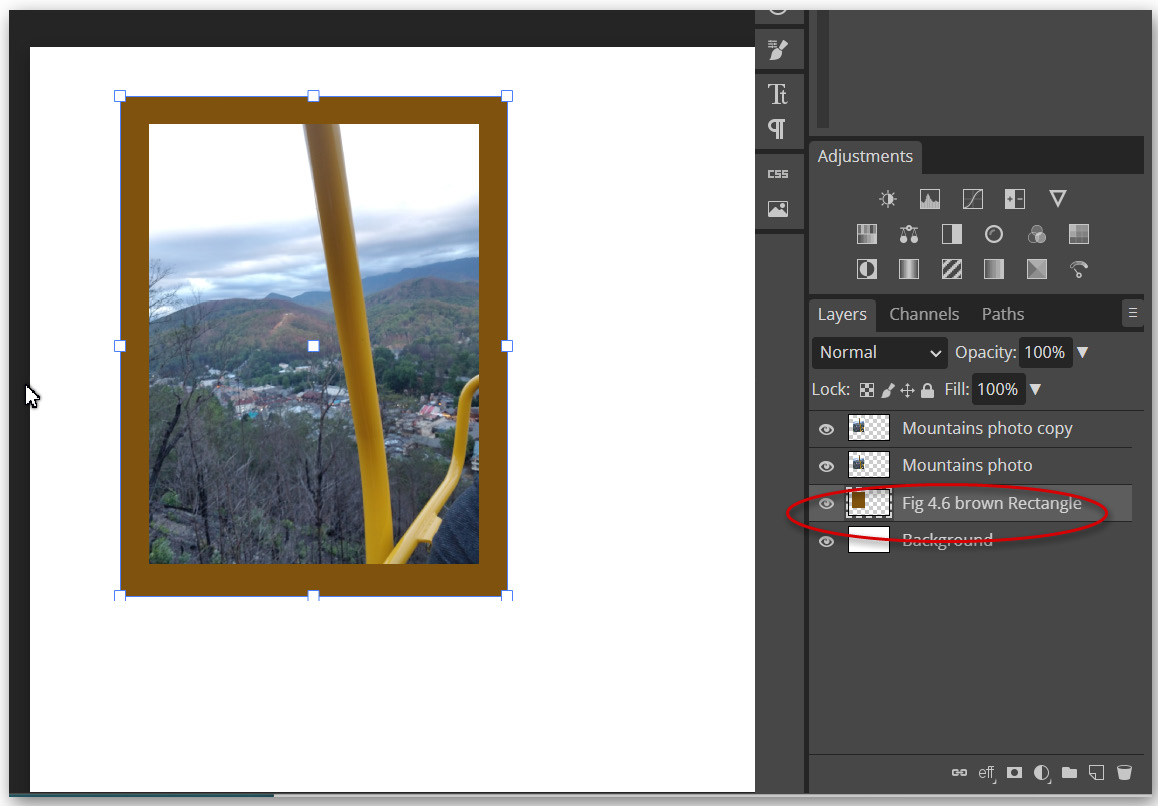
Figure 4.7 – Adding a rectangle border around Mountains photo

Figure 4.7 – Adding a rectangle border around Mountains photo

We have learned different ways to arrange Layers in order and have learned how to make a photo more interesting by adding a border. That sums up this section. Now we are ready to review Group...

lock icon The rest of the chapter is locked
Register for a free Packt account to unlock a world of extra content!
A free Packt account unlocks extra newsletters, articles, discounted offers, and much more. Start advancing your knowledge today.
Unlock this book and the full library FREE for 7 days
Get unlimited access to 7000+ expert-authored eBooks and videos courses covering every tech area you can think of
Renews at $19.99/month. Cancel anytime
Banner background image