Search icon CANCEL
Subscription
0
Cart icon
Your Cart (0 item)
Close icon
You have no products in your basket yet
Save more on your purchases now! discount-offer-chevron-icon
Savings automatically calculated. No voucher code required.
Arrow left icon
Explore Products
Best Sellers
New Releases
Books
Videos
Audiobooks
Learning Hub
Conferences
Free Learning
Arrow right icon
Arrow up icon
GO TO TOP
pfSense 2.x Cookbook

You're reading from   pfSense 2.x Cookbook Manage and maintain your network using pfSense

Arrow left icon
Product type Paperback
Published in Dec 2018
Publisher
ISBN-13 9781789806427
Length 298 pages
Edition 2nd Edition
Tools
Arrow right icon
Author (1):
Arrow left icon
David Zientara David Zientara
Author Profile Icon David Zientara
David Zientara
Arrow right icon
View More author details
Toc

Table of Contents (13) Chapters Close

Preface 1. Initial Configuration 2. Essential Services FREE CHAPTER 3. Firewall and NAT 4. Additional Services 5. Virtual Private Networking 6. Traffic Shaping 7. Redundancy, Load Balancing, and Failover 8. Routing and Bridging 9. Services and Maintenance 10. Backing Up and Restoring pfSense 11. Determining Hardware Requirements 12. Other Books You May Enjoy

Configuring PPPoE


PPPoE stands for Point-to-Point Protocol over Ethernet, a network protocol that allows and encapsulates Point-to-Point frames over Ethernet frames. PPPoE allows two clients to connect to pfSense using PPPoE and to conveniently pass data between each other.

This recipe describes how to enable a PPPoE server on pfSense.

How to do it...

  1. Navigate to Services | PPPoE server, as shown in the following screenshot:
  1. Click on the Add button.
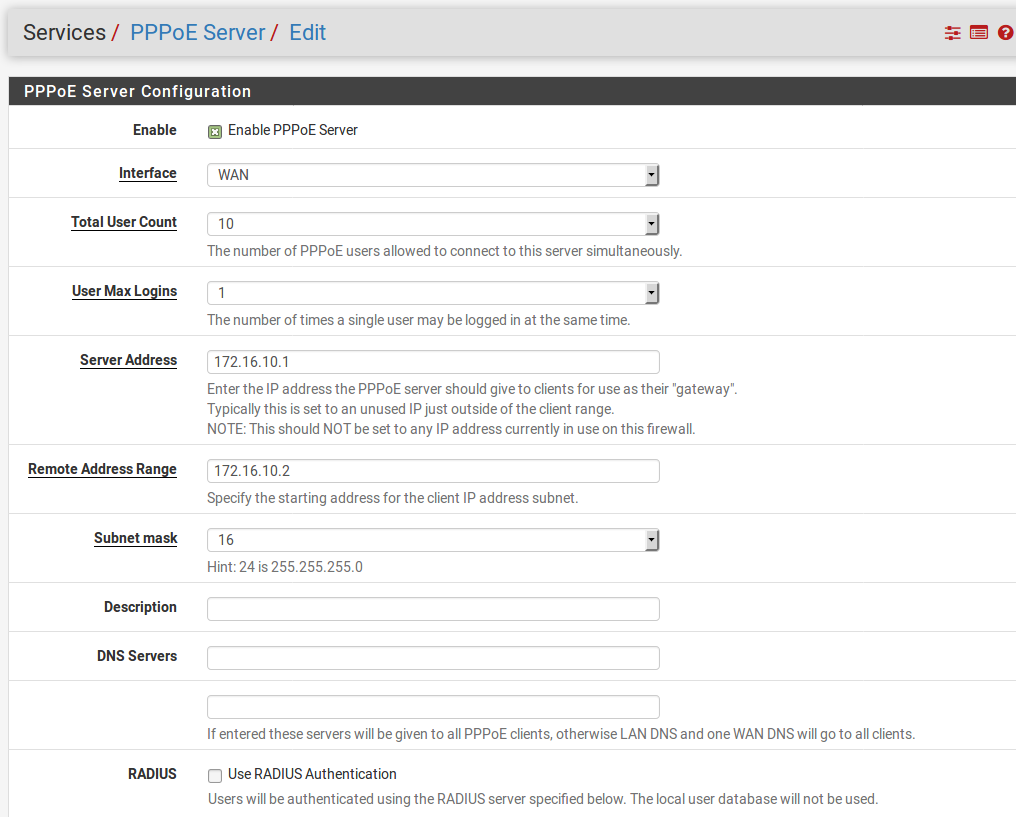
  1. Check the Enable PPPoE Server checkbox:
  1. Choose an interface in the Interface drop-down menu (probably WAN).
  2. Set Total User Count to the maximum number of users you want to be able to use the PPPoE server at the same time.
  3. In the Subnet mask drop-down box, select the CIDR corresponding to your subnet mask (for example, 24 is 255.255.255.0).
  4. In Remote Address Range text field, specify the starting address of the client IP address subnet. The total range will be the starting address, plus the number specified in Total User Count.
  5. In the Server Address text...
lock icon The rest of the chapter is locked
Register for a free Packt account to unlock a world of extra content!
A free Packt account unlocks extra newsletters, articles, discounted offers, and much more. Start advancing your knowledge today.
Unlock this book and the full library FREE for 7 days
Get unlimited access to 7000+ expert-authored eBooks and videos courses covering every tech area you can think of
Renews at $19.99/month. Cancel anytime