To get started with Azure App Service, you have to learn how to create that service and deploy your code. You will see how Azure provides many different ways for doing so, and each path can be easier or harder, depending on your current needs and the specification of your application. However, the strength of a cloud and Platform as a Service (PaaS) offering lies in the straightforward and intuitive process of provisioning new components of your system.
Creating and deploying Azure App Service
Creating Azure App Service using the Azure Portal
To begin with App Service, I will show you how you can create your very first web app using the Azure Portal. In fact, all you need is your mouse and keyboard (because each application has to have a name)—neither external hardware nor detailed configuration information is required here, because Azure will do everything for you.
Selecting Azure Web App from available services
To create Azure App Service in the Azure Portal, you first have to find it in the list of available services. The easiest way to do so is to click on + Create a resource button and search for Web App:
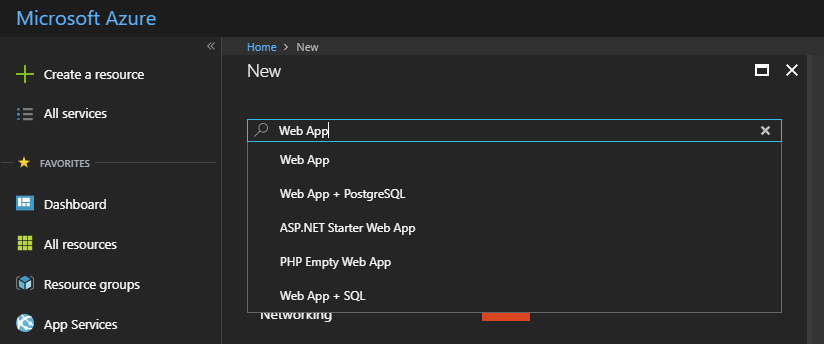
As you can see, the Azure Portal tries to help you find the service most relevant to the search string. When you click on the Web App item, you will see another screen containing multiple similar items, all related in some way to the one you are searching for:
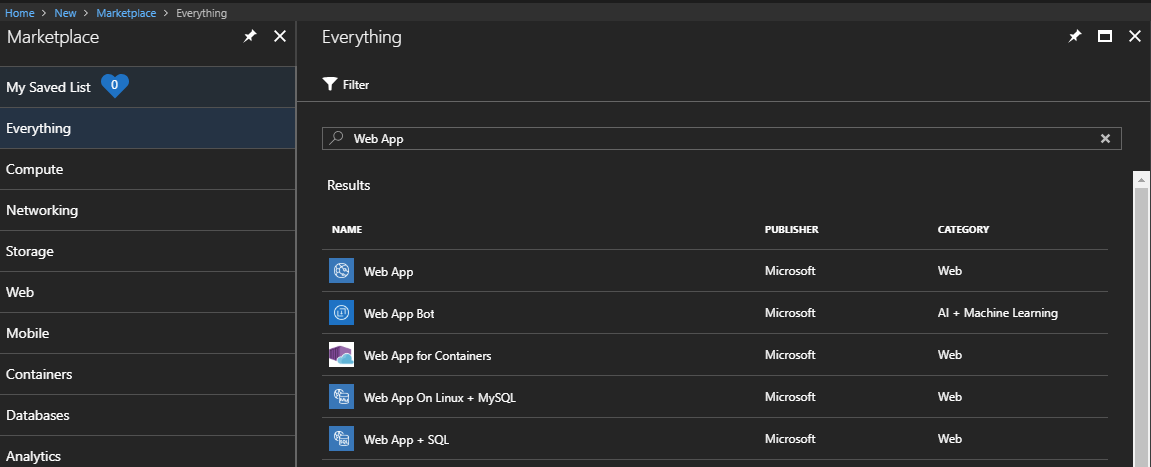
For the purpose of this exercise, select Web App, and then click on the Create button at the right bottom of the screen.
Configuring an Azure web app
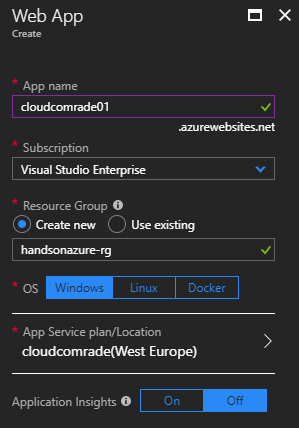
When you click on the Create button, you will see a screen where you can enter all the information needed to create a web app. All required fields are marked using an * (asterisk) symbol:
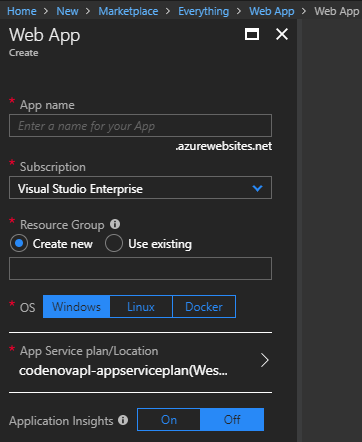
As you can see, when creating a web app, we have to fill almost all fields (with a little exception regarding the Application Insights radio button, which we will cover in the next chapters). Let's focus on each field separately, so we have a better understanding of how they work:
- App name: This field represents the domain name of your application. It is important to select both a unique and valid name, as it cannot be changed later on. Please note that you can easily attach your own custom domain if needed.
- Subscription: If you have access to more than one subscription, you will be given an opportunity to select the right one for this particular resource. Thanks to that, you will be able to differentiate the cost between, for example, different projects.
- Resource Group: In Azure, each resource has to be a part of a logic container, called a resource group. This does not imply any additional cost by itself, so you do not have to worry about creating multiple resource groups.
- OS: Currently in Azure, you can create a web app using the different operating systems of Windows, Linux, or Docker containers. This choice can impact both cost and performance, so make sure you have chosen the right operating system for your needs.
- App Service plan/Location: App Services in Azure are directly linked to App Service Plans, which provide different features and performance depending on the option you choose.
Since you are just starting with Azure, you probably do not have any App Service Plans created. As we cannot create an App Service without an App Service Plan, we will sort this now.
Creating an App Service Plan
When you click on App Service plan/Location, you will see a screen with the + Create new button, allowing for the creation of a new App Service Plan. It should look like this:
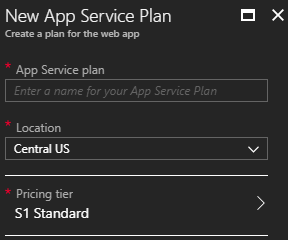
As you can see, we have to enter three fields:
- App Service plan: This is the name of your App Service Plan, which has to be unique within a resource group.
- Location: Thanks to this setting, we can locate our App Service Plan in a specific region. This sometimes implies different features are available.
- Pricing tier: When you click on this item, you will see another screen presenting available features for different available tiers. This choice is really important feature-wise, and will depend in most cases on the environmental characteristics you are planning (such as Dev / Test environments, Production applications, whether you need deployment slots or not, and so on):
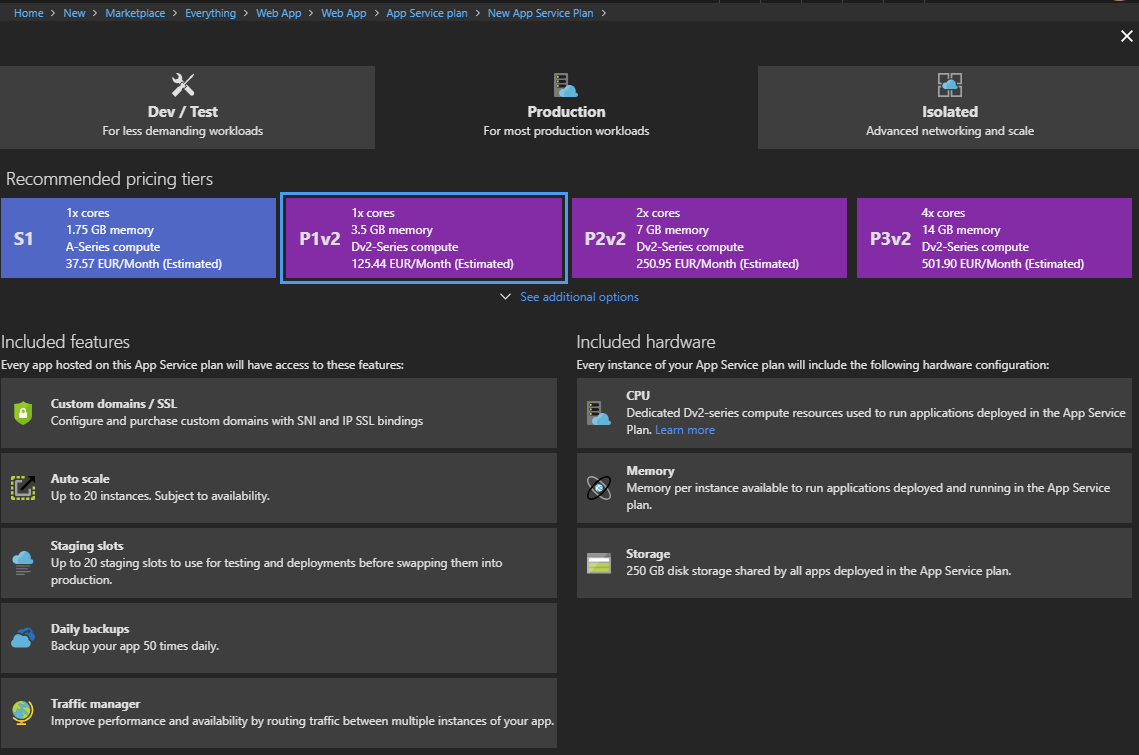
As you can see in the preceding screenshot, we have three categories of App Service Plans:
- Dev / Test: This one contains F, D, and B tiers (which stand for free, shared, and basic). They are designed for simple dev/test scenarios and lightweight web applications that do not need features such as autoscaling or backups.
- Production: This offers powerful machines and advanced features that are useful in many realistic scenarios, such as APIs, e-commerce, and popular portals.
- Isolated: This uses the same hardware as the Production tier, but with even more features and possibilities to isolate your web apps from external access. This is the most expensive category, but can be helpful when creating systems that cannot be made available publicly.
For the purpose of this exercise, I would recommend selecting any tier from the Dev / Test category. Once you are satisfied with the option you've selected, you can click the Apply button. My configuration, for example, looks like this:
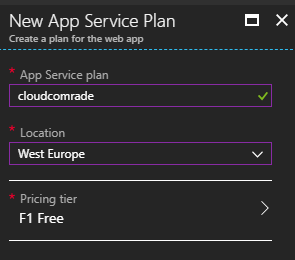
Now, you can click OK, and you will return to the Web App blade, where you can enter missing fields. Here, you can see the whole configuration of my web app:
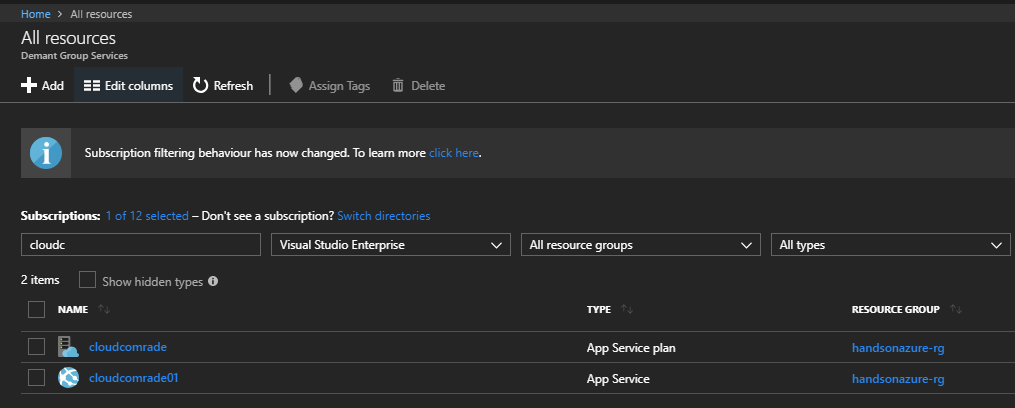
Now the only thing left is to click on the Create button and wait several seconds for the creation of a new resource. During this time, Azure will validate the template and parameters, and orchestrate multiple underlying controllers to create a service. Once a new resource is created, you should see a notification and be able to see in your resources. To quickly validate this, click on the All resources button on the left and filter all of them using, for example, the name of the App Service you have created:
Creating an Azure App Service using Visual Studio
If you do not want to create your web apps using the Azure Portal, you can use Microsoft Visual Studio, which has built-in integration for many different Azure services.
In Visual Studio, click on File | New Project. This will display a New Project window, where you can find plenty of different templates for starting with a new application. Because we are interested in cloud projects, let's start with the Cloud category:
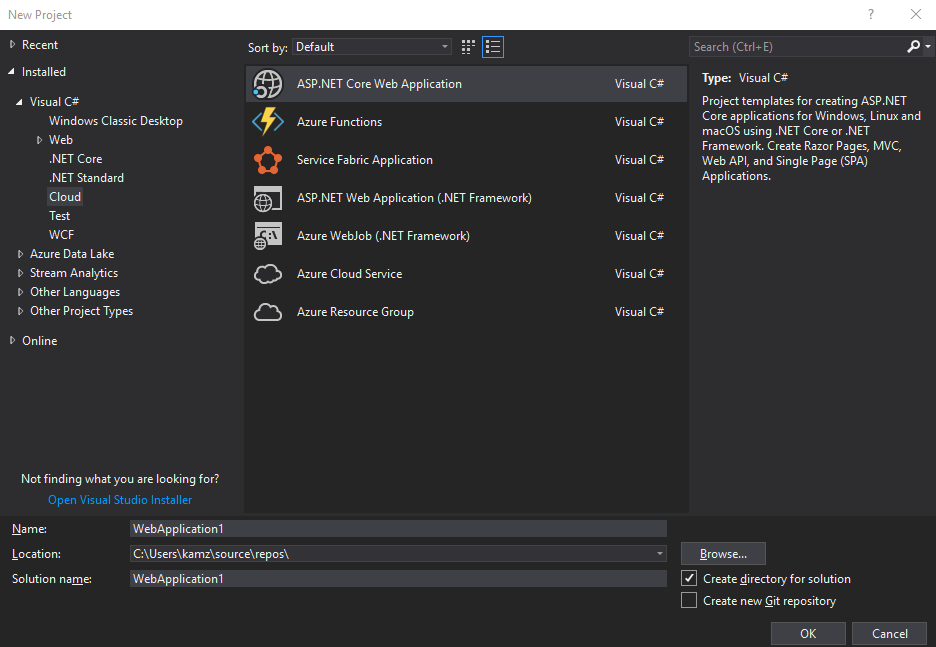
Since we are working with App Services in this chapter, the template we are interested in is ASP.NET Web Application (.NET Framework). The other valid option here is also ASP.NET Core Web Application—feel free to use it if you feel confident enough to work with the latest .NET releases, as we will cover both scenarios. When you are satisfied with your choice, click OK.
The next step is the selection of the proper template. Here, you have multiple options, such as the following:
- Empty: The most simple option, which lets you have full control over installed packages and overall structure
- Web Forms: The oldest available framework for building web applications, using many built-in controls with data access
- MVC: A well-known model-view-controller (MVC) architecture, which took the place of Web Forms
- Web API: A template for creating RESTful HTTP services using the .NET programming stack
- Single Page Application: This template comes with plenty of additional tools for building client-side interactions
All the preceding options should be more or less familiar to you. However, thanks to installing the Azure toolset, you should have access to two additional templates:
- Azure API App: This offers additional integrations with different Azure services such as Azure AD, API Management, and Logic apps
- Azure Mobile App: A template for building mobile backends
However, we will cover those two in the next sections of this chapter. For now, to proceed, let's select MVC, as this is the most common and simplest of all templates listed here. Use the default options for this template and click OK.
After several seconds, Visual Studio should generate a project based on the selected template. I believe it should look familiar to you, as it is not that different to a traditional web application created from an MVC template. I am sure you cannot wait to see whether it works—do not wait any longer, and press F5 to start the application.
You should see a screen similar to mine:
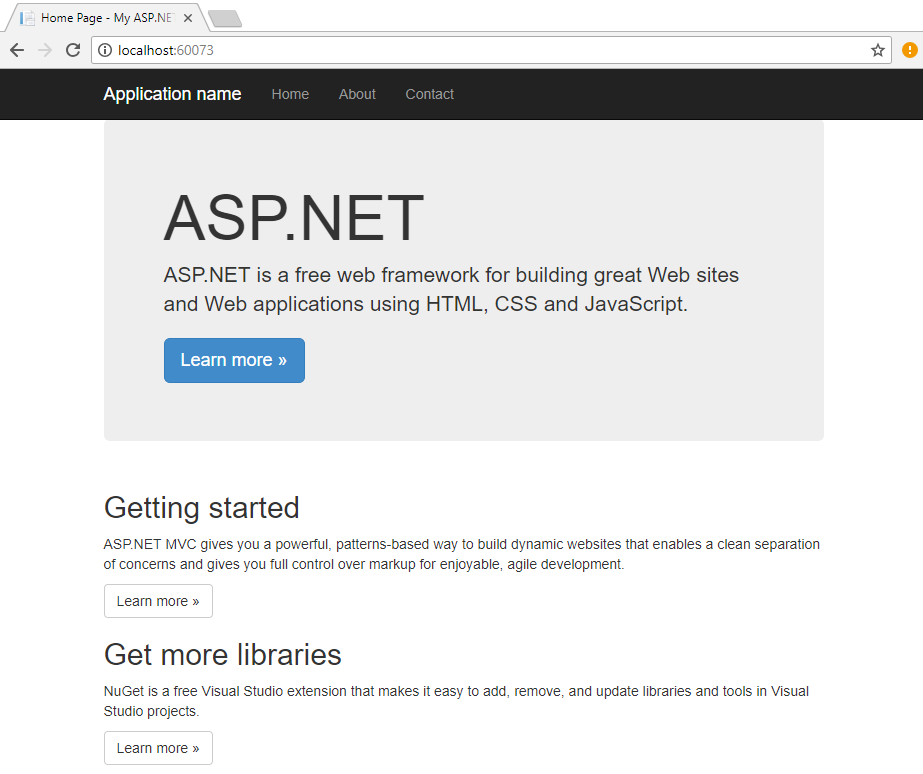
As you can see, it is the same generic template that you would see when starting with a traditional project. The question is, how can we deploy it to Azure to have our website working in the cloud?
Let's stop our website running locally and go back to Visual Studio for a moment. When you right-click on a project icon, you will see a context menu. There, between multiple different options, you can click on Publish...:
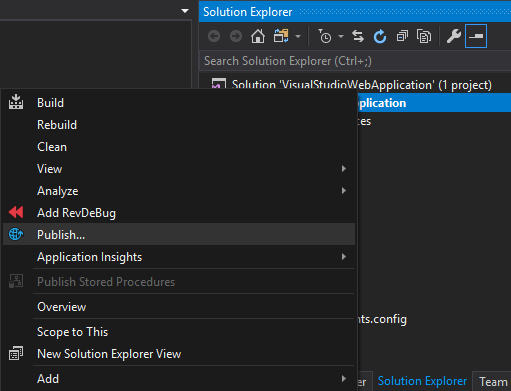
Since this is a cloud project, you will see additional options besides IIS, FTP, and Folder:
- App Service: This is for deploying your application to a PaaS service
- Azure Virtual Machines: This is for deploying your application to a virtual machine that you have configured
For now, let's select App Service. You should see two different options:
- Create new: For deploying an application to a freshly created App Service
- Select existing: This option is only useful if you have already deployed your site
Because we are just starting, the option we are interested in is Create new. After clicking on Publish..., you will see another screen, where you can enter all the required parameters. If you read the previous section about creating an App Service using the Azure Portal, some fields should look familiar—in fact, you are doing the very same thing as you would do in the portal. If you skipped this section, I strongly recommend that you go back and read the descriptions. After configuring my web app, my screen looks like this:
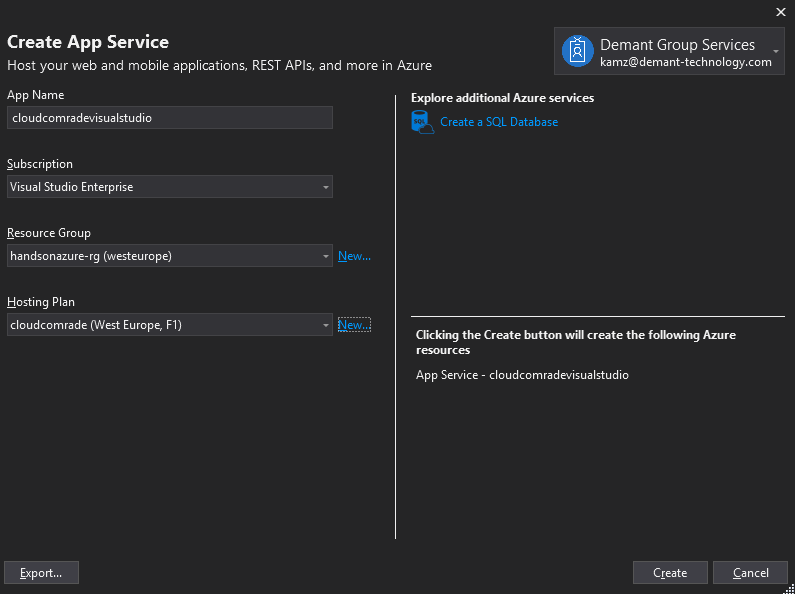
If you are satisfied with the current configuration, the last thing left is to click on the Create button and wait a moment for the application deployment to complete. Additionally, Visual Studio will prepare a publish profile that you can reuse whenever you want to. We will have a look at it, as it will help us in the next section of this chapter. Once deployment is completed, you should see your web application open automatically in your default browser:
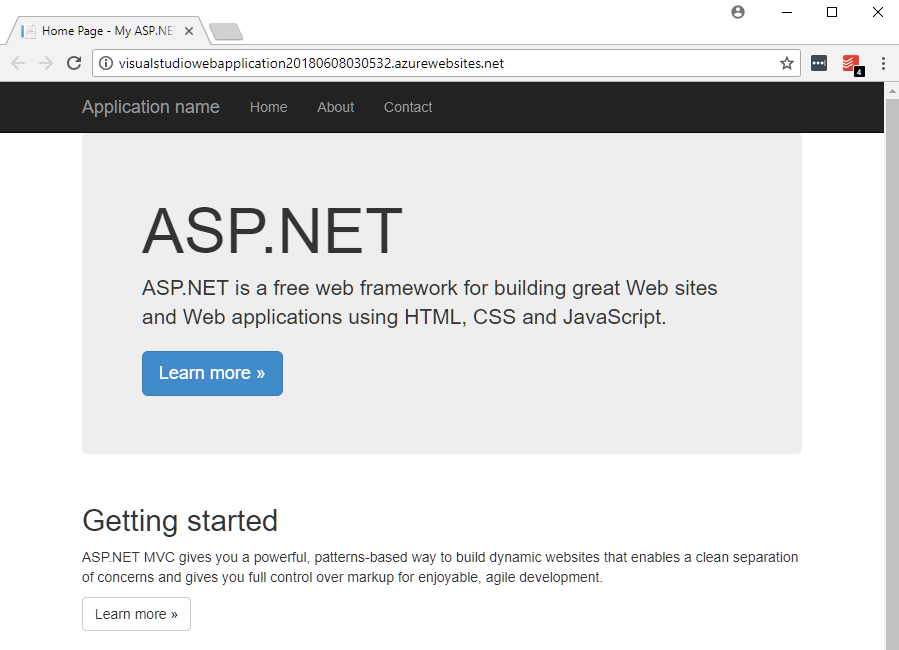
Congratulations! You have just created and deployed your very first App Service. If you take a look at the URL, you'll see that it contains the name you set in the Visual Studio wizard. All web apps in Azure can be accessed using the following URL format:
http(s)://{appservicename}.azurewebsites.net
This also explains why a name has to be unique: since, by default, all web applications hosted as Azure Web Apps are available publicly, you have to select a name that is not already in use in another URL. In the next section, we will try to use FTP to deploy our application, as an alternative to using Visual Studio.
Deploying Azure App Service using FTP
Using Visual Studio for deployments is a good idea for testing things and development, but for sure, it cannot be used for deploying production environments. The easiest option to upload files to App Service is FTP, which is already integrated with this particular Azure resource.
Deploying Azure App Service with user-level credentials
When you go to the Azure Portal and select the Web App you created previously, take a look at the Overview screen—you will see plenty of information regarding this service, such as current Status, Location, and URL. Among all that information, there is an FTP section containing three different parameters:
- FTP/deployment username: A name that you will use when connecting to your Web App using FTP client
- FTP hostname: A host that should be used when creating an FTP connection
- FTPS hostname: The same host as the previous one, but allowing for secure connection
My App Service currently looks like this:

All FTP information can be found in the bottom-right corner of the whole section. What we need now is the FTP client that we will use to connect to the server. I do not have any particular recommendation when it comes to selecting such an application. Personally, I prefer using FileZilla for managing my FTP connections and file transfers. You can, however, use whichever client you like, as all are quite similar regarding functionality. Before we start uploading files to the server, we need one more thing, a password for the user. To generate a new password, go to the Deployment credentials blade, which can be found on the left in the DEPLOYMENT section of App Service features:
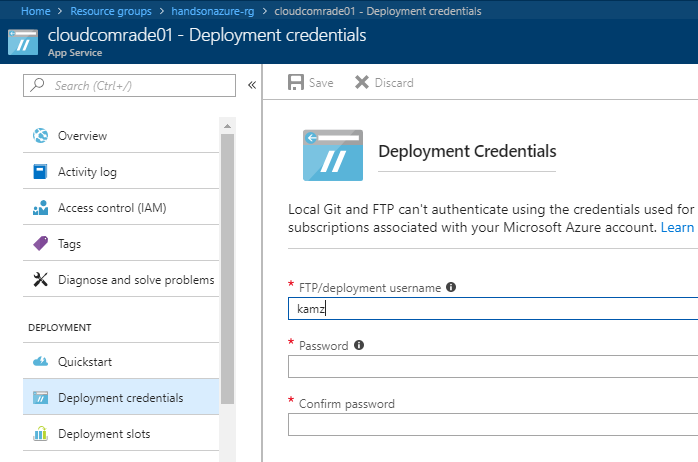
Here, you can set two fields:
- Username for FTP user
- Password for this particular user
You may wonder how this is connected to the previous username, which can be found on the Overview screen. The difference is quite simple: using Deployment credentials, you are creating a new user that will be used for all applications in all subscriptions associated with your Microsoft Azure account. This has the implication that you will be able to use the very same credentials for each App Service you deploy. This is not ideal for every scenario you will face, but for the purpose of this exercise, let's set a user and use it for deployment. In the next part of this section, I will show you how to retrieve credentials from a Publish Profile generated by Visual Studio. Once you enter a username and a password, press Save. Now, we can go to the FTP client and use these credentials for setting a connection. Here, you can see my configuration (note that your username has to be in the following format: <appservicename>\<ftpusername>):

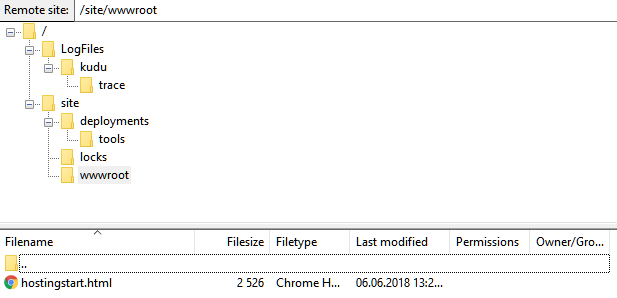
Once you connect to a server, you will see a list of available directories. The very first level contains the following:
- LogFiles: Files containing diagnostic information regarding running App Service
- site: Your Web App working files are stored here
We will cover LogFiles in the next sections of this chapter, describing monitoring and diagnosing an application. For now, we are interested in the site folder. When you enter it, you will see other directories: deployments, locks, and wwwroot. The last one should be familiar for those of you who have worked with IIS, as this is the most common name of the folder containing a web application. In fact, this is the working directory of your App Service, where all necessary files should be uploaded. Here, you have the full structure of an empty web app:
Now that you know how App Service is structured, you can deploy your files and see whether or not it works. If you want, you can reuse a project from the previous exercise, or upload a brand new website.
Here are the files from a previous project of mine uploaded to my FTP server:
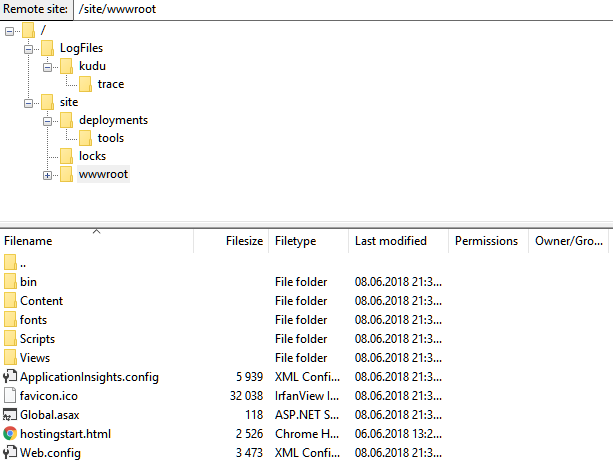
Now, when I go to the URL of my website, I will see a working application:
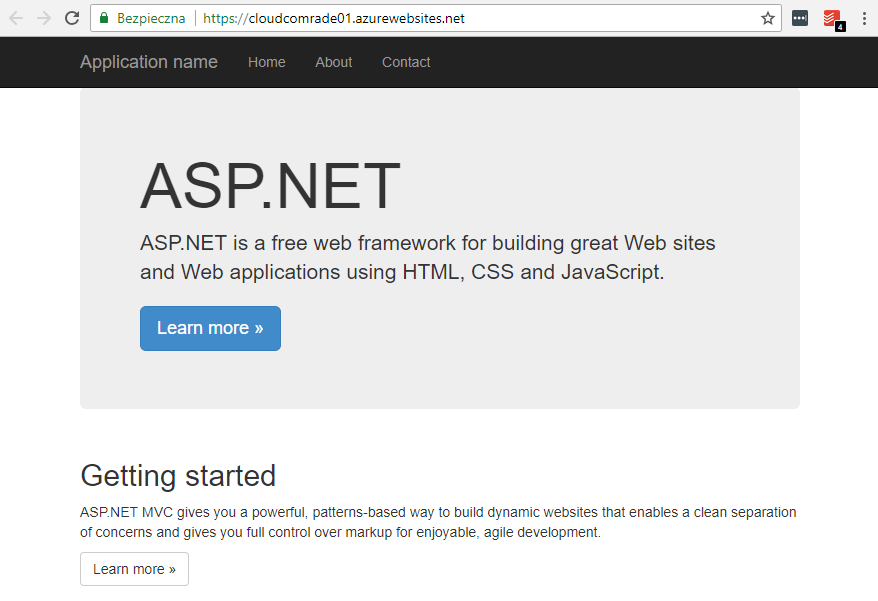
Great—you have just learned how to leverage the FTP feature of App Services to deploy an application from any location and environment. However, as I mentioned earlier, we are using user-level credentials, which will be the same for all web apps that you deploy within your subscription. How do we achieve the same result using an app-level username and password?
Deploying Azure App Service using app-level credentials
There are two ways to deploy an application using app-level credentials:
- Download them from the Azure Portal
- Configure WebDeploy in Visual Studio
Downloading app-level credentials from the Azure Portal
When you go to your App Service and click on the Overview blade, you will see the Get publish profile button at the top, as shown in the following screenshot:

Now, when you click on it, your browser will download a .PublishProfile file. Please open it to check its content. Here is an example file from my web app:
<?xml version="1.0" encoding="UTF-8"?>
 <publishData>
 <publishProfile profileName="cloudcomrade01 - Web Deploy" publishMethod="MSDeploy" publishUrl="cloudcomrade01.scm.azurewebsites.net:443" msdeploySite="cloudcomrade01" userName="$cloudcomrade01" userPWD="LEebknaDdg0KS6SgScLuXlwtzxvwYway7ssoKxCSkCLi6Gw0HRyt2iEGMLbP" destinationAppUrl="http://cloudcomrade01.azurewebsites.net" SQLServerDBConnectionString="" mySQLDBConnectionString="" hostingProviderForumLink="" controlPanelLink="http://windows.azure.com" webSystem="WebSites">
 <databases />
 </publishProfile>
 <publishProfile profileName="cloudcomrade01 - FTP" publishMethod="FTP" publishUrl="ftp://waws-prod-am2-197.ftp.azurewebsites.windows.net/site/wwwroot" ftpPassiveMode="True" userName="cloudcomrade01\$cloudcomrade01" userPWD="LEebknaDdg0KS6SgScLuXlwtzxvwYway7ssoKxCSkCLi6Gw0HRyt2iEGMLbP" destinationAppUrl="http://cloudcomrade01.azurewebsites.net" SQLServerDBConnectionString="" mySQLDBConnectionString="" hostingProviderForumLink="" controlPanelLink="http://windows.azure.com" webSystem="WebSites">
 <databases />
 </publishProfile>
 </publishData>
As you can see, it is a simple XML file containing plenty of useful information. What we are interested in currently is both the userName and userPWD properties. Those are what we have been searching for—app-level credentials automatically created on App Service creation. You can use these instead of the user-level ones that we created previously.
Configuring WebDeploy in Visual Studio
To check how to configure WebDeploy in Visual Studio, please go through all steps from the beginning of Creating an Azure App Service using Visual Studio section about publishing an application from this IDE. If you have done that, go once more to the Publish screen.
When you click on the Configure button, you will see another window containing the whole configuration of your deployment:
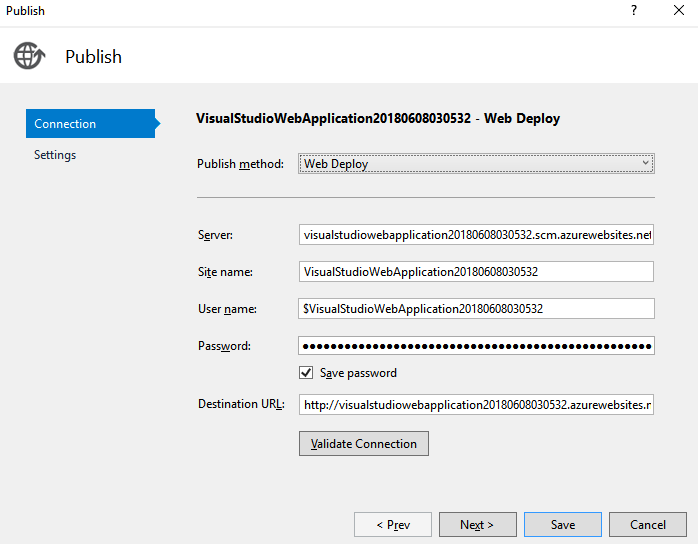
As you can see, it contains a completely different set of information, which does not reflect the user-level settings you have configured.
The choice between app-level and user-level credentials depends solely on the process of delivering your application. In most cases, you don't need to check by checking and setting them, as tools such as Visual Studio or Azure DevOps (formerly Visual Studio Team Services) obtain and use them implicitly. App-level credentials are often only used when we are in need of manual deployment.
Creating Azure App Services using Visual Studio Code
Microsoft Visual Studio is not the only available IDE that allows you to work with Azure App Services. Because this Azure service supports different technology stacks, including .NET, JS, PHP, Java, and so on, you can easily leverage its capabilities to host different websites using different runtimes. For instance, let's assume that we have the following PHP code that displays a Hello World message:
<?php
echo('Hello world from Azure App Service - PHP here!');
?>
Such a simple PHP application can be easily created in any available IDE that supports the PHP language. For the purpose of this exercise, I chose Visual Studio Code, an open source editor, as it can easily be extended using many different plugins. To make things easier, you can install the following extensions:
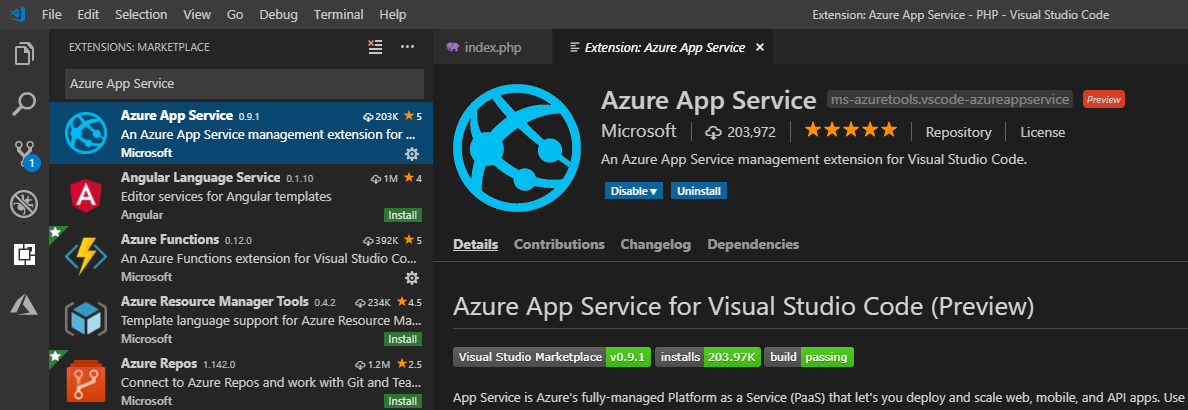
With this plugin installed, you will be able to easily deploy your applications from within the IDE, without the need to go to the portal or use other methods. To push the application to the cloud, you have to go to the AZURE tab and find the APP SERVICE section.
Before we deploy our simple PHP application, we have to create an Azure App Service. To do so, you will have to click on the Create New Web App... button:

The wizard is a little bit different than in Microsoft Visual Studio, as it acts similarly to a command line, where you provide all fields and information one after another. In Visual Studio Code, you will have to enter the following:
- The Azure App Service name
- The operating system of your choice
- The runtime version
In this particular example, I specified the following:
- handsonazure-euw-appservice
- Linux
- PHP 7.2
Once the provisioning is complete, Visual Studio Code will ask you whether to deploy the application. Select OK, and then choose the folder to deploy to:

Once everything is set and ready, you will see a notification informing you that you are now able to browse the website:

When you click on the Browse Website button, you will be forwarded to the freshly deployed web application. Note that this extension allows you to directly manage the service from within the IDE, and gives you access to different features, including application settings, deployment slots, and Azure WebJobs (the latter of which is described in Chapter 2, Azure WebJobs). Here, you can see the working example hosted within Azure:

The important thing here is that by using the same path, you will be able to host a variety of different runtimes inside different Azure App Services. It doesn't matter whether it is a Java application, a Python script, or a Node.js backend—they are all supported and can be easily developed using IDEs such as Visual Studio Code.


