Search icon CANCEL
Subscription
0
Cart icon
Your Cart (0 item)
Close icon
You have no products in your basket yet
Save more on your purchases! discount-offer-chevron-icon
Savings automatically calculated. No voucher code required.
Arrow left icon
Explore Products
Best Sellers
New Releases
Books
Videos
Audiobooks
Learning Hub
Newsletter Hub
Free Learning
Arrow right icon
timer SALE ENDS IN
0 Days
:
00 Hours
:
00 Minutes
:
00 Seconds
Arrow up icon
GO TO TOP
Hands-On AWS Penetration Testing with Kali Linux

You're reading from   Hands-On AWS Penetration Testing with Kali Linux Set up a virtual lab and pentest major AWS services, including EC2, S3, Lambda, and CloudFormation

Arrow left icon
Product type Paperback
Published in Apr 2019
Publisher Packt
ISBN-13 9781789136722
Length 508 pages
Edition 1st Edition
Tools
Arrow right icon
Authors (2):
Arrow left icon
Benjamin Caudill Benjamin Caudill
Author Profile Icon Benjamin Caudill
Benjamin Caudill
Karl Gilbert Gupta Karl Gilbert Gupta
Author Profile Icon Karl Gilbert Gupta
Karl Gilbert Gupta
Arrow right icon
View More author details
Toc

Table of Contents (28) Chapters Close

Preface 1. Section 1: Kali Linux on AWS FREE CHAPTER
2. Setting Up a Pentesting Lab on AWS 3. Setting Up a Kali PentestBox on the Cloud 4. Exploitation on the Cloud using Kali Linux 5. Section 2: Pentesting AWS Elastic Compute Cloud Configuring and Securing
6. Setting Up Your First EC2 Instances 7. Penetration Testing of EC2 Instances using Kali Linux 8. Elastic Block Stores and Snapshots - Retrieving Deleted Data 9. Section 3: Pentesting AWS Simple Storage Service Configuring and Securing
10. Reconnaissance - Identifying Vulnerable S3 Buckets 11. Exploiting Permissive S3 Buckets for Fun and Profit 12. Section 4: AWS Identity Access Management Configuring and Securing
13. Identity Access Management on AWS 14. Privilege Escalation of AWS Accounts Using Stolen Keys, Boto3, and Pacu 15. Using Boto3 and Pacu to Maintain AWS Persistence 16. Section 5: Penetration Testing on Other AWS Services
17. Security and Pentesting of AWS Lambda 18. Pentesting and Securing AWS RDS 19. Targeting Other Services 20. Section 6: Attacking AWS Logging and Security Services
21. Pentesting CloudTrail 22. GuardDuty 23. Section 7: Leveraging AWS Pentesting Tools for Real-World Attacks
24. Using Scout Suite for AWS Security Auditing 25. Using Pacu for AWS Pentesting 26. Putting it All Together - Real - World AWS Pentesting 27. Other Books You May Enjoy

Configuring and running Nessus

Nessus is a popular tool for automating vulnerability scans within a network, with some added functionality of scanning web applications as well. In the first section, we shall set up Nessus on our PentestBox on EC2. Then we shall use it to run basic and advanced scans on the lab that we set up earlier.

Installing Nessus on Kali

The first step to performing automated pentesting and vulnerability assessment using Nessus, is obviously to install it on Kali. To make things easy, Nessus comes in a .deb package that can be directly installed using dpkg.

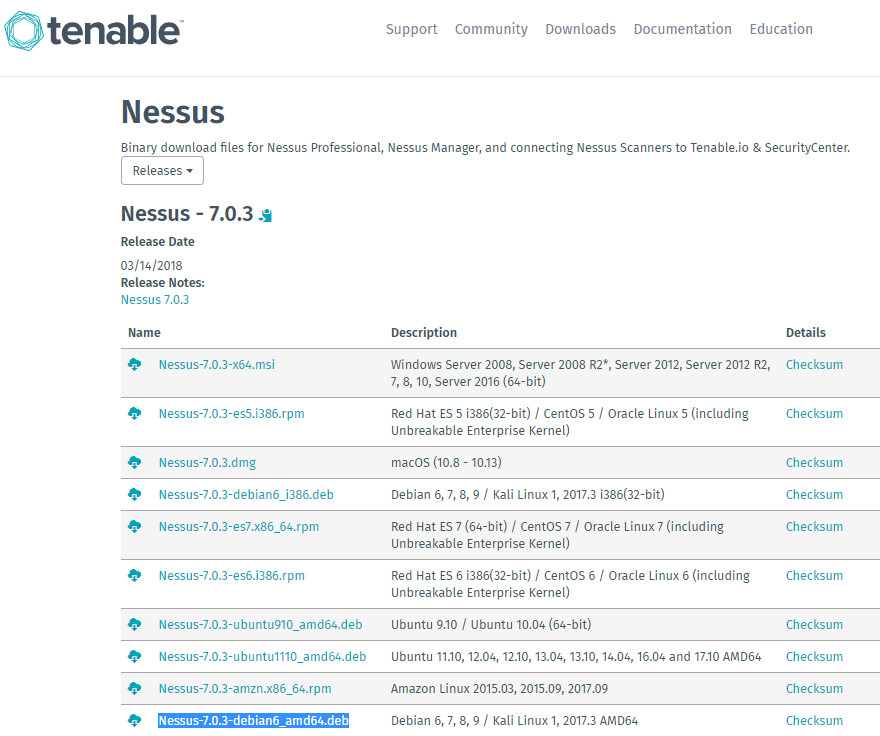
  1. To install Nessus, the first step is to download the .deb package from the tenable website, on https://www.tenable.com/downloads/nessus:
  1. Once downloaded, we need to transfer this to our Kali PentestBox on AWS. We can do this file transfer using WinSCP on Windows. On Linux/macOS, the native SCP utility can be used. The setup is available at https://winscp.net/eng/download.php
  2. Once WinSCP is installed, we need to set up a connection to our Kali PentestBox. First, we need to add a new site:
  1. Next, we need to add the public key, downloaded from AWS, for authentication. To do this, we need to click on Advanced and set the path to the key on SSH | Authentication:
  1. Once done, it's a simple matter of saving the site and then connecting to it to see a folder listing on the remote host:
  1. From here, it's a simple matter of dragging the .deb package into the root folder that we just accessed in the previous step. Once done, we can get started with installing the package. This can be achieved using dpkg through an SSH shell to the AWS EC2 instance:
  1. Once done, we start the Nessus service and confirm that it is running:
sudo /etc/init.d/nessusd start
sudo service nessusd status
  1. If the status command returns a status of running, we have successfully started the service. Next, we need to set up SSH tunneling to forward port 8834 from the Kali PentestBox to our localhost over the SSH connection. On a Linux Terminal, the following syntax needs to be used:
ssh -L 8834:127.0.0.1:8834 ec2-user@<IP address>
  1. On Windows, if you're using PuTTY, the SSH Tunnels can be configured here, by clicking on the Tunnels option after launching PuTTY:
  1. Once done, reconnect to the instance and you can now access Nessus on your local machine on https://127.0.0.1:8834.

Configuring Nessus

Once Nessus has been installed and the SSH tunnel configured, we can access Nessus on the browser by pointing at https://127.0.0.1:8834. We will need to go through a set of first steps to set up Nessus now.

  1. The very first screen prompts the user to Create an account:
  1. Enter suitable credentials and proceed to the next step. Now we need to activate a home license. We can grab one at https://www.tenable.com/products/nessus-home by filling in the following form:
  1. Once you've received the activation code by email, enter it into the web interface and trigger the initialization process. Now Nessus goes through the process of downloading data that is needed for the scanning of network assets:

This process usually takes a few minutes, so there's enough time to go grab a cup of coffee while this is happening.

Performing the first Nessus scan

Once the initialization is complete, we're welcomed by the Nessus home screen. Here, we need to click on New Scan to start a new scan on the pentesting lab that we set up earlier.

  1. Once on the new scan tab, we need to start a Basic Network Scan:
  1. After clicking on Basic Network Scan, we need to give a scan name and enter the IPs of the two other hosts that we set up in the lab:
  1. Next up, we configure the DISCOVERY and ASSESSMENT options. For discovery, let's request a scan of all services:

This has the advantage of enumerating all services running on a host and discovers hosts if no traditional services are running on them.

  1. Let's configure Nessus to scan web applications as well:
  1. Finally, we Launch the scan:

Once again, scanning is a time-consuming process, so this would take around 15 to 20 minutes to complete on average, if not more.

lock icon The rest of the chapter is locked
Register for a free Packt account to unlock a world of extra content!
A free Packt account unlocks extra newsletters, articles, discounted offers, and much more. Start advancing your knowledge today.
Unlock this book and the full library FREE for 7 days
Get unlimited access to 7000+ expert-authored eBooks and videos courses covering every tech area you can think of
Renews at $19.99/month. Cancel anytime
Banner background image