Using the project files
As we work through each chapter of the book, we will be using exercise files that contain examples of how each page will be themed is laid out. This will include database snapshots, HTML, CSS, and images for our Home, About, Portfolio, Blog, and Contact pages. Before we begin using these files, we need to know where to download them from and the best location to extract them to for future use.
Downloading and extracting the exercise files
We can find the exercise files at https://www.packtpub.com/support. Click on the download link and save the compressed file to the desktop. Once the download is finished, we will need to extract the contents. Let's take a quick look at what we have:
- Several chapter folders containing files that we will use for whatever task we are working on in that chapter
- A
Mockupfolder that contains the finished HTML version of our theme - A database snapshot contained within various chapter folders that we will use to restore on top of our current Drupal instance to ensure that we always have the same configuration at specific points along the way
Since we will be working with database snapshots at various points, we will want to look at how we can manage these files using the MySQL database tool named phpMyAdmin.
Database backup
It is important to know how to backup our database when working in Drupal 8 as most of our content and configurations are contained within a database. Make sure that phpMyAdmin is open in the browser.
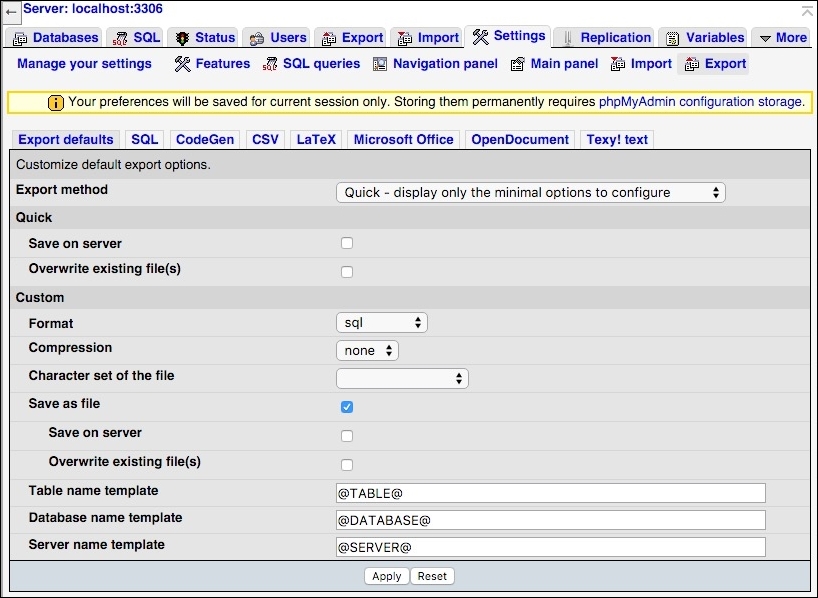
Next, we will want to make sure that any database exports are saved as a file versus just plain SQL script. Because this is a global setting, we will need to make sure that we have not selected any specific database. We can make sure that we are affecting global settings by clicking on the house icon in the left-hand sidebar underneath the phpMyAdmin logo. Next, we can navigate to Settings and then Export, as shown in the following image:

Next, click on the Save as file option and the Apply button.
Export settings
One little gotcha when using phpMyAdmin is making sure that when we create our database export, we ensure that the SQL also drops any tables before trying to recreate them when we do the import later.
We can create our database export by following these steps:
- Select the
drupal8database from the left sidebar. - Click on the Export tab.
- Select Custom - display all possible options as our export method.
- Select SQL as our format.
- Choose Add DROP TABLE / VIEW / PROCEDURE / FUNCTION / EVENT / TRIGGER statement from Object creation options.
- Click on the Go button.
At this point, we have a new file named drupal8.sql, which contains a backup of our database. Next, we will use this file we just created to restore our database.
Database restore
Restoring a database is simpler than backing our database up. Except this time, we will be using an existing database snapshot that either we have taken or that we were provided to overwrite our current database files with. Let's begin by following these steps:
- Click on the Import tab.
- Click on the Choose File button and locate the
drupal8.sqlfile we created earlier. - Click on the Go button to begin the restoration process.
The process of restoring the file can sometimes take a minute to complete, so please be patient while the file is being restored.
While phpMyAdmin allows us to manage database operations, we can choose to use other database tools or even the command line, which is a lot faster to export and import databases.
Now that we have a good understanding of how to back up and restore our database, it's time to take a quick look at how we will be using Google Chrome to review our HTML and CSS structure within Drupal 8 and our theme Mockup.
Using Google Chrome to inspect elements
While there are many different browsers to view web content on, Google Chrome is definitely a favorite browser when theming in Drupal. It is not only standards compliant ensuring that most HTML and CSS work properly but Chrome also allows us to inspect the HTML and CSS and preview changes "live" within the browser using the Developer Tools option.
Begin by browsing to our local Drupal 8 instance in Google Chrome and then selecting Developer Tools from the View | Developer | Developer Tools menu. The Developer Tools will open up in the bottom of your browser, as shown in the following image:

There are several tools available for our use, but the one we will use the most is inspecting Elements on the page, which allows us to view the HTML structure and any CSS being applied to that element from the Elements and Styles panels. We can navigate through the HTML structure, or if we prefer to isolate an element on the page, we can place our cursor on that element and right-click to open up a context menu where we can select Inspect. Doing so will target that element in the Elements pane for us.
As we dive deeper into theming, we will use this set of tools to help preview changes as well as isolate any issue we may be experiencing as our HTML structure changes based on what Drupal 8 outputs.


