Adding buttons and navigating with them
In this recipe, we will learn how to use the various buttons available in SwiftUI. We will use a Button view to trigger the change of a count when clicked and implement a NavigationStack to move between various SwiftUI views and an EditButton to remove items from a list. We will also briefly discuss the MenuButton and PasteButton only available in macOS.
Getting ready
Let’s start by creating a new SwiftUI project called Buttons.
How to do it…
Let’s create a home screen with buttons for each of the items we want to go over. Once clicked, we’ll use SwiftUI’s NavigationLink to show the view that implements the concept. The steps are given here:
- Add a new SwiftUI view file called
ButtonViewto the project: File | New | File (or press the shortcut keys + N).
+ N). - Select SwiftUI View from the UI templates.
- In the Save As field of the pop-up menu, enter the filename
ButtonView. - Repeat Step 1 and enter the filename
EditButtonView. - Repeat Step 1 and enter the filename
PasteButtonView. - Repeat Step 1 and enter the filename
MenuButtonView.
Important Note
Avoid using the MenuButton view because this is deprecated and only available in macOS 10.14–12.0. For similar functionality, use the Menu view instead, which is available for macOS, iOS and iPadOS.
- Open the
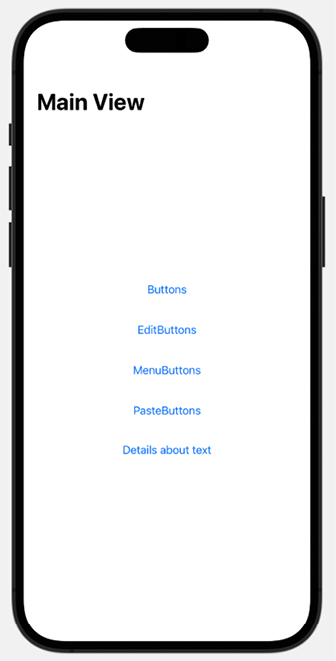
ContentView.swiftfile and create aNavigationStackto navigate between the SwiftUI views we added to the project. TheContentViewstruct should look like this:struct ContentView: View { var body: some View { NavigationStack { VStack(spacing: 44) { NavigationLink("Buttons"){ ButtonView() } NavigationLink("EditButtons") { EditButtonView() } NavigationLink("MenuButtons") { MenuButtonView() } NavigationLink("PasteButtons") { PasteButtonView() } NavigationLink("Details about text") { Text("Very long text that should not be displayed in a single line because it is not good design") .padding() .navigationTitle(Text("Detail")) } } .navigationTitle(Text("Main View")) } } } - Upon completion, the
ContentViewpreview should look like this:

Figure 1.13: ButtonsApp ContentView
- Open the
ButtonView.swiftfile in the project navigator and replace the existing struct with the following code:struct ButtonView: View { @State var count = 0 var body: some View { VStack { Text("Welcome to your second view") Text("Current count value: \(count)") .padding() Button { count += 1 } label: { Text("Tap to Increment count") .fontWeight(.bold) .foregroundStyle(.white) .padding() .background(.blue) .clipShape(Capsule()) } }.navigationBarTitle("Button View") } } #Preview { NavigationStack { ButtonView() } } - Open the
EditButtonView.swiftfile in the project navigator and replace the existing struct with the following code that implements anEditButton:struct EditButtonView: View { @State private var animals = ["Cats", "Dogs", "Goats"] var body: some View { List{ ForEach(animals, id: \.self){ animal in Text(animal) } .onDelete(perform: removeAnimal) } .toolbar { EditButton() } .navigationTitle("EditButtonView") } func removeAnimal(at offsets: IndexSet){ animals.remove(atOffsets: offsets) } } #Preview { NavigationStack { EditButtonView() } } - Open the
MenuButtonView.swiftfile and replace the existing struct with the following code forMenuButtonView:struct MenuButtonView: View { var body: some View { Menu("Choose a country") { Button("Canada") { print("Selected Canada") } Button("Mexico") { print("Selected Mexico") } Button("USA") { print("Selected USA") } } .navigationTitle("MenuButtons") } } #Preview { NavigationStack { MenuButtonView() } } - Open the
PasteButtonView.swiftfile and implement the text regardingPasteButtons:struct PasteButtonView: View { @State var text = String() var body: some View { VStack{ Text("PasteButton controls how you paste in macOS but is not available in iOS. For more information, check the \"See also\" section of this recipe") .padding() } .navigationTitle("PasteButton") } } #Preview { NavigationStack { PasteButtonView() } }
Go back to ContentView, run the code in the canvas preview or simulator, and play around with it to see what the results look like.
How it works…
A NavigationLink must be placed in a NavigationStack or NavigationSplitView prior to being used.
In this recipe, we use a NavigationLink with two parameters—destination and label. The destination parameter represents the view that would be displayed when the label is clicked, while the label parameter represents the text to be displayed within NavigationLink. Since our label is a simple Text view, we use the convenience initializer init(_:destination:) of NavigatioLink to keep our code more concise.
NavigationLink buttons can be used to move from one SwiftUI view to another—for example, moving from ContentView to EditButtonView. They can also be used to display text details without creating a SwiftUI view in a separate file, such as in the last NavigationLink, where a click just presents a long piece of text with more information. This is made possible because the Text struct conforms to the view protocol.
The .navigationTitle("Main View")) modifier adds a title to the ContentView screen.
The .navigationTitle() modifier is also added to EditButtonView and other views. Since these views do not contain NavigationStack structs, the titles would not be displayed when viewing the page directly from the preview, but would show up when running the code and navigating from ContentView.swift to the view provided in NavigationLink. To solve this, we use a NavigationStack in the PreviewProvider structs. To make the previews more useful, note how we have enclosed the view in a NavigationStack so we can see the title in the canvas preview window.
The EditButton view is used in conjunction with List views to make lists editable. We will go over List and Scroll views in Chapter 2, Displaying Scrollable Content with Lists and Scroll Views, but EditButtonView provides a peek into how to create an editable list.
The MenuButtonView uses the Menu struct, introduced in iOS 14, to display a floating menu of actions. Check out the Exploring more views and controls recipe at the end of this chapter for more information on Menu.
PasteButtons are only available on macOS. Refer to the See also section of this recipe for code on how the PasteButton is implemented.
See also
- The code for implementing
PasteButtonscan be found here: https://gist.github.com/sturdysturge/79c73600cfb683663c1d70f5c0778020#file-swiftuidocumentationpaste. More information regardingNavigationLinkbuttons can be found here: https://developer.apple.com/documentation/swiftui/navigationlink. - More information regarding Menu can be found here: https://developer.apple.com/documentation/swiftui/menu/.


