Using Network Watcher
Azure provides the Network Watcher tool for monitoring and investigating problems between devices on a Virtual Network (VNET), including the following:
- Connection Monitoring
- Performance Monitoring
- Diagnostics
- Network Security Group flow logs
Important note
A VNET is a private network you can create in your Azure subscription. VNETs are defined with set IP ranges, which in turn can be sub-divided into subnets. Some Azure services, such as VMs, must be connected to a VNET. Other services, such as App Services and Azure SQL, can optionally use VNETs to ensure traffic between them is direct and secure.
You can also see a topology map of devices to understand better the various components involved in the communication flow.
The first step in setting up the Network Watcher capabilities is to ensure it has been enabled for the region(s) you are using by following these steps:
- Navigate to the Azure portal by opening https://portal.azure.com.
- In the left-hand menu, select or search for
Network Monitor:
Figure 1.15 – Enabling Network Watcher per Region
- If the region that contains the resources you wish to monitor is set to Disabled, click the ellipses at the right and select Enable network watcher.
- On the left-hand menu, select the Topology, then select a resource group that contains resources you wish to view. In the following screenshot, I am choosing a group that includes a simple VM:
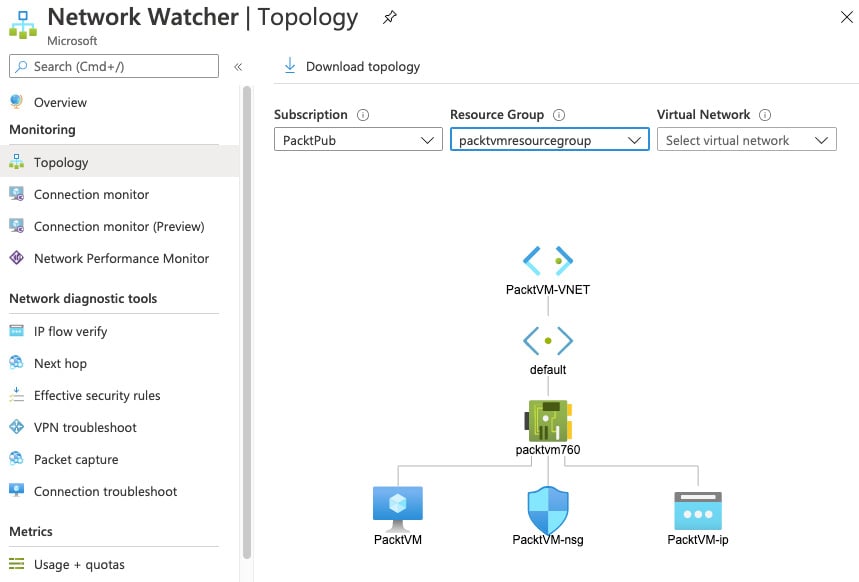
Figure 1.16 – Network Monitor Topology view
Once Network Watcher has been enabled for your region, we can now start to use the different tools, such as Connection Monitor, to troubleshoot and fix common communication problems.
Connection Monitor
When services are running, you may want to be alerted to issues with connectivity. An example might be a web server that needs to maintain a connection to a backend database server. However, the destination can be another VM, a URI, or an IP address. The URI or IP address can be either an internal resource in your Azure subscription or an external resource.
Connection Monitor allows us to set up continual monitors that can trigger alerts when communications are interrupted:
- Still in Network Watcher, on the left-hand menu, select Connection Monitor.
- Click Add to create a Connection Monitor.
- Complete the details to define a source, target, and port. For this example, instead of monitoring connection to another server, we will monitor connections to the internet, specifically to the Packt Publishing website:
a) Name:
InternetConnectionb) Virtual Machine: Source VM you wish to monitor
c) Destination:
--Specify Manually
--URI: www.packtpub.com
d) Port:
443 - Click Add:
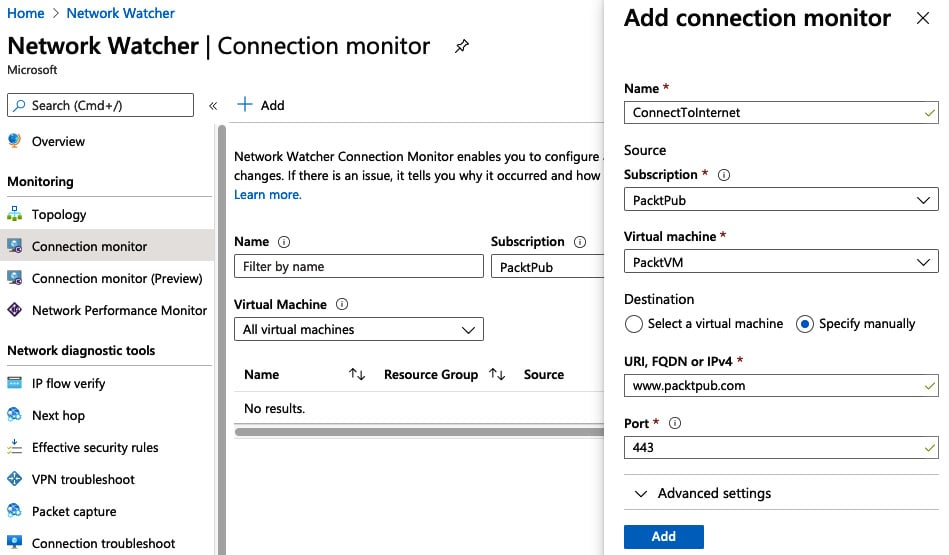
Figure 1.17 – Connection Monitor setup example
Once set up, you can select the Connection Monitor you have just created, and it will show basic details of the status and flow of traffic from source to destination. You can also set the time period to see data from the past hour up to the past 30 days as shown in the following screenshot:
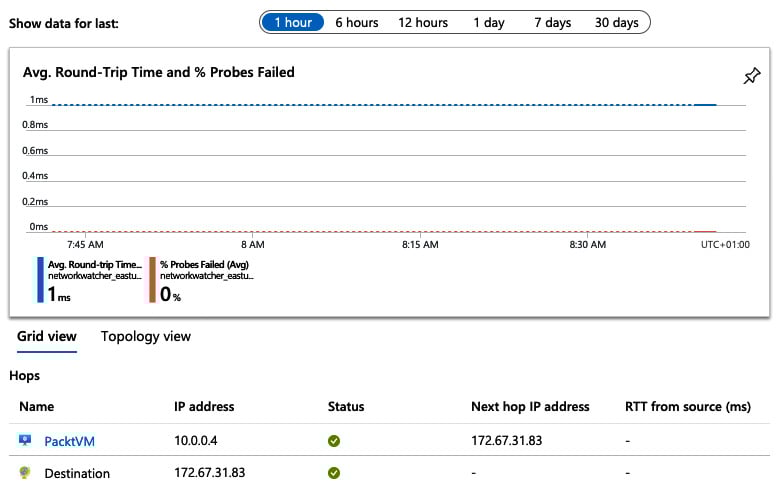
Figure 1.18 – Connection Monitor example
Connection Monitor is great for initial investigations and for setting up alerts; for more complex issues we use advanced options such as the Diagnostics tooling.
Diagnostics
When you encounter connectivity issues, Network Watcher diagnostics offers a range of tools to help pinpoint the problem.
The first step in troubleshooting connectivity issues is to confirm that traffic is flowing.
IP Flow Verify
IP Flow Verify allows you to confirm the flow of traffic from a source to a destination is working. Set up a typical test by performing the following steps:
- From the Network Watcher blade, select IP flow verify from the left-hand menu.
- Select your VM and network interface you wish to test.
- Select the desired protocol (TCP or UDP).
- Select the direction of traffic you want to check.
- Confirm the local (source) IP address and port your traffic flows on.
- Enter the remote (destination) IP address and port.
The following figure shows an example request. When the Check button is clicked, we can see a status response returned. In the example, we can see the request has failed, but importantly we see it failed because of the DenyAllOutbound Network Security Group rule:
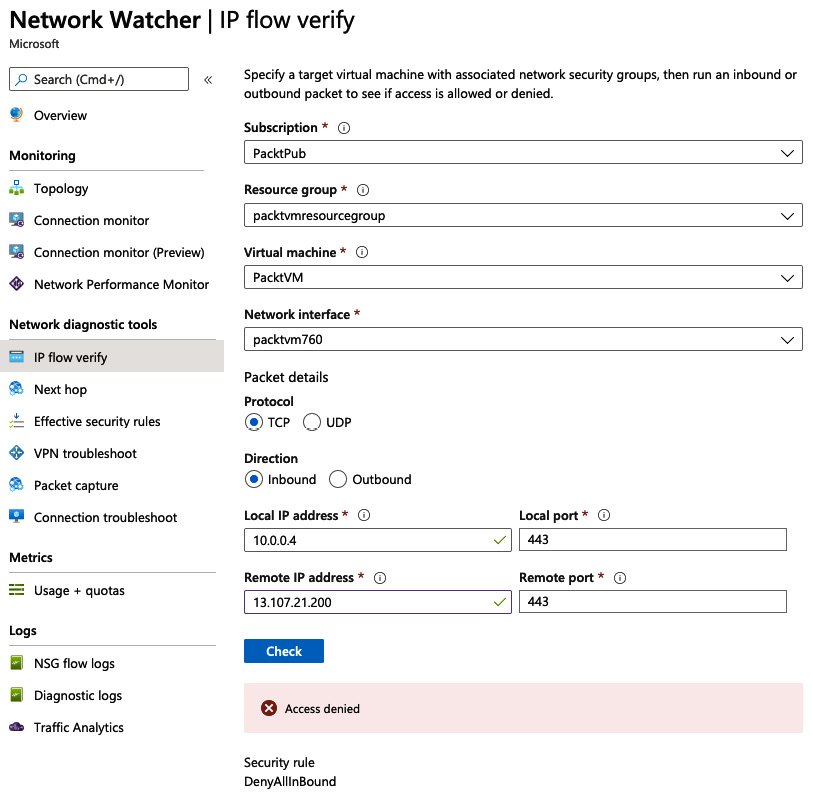
Figure 1.19 – IP flow verify example
IP flow verify helps to confirm that end-to-end communication is functioning, but if you do find problems you can use other Network Watcher tools to continue your investigations.
Next Hop
The subsequent step in identifying communications issues could be to understand the route traffic takes from point a to point b, and the Next Hop service helps with this:
- Still in Network Watcher, in the left-hand menu, click Next Hop.
- Define the source VM you wish to check connectivity from.
- Enter the IP address of the service you are attempting to reach and click the Next Hop button.
The example in the following screenshot shows the next hop to the IP address (one of the Bing.com addresses) is the Azure Internet egress appliance, and the route to it has been defined in the system route table (route tables will be covered in Chapter 4, Implementing and Managing Virtual Networking):
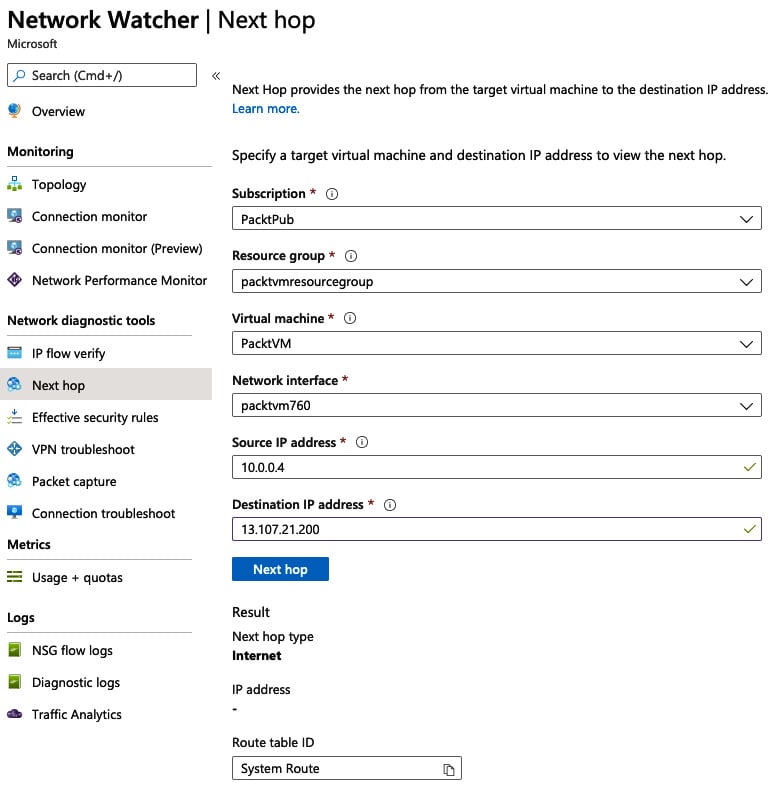
Figure 1.20 – Next Hop configuration example
Depending on the results from the IP flow verify and Next Hop tools, the next step in your troubleshooting process may be to look at access issues.
Viewing effective security rules
A common cause of issues is a misconfiguration of Network Security Groups (NSG) between devices. We cover NSGs in Chapter 10, Implementing Load Balancing and Network Security. In brief, they allow you to define firewall rules on VNETs or devices.
Restrictions on allowed IP addresses and ports can be set in multiple layers, and as such, can become complex and challenging to manage. For this reason, you can use the effective security rules option:
- Still in Network Watcher, in the left-hand menu, click Effective security rules.
- Select the Subscription, Resource group, and Virtual machine you wish to check. The following screenshot shows an example:

Figure 1.21 – Configuring the effective security rules option
- Once your VM has been selected, the effective rules will be listed, separated by NSG, Inbound rules, and Outbound rules. The following screenshot shows a typical result:
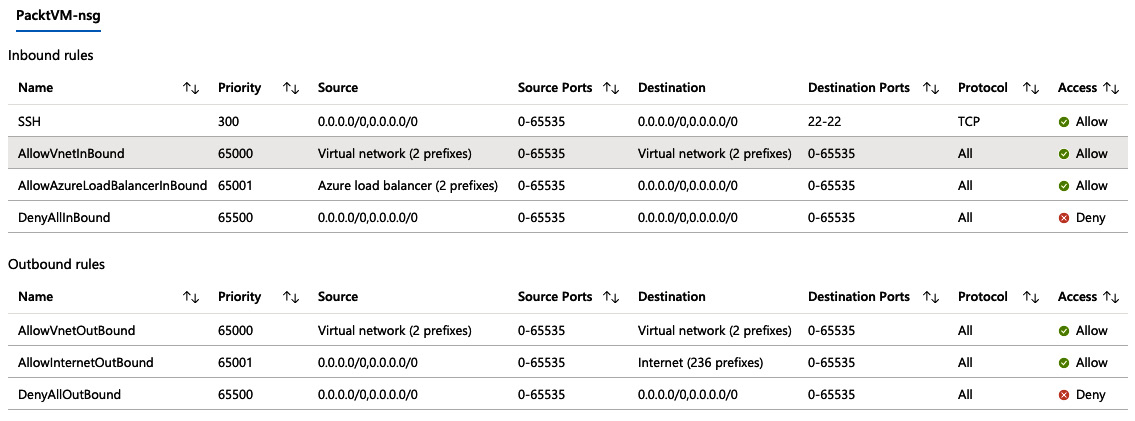
Figure 1.22 – Example of effective NSG rules in action
We will now have a look at using Packet Capture to examine the data.
Packet Capture
When everything looks OK but you are still experiencing issues, you may need to look in detail at the actual traffic being sent and received. Specialist tools are available for analyzing packet information, and through the Network Watcher, you can set up Packet Capture to collect data for a specific amount of time and then examine that traffic:
- Still in Network Watcher, in the left-hand menu, click Packet Capture.
- Select your VM.
- Choose whether to store the Packet Capture data in a storage account (we cover storage accounts and how to create them in Chapter 2, Creating and Configuring Storage Accounts), in the VM itself, or both.
- Optionally set the maximum and minimum bytes per capture or a time limit.
The following screenshot shows an example of what this looks like:

Figure 1.23 – Example packet capture setup
- Optionally click +Add Filter to enter more precise details of the source and destination for which you want to capture data, as in the following screenshot:

Figure 1.24 – Packet capture filters
- Click Save.
- The capture session will automatically start; let it run for a few minutes.
- Stop the capture by clicking the ellipsis at the right of the session you created and click Stop.
- Click on the session, and the file link will be presented in the lower pane.
- Click on the capture link to download it.
The following screenshot shows an example of how this might look:
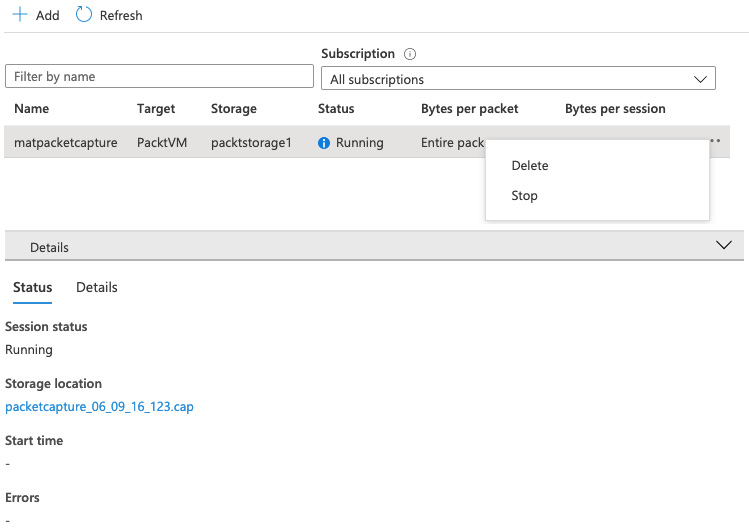
Figure 1.25 – Example Packet Capture
The Packet Capture can then be opened in a viewing tool for a detailed examination of the traffic. The following screenshot shows an example of how this might look:
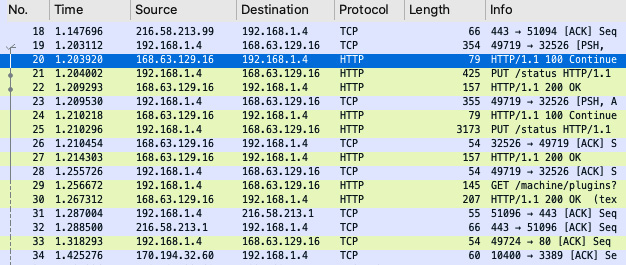
Figure 1.26 – Example traffic details from a Packet Capture
As we have seen, Network Watcher is a robust set of tools to help identify issues with connectivity and to provide a detailed analysis of the flow of traffic. Also, it is important for monitoring traffic and events for security purposes.


