Tour of the interface
Let’s begin to take a tour of Live!
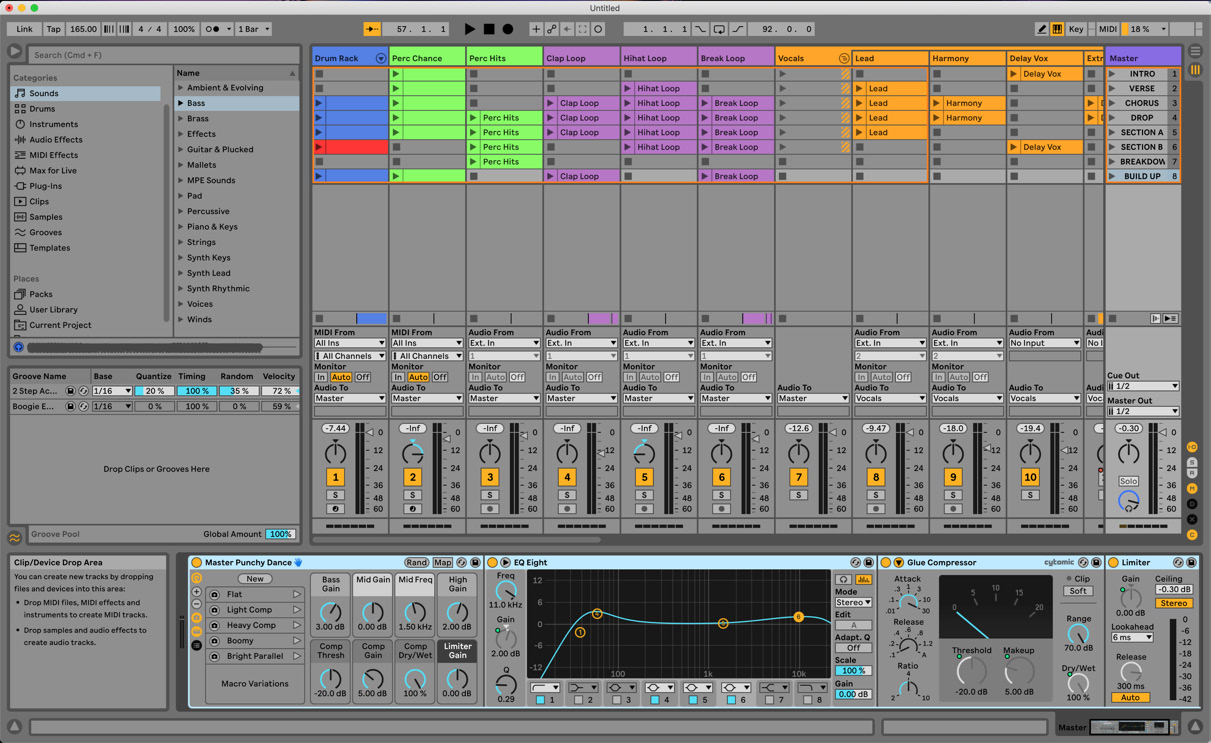
Figure 1.2 – Session View accessible by the Tab key
We are going to go through all the crucial parts of the interface, and in the next section, we will conclude with how Session View and Arrangement View operate in this parallel workflow.
But first, let’s look at the parts of the interface that you can display regardless of whether you are working in Session View or Arrangement View.
The browser
In the browser, we can access all our samples, loops, synthesizers, samplers, audio and MIDI effects, as well as third-party plugins, grooves, Packs, templates, Max for Live devices, User Library content, project content, and custom collections of these.
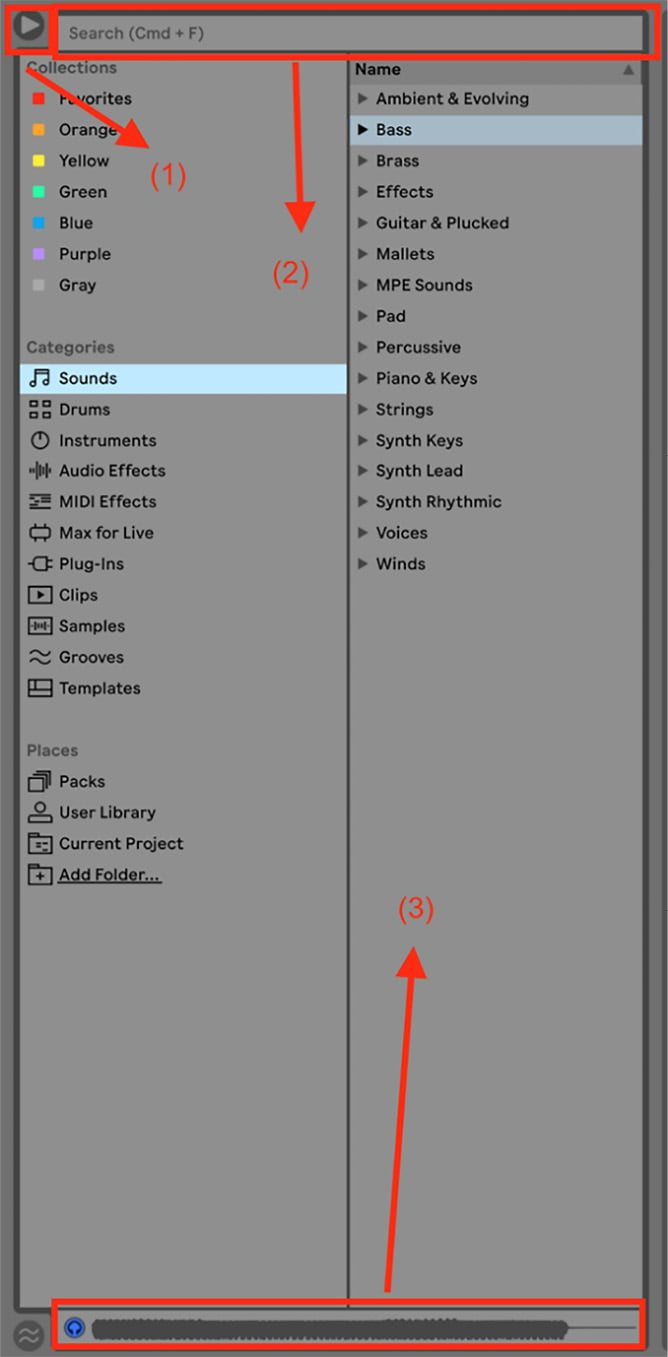
Figure 1.3 – The browser
This is where you are going to start your music-making. The unfold button (triangle) shown in Figure 1.3(1) shows and hides the browser.
Categories
There are two columns in the browser: the browser sidebar on the left and the content panel. When we click on something under Categories, it will expand the content of that category and show subfolders in the content panel.
For example, if you click on the Instruments category, Live will show you all the available instrument devices you can use. Furthermore, each of these devices will have a small triangle next to them, which will further expand the instrument types and presets (Figure 1.4).
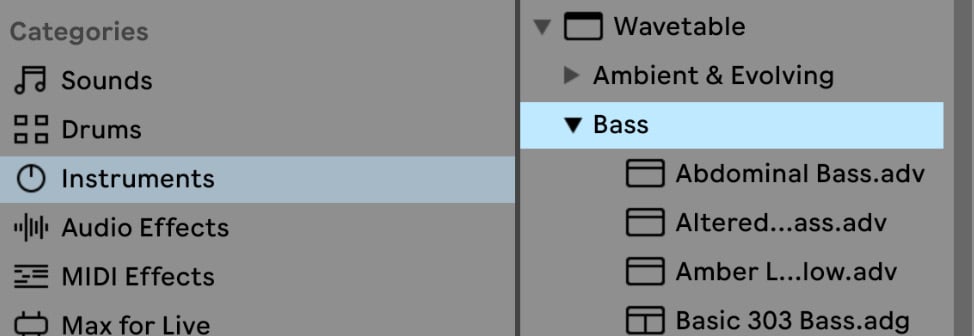
Figure 1.4 – Bass presets of the Wavetable instrument
Let’s briefly cover the different categories:
- Sounds: Instrument presets, categorized by sound type rather than instrument type
- Drums: Drum presets/drum racks
- Instruments: Instrument devices and presets, categorized by instrument type
- Audio Effects: Audio effect devices and presets
- MIDI Effects: MIDI effect devices and presets
- Max for Live: Max for Live devices and presets
- Plug-Ins: Third-party AU/VST/VST3 instruments and effects
- Clips: Clips installed in Live
- Samples: Audio files
- Grooves: Live’s grooves
- Templates: Different project templates
Places
Now that we’ve looked at the categories, let’s go through what we can find under Places:
- Packs: Library content and installed content of Live which we looked at under Preferences already.
- User Library: Your own content. Your personal, saved presets of devices and effects, for example, will be found here.
- Current Project: You can access here all the files that are part of the currently active project that you are working on and open them.
- Add Folder…: Here, you can add custom folders to Live’s browser. For example, if you have a personal samples folder on your computer, you can simply add it so that those external files will be part of your browser and you can take advantage of the Preview function (Figure 1.3(3)).
Preview will enable you to hear the selected media in the browser before loading it into your session. You can activate it with the small headphone button on the left of the waveform display (Figure 1.3(3)). You can preview the media in real time or synced with the current tempo of the project. The preview can also be routed to a separate output, so if you are looking for a sample, loop, or instrument preset in the browser when playing live, it will not interrupt the music playing through your main output.
Collections
Collections allows us to organize any media within the browser into custom-made folders, so if you are working on a project that requires you to use the same device, preset, or sample over and over again, it’s a good idea to tag those items into a collection folder.
You can simply navigate to the item, Ctrl + click (right-click for Windows), and choose the appropriate collection folder from the drop-down menu (Figure 1.5).
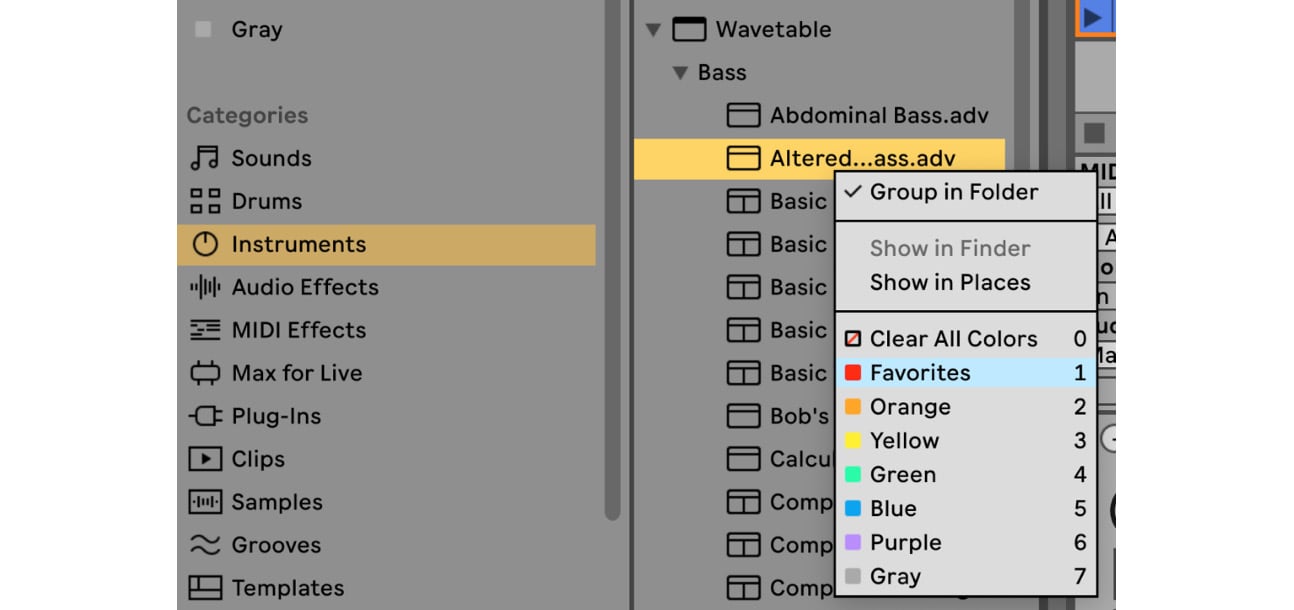
Figure 1.5 – Choosing a collection folder
You can also rename a collection folder by Ctrl + click (right-click for Windows) on it or selecting the folder and hitting Cmd + R/Ctrl + R (Figure 1.6):

Figure 1.6 – Renaming a collection folder
In order to speed up the browsing process, we can also use the Search field in the browser (Figure 1.3(2)).
We can type in bass, for example, and it will show us everything in the browser with this keyword within the selected category.
If we would like to browse in all the categories at the same time, then we can select All results, or press Cmd+F (Ctrl + F for Windows) (Figure 1.7).
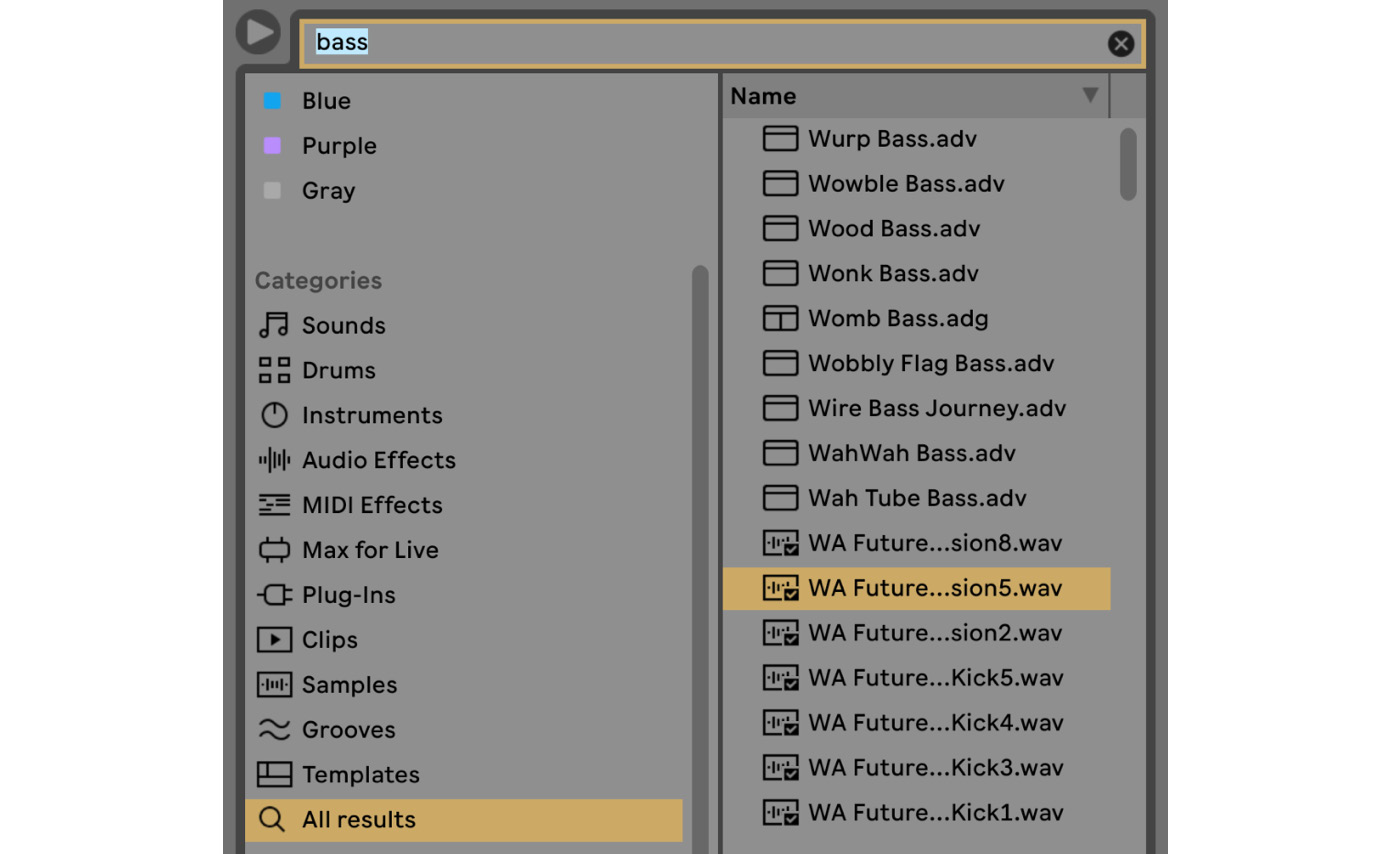
Figure 1.7 – Searching for bass in the browser
Now that we have gone through the browser, let’s have a look at the other areas of the interface…
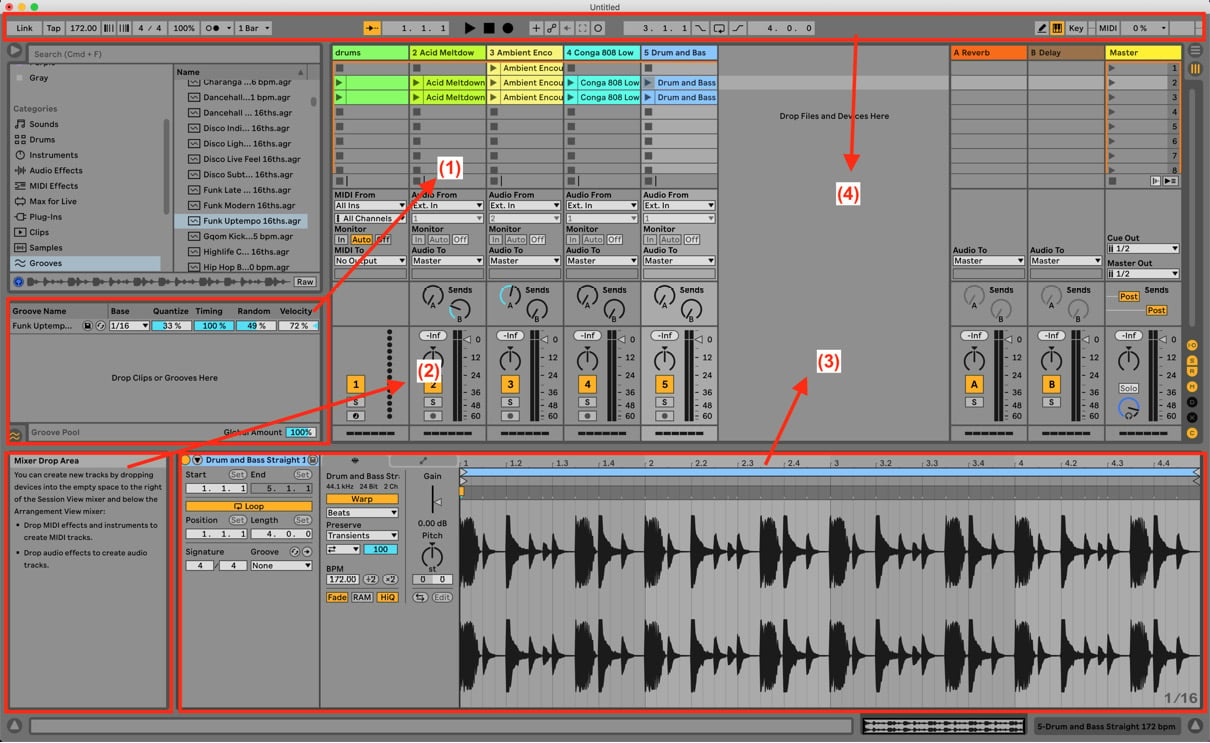
Figure 1.8 – The interface
Groove Pool
The Groove Pool (Figure 1.8(1)) allows you to add a more humanized feel (additional movement and fluctuation of values) to your clips by using grooves. Live comes with a rather large number of grooves, which you can either drop into the Groove Pool from the browser and then later add to your clips, or drop the Grooves straight onto a clip. They will appear in the Groove Pool, where you can adjust the parameters. More on this in Chapter 5, MIDI Editing and MIDI Effects.
Help View
Now, this is a quite crucial area if you are only beginning your journey in Live.
The Help View (Figure 1.8(2)) explains the functionality of each parameter in Live. You simply need to hover your mouse over the parameter and the Help View will display the appropriate information regarding the chosen parameter.
I strongly suggest displaying the Help View, as even for a seasoned Live user, it can be useful when the time comes to provide a little reminder of some functionalities.
You can hide and show the Help View by simply clicking on the small triangle button underneath the Help View box.
Clip View/Device View
This area (Figure 1.8(3)) will display either the device chain on the chosen track or the Clip View, which will be either the sample editor or the MIDI editor, depending on the chosen track’s type.
You can simply double-click on the track head to display the Device View or double-click on the audio or MIDI clip to display the Clip View. Additionally, you could use the Clip View selector or Device View selector, as shown in Figure 1.9.
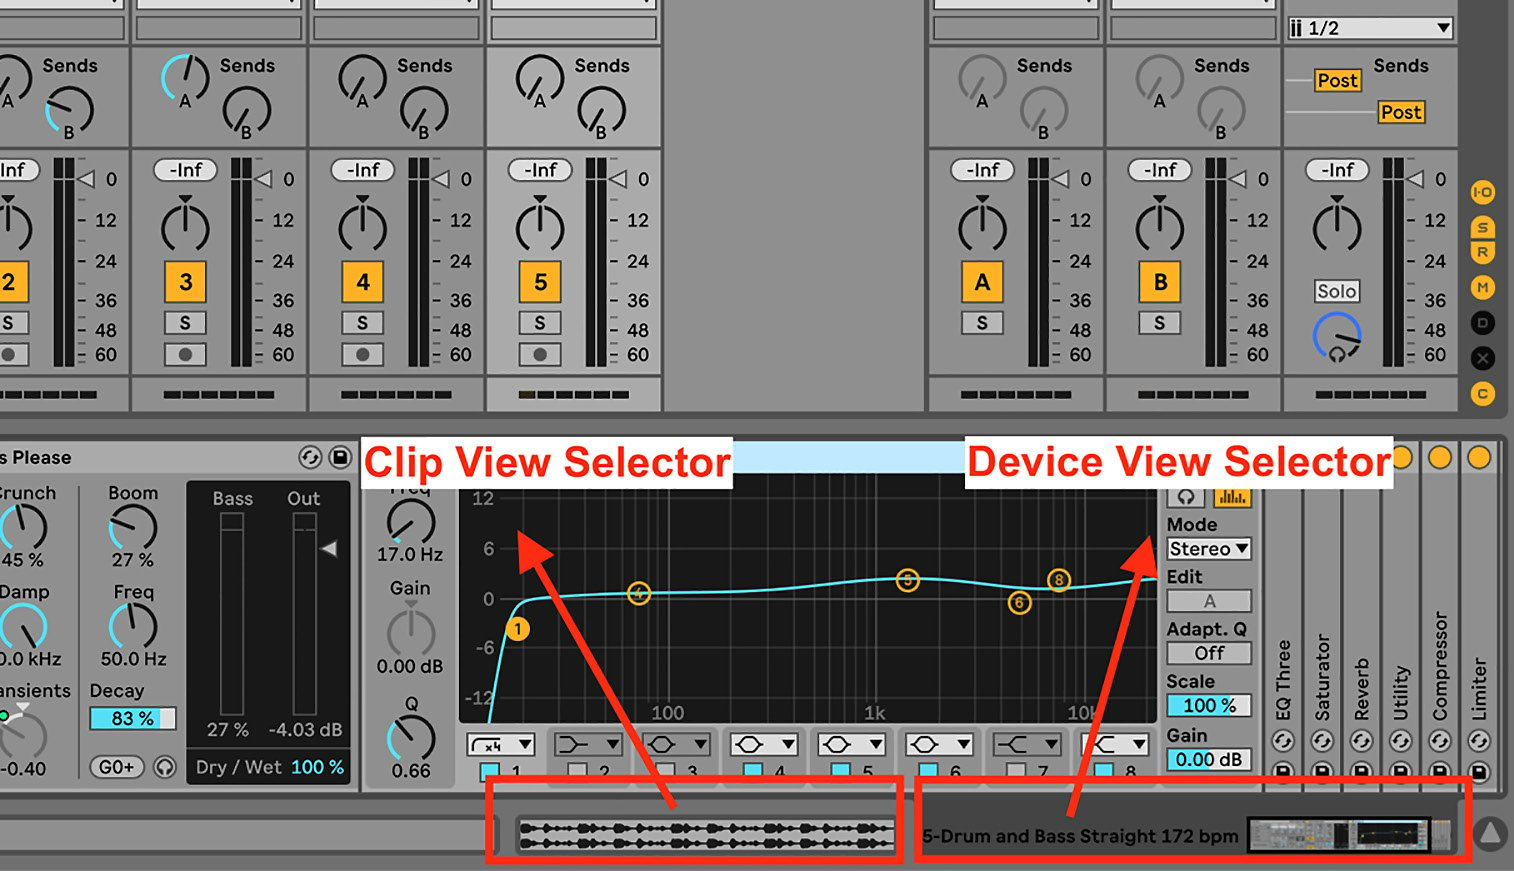
Figure 1.9 – Clip View Selector and Device View Selector
Control Bar
In the Control Bar, you can find the transport controls (Figure 1.8(4)). This area holds crucial functions, such as start playback, stop, and record, in both Session View and Arrangement View. Additionally, you can set the tempo here and switch on and off the metronome, among other functions.
Let’s quickly have a look at these:

Figure 1.10 – Control Bar and transport controls
- The Follow button will make the screen scroll along with the position of the playback head to always display the current play position of the song (Figure 1.10(1)).
- Arrangement Position will display the current position of the playback head in the arrangement (Figure 1.10(2)).
- The Play button (Figure 1.10(3)).
- The Stop button (Figure 1.10(4)).
- The Arrangement Record button, when pressed, records clips in Arrangement View. There's more on this in Chapter 2, Recording Audio in Ableton Live 11, Chapter 4, Exploring MIDI Sequencing Techniques, and Chapter 10, Utilizing Arrangement and Organization Techniques in our Ableton Live project (Figure 1.10(5)).
- When the MIDI Arrangement Overdub button is enabled, recording MIDI over an already existing MIDI clip will add the new notes to the clip, not overwrite them. There's more on this in Chapter 4, Exploring MIDI Sequencing Techniques (Figure 1.10(6)).
- When the Automation Arm button is enabled, manual parameter changes will be recorded to the clips in Session View and Arrangement View. There's more on this in Chapter 11, Implementing Automation and Modulation (Figure 1.10(7)).
- The Re-enable Automation button will re-enable manually overridden inactive automation. There's more on this in Chapter 11, Implementing Automation and Modulation (Figure 1.10(8)).
- The Capture button pre-records MIDI and “captures” the notes you just played, even if you didn’t hit the record button. There's more on this in Chapter 4, Exploring MIDI Sequencing Techniques (Figure 1.10(9)).
- The Session Record button enables you to record (and overdub MIDI) audio and MIDI clips in Session View (Figure 1.10(10)).
- Loop Start/Punch in Point in Arrangement View displays the start of the Arrangement loop or Punch recording. More on this in Chapter 2, Recording Audio in Ableton Live 11 (Figure 1.10(11)).
- Punch-In Switch in Arrangement View will prevent Live recording anything prior to the punch in point. There's more on this in Chapter 2, Recording Audio in Ableton Live 11 (Figure 1.10(12)).
- Loop Switch in Arrangement View activates the Arrangement loop. There's more on this in Chapter 2, Recording Audio in Ableton Live 11 (Figure 1.10(13)).
- Punch-Out Switch in Arrangement View will prevent Live recording anything after the punch out point. There's more on this in Chapter 2, Recording Audio in Ableton Live 11 (Figure 1.10(14))
- Loop/Punch-In Region Length in Arrangement View displays the length of the Arrangement loop or punch-region. More on this in Chapter 2, Recording Audio in Ableton Live 11 (Figure 1.10(15)).

Figure 1.11 – Control Bar
- Draw Mode Switch is useful for drawing in MIDI notes as well as envelopes for automation and modulation. This can be also turned on and off by pressing the B button (Figure 1.11(1)).
- Computer MIDI Keyboard enables you to use your computer keys to input MIDI notes (Figure 1.11(2)).
- Key Map Mode Switch enables you to map Live’s parameters to your computer keys (Figure 1.11(3)).
- Key/MIDI In and Out Indicators will flash when Live is sending or receiving MIDI messages belonging to remote control assignments made in Key and MIDI Map Modes. There's more on this in Chapter 14, Exploring MIDI Mapping, External Instruments, and MIDI CCs (Figure 1.11(4)).
- MIDI Map Mode Switch, when turned on, enables you to carry out MIDI mapping. There's more on this in Chapter 14, Exploring MIDI Mapping, External Instruments, and MIDI CCs (Figure 1.11(5)).
- CPU Load Meter can be seen in Figure 1.11(6). Clicking on the small arrow will give you additional options, such as switching the CPU load meter between Average and Current and configuring your audio preferences (Figure 1.12).
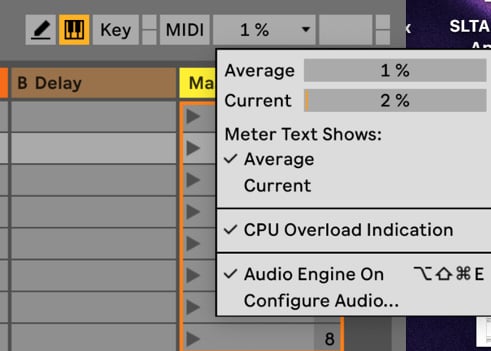
Figure 1.12 – CPU Load Meter
- Overload Indicator: This lights up when the CPU is overloaded because Live was not able to load audio fast enough. When this happens you will experience audio dropouts. It might be because your computer is not powerful enough to handle all the audio processing you are trying to do, or you need to increase your buffer size because it is currently set too low (Figure 1.11(7)).
- MIDI Track In Indicator/MIDI Track Out Indicator: These will flash when Live’s tracks are receiving or sending out MIDI messages (Figure 1.11(8)).

Figure 1.13 – Control Bar
- The Link On/Off switch triggers Ableton Link on and off. There's more on this in Chapter 15, Playing Live (Figure 1.13(1)).
- Tap Tempo is where you can set the tempo, by tapping this button. Live’s playback will follow the tempo of your tapping (Figure 1.13(2)).
- Tempo is where you can manually type in the tempo for your project (Figure 1.13(3)).
- Phase Nudge Down/Up can be useful when you are trying to synchronize Live to a source that isn’t locked to one tempo, to temporarily increase or decrease the tempo of Live (Figure 1.13(4)).
- Time signature Numerators will allow you to type in the time signature of your song (Figure 1.13(5)).
- Global Groove Amount defines the global intensity of all grooves in the Groove Pool (Figure 1.13(6)).
- Figure 1.13(7) shows Metronome and Metronome Settings. Here, you can enable and disable the metronome. By clicking on the small arrow, you can also enable count-in and apply further settings to the metronome, such as sound and rhythm.
- Figure 1.13(8) shows Quantization Menu. This is the magical function that keeps everything in time in your session. Global Quantize controls the global launching behavior of Live. We will be looking at this in more detail a bit later in this chapter.
So, now that we have had our first proper tour of Live, we can continue to have a look at Session View and Arrangement View. This is super important in order to take full advantage of the creative workflow that Live has to offer.


