Classifying images with a pre-trained network using the Keras API
We do not always need to train a classifier from scratch, especially when the images we want to categorize resemble ones that another network trained on. In these instances, we can simply reuse the model, saving ourselves lots of time. In this recipe, we'll use a pre-trained network on ImageNet to classify a custom image.
Let's begin!
Getting ready
We will need Pillow. We can install it as follows:
$> pip install Pillow
You're free to use your own images in the recipe. Alternatively, you can download the one at this link: https://github.com/PacktPublishing/Tensorflow-2.0-Computer-Vision-Cookbook/tree/master/ch2/recipe5/dog.jpg.
Here's the image we'll pass to the classifier:

Figure 2.4 – Image passed to the pre-trained classifier
How to do it…
As we'll see in this section, re-using a pre-trained classifier is very easy!
- Import the required packages. These include the pre-trained network used for classification, as well as some helper functions to pre process the images:
import matplotlib.pyplot as plt
import numpy as np
from tensorflow.keras.applications import imagenet_utils
from tensorflow.keras.applications.inception_v3 import *
from tensorflow.keras.preprocessing.image import *
- Instantiate an
InceptionV3network pre-trained on ImageNet:model = InceptionV3(weights='imagenet')
- Load the image to classify.
InceptionV3takes a 299x299x3 image, so we must resize it accordingly:image = load_img('dog.jpg', target_size=(299, 299)) - Convert the image to a
numpyarray, and wrap it into a singleton batch:image = img_to_array(image) image = np.expand_dims(image, axis=0)
- Pre process the image the same way
InceptionV3does:image = preprocess_input(image)
- Use the model to make predictions on the image, and then decode the predictions to a matrix:
predictions = model.predict(image)
prediction_matrix = (imagenet_utils
                     .decode_predictions(predictions))
- Examine the top
5predictions along with their probability:for i in range(5): _, label, probability = prediction_matrix[0][i] print(f'{i + 1}. {label}: {probability * 100:.3f}%')This produces the following output:
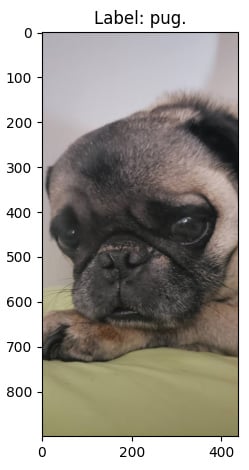
1. pug: 85.538%
2. French_bulldog: 0.585%
3. Brabancon_griffon: 0.543%
4. Boston_bull: 0.218%
5. bull_mastiff: 0.125%
- Plot the original image with its most probable label:
_, label, _ = prediction_matrix[0][0]
plt.figure()
plt.title(f'Label: {label}.')
original = load_img('dog.jpg')
original = img_to_array(original)
plt.imshow(original / 255.0)
plt.show()
This block generates the following image:

Figure 2.5 – Correctly classified image
Let's see how it all works in the next section.
How it works…
As evidenced here, in order to classify images effortlessly, using a pre-trained network on ImageNet, we just need to instantiate the proper model with the right weights, like this: InceptionV3(weights='imagenet'). This will download the architecture and the weights if it is the first time we are using them; otherwise, a version of these files will be cached in our system.
Then, we loaded the image we wanted to classify, resized it to dimensions compatible with InceptionV3 (299x299x3), converted it into a singleton batch with np.expand_dims(image, axis=0), and pre processed it the same way InceptionV3 did when it was trained, with preprocess_input(image).
Next, we got the predictions from the model, which we need to transform to a prediction matrix with the help of imagenet_utils.decode_predictions(predictions). This matrix contains the label and probabilities in the 0th row, which we inspected to get the five most probable classes.
See also
You can read more about Keras pre-trained models here: https://www.tensorflow.org/api_docs/python/tf/keras/applications.


