Downloading and installing the required software
We are going to download and install Android SDK with the ADT bundle first. JDK 6 or later should already be installed and configured on your development machine.
Downloading the Android SDK
Go to http://developer.android.com/sdk/. If you are on Windows, click on the Download Eclipse ADT with the Android SDK for Windows button. If you are using a different operating system, the page should autodetect it and offer you the link for your OS. In case it doesn't detect it correctly, there is a link called VIEW ALL DOWNLOADS AND SIZES that will expand a list of available platforms. Choose the right platform for you. Be careful when choosing 32-bit or 64-bit software. If you are running a 32-bit Java on a 64-bit system, choose the 32-bit software. Accept the license agreement and save the file to your hard drive. The examples in this chapter are from the 32-bit version for Windows.
Note
There is another IDE available, Android Studio. However, it is in the early access stage. It is not recommended to use this IDE.
Installing the Android SDK
The downloaded file will be a ZIP archive called something like adt-bundle-windows-x86-20131030.zip. The filename indicates the selected platform and the date of release. To install the software, simply unpack the archive to any folder.
Tip
If you have decided to use an existing Eclipse IDE, expand the GET THE SDK FOR AN EXISTING IDE link and click on the Download the stand-alone Android SDK tools for Windows button. Or, download the SDK tools for appropriate platforms from the VIEW ALL DOWNLOADS AND SIZES link. After that, follow the instructions at http://developer.android.com/sdk/installing/.
You should find the following in the folder where you have unpacked the archive:
- The
eclipsefolder - The
sdkfolder - The
SDK Manager.exefile
First, run the SDK Manager.exe file. It might take a while to start, and it doesn't show any splash screen. You will be presented with a window similar to the one in the following screenshot:

Check for any packages that have updates available. Note that you only need the latest SDK, which at the time this book was written was SDK 19 for Android 4.4. The latest version is always bundled with the Android SDK. You should also check the Google USB Driver option.
Note
Every SDK version allows you to write applications that can be deployed to any Android version. If you use a function from an SDK version that is not available in an older Android SDK, the method will not be executed and you will get a warning or an exception. Be careful with that because the code will compile and deploy!
Optionally, you can install the Android emulator system images for older Android versions. This is useful for testing. However, AndEngine can't be deployed to an Android emulator with Android versions 2.x. For now, do not install anything else but the updates and the USB driver. Install the selected packages and close the SDK manager. The installation might take a while, because the packages are downloaded from the Internet.
Configuring the Eclipse IDE
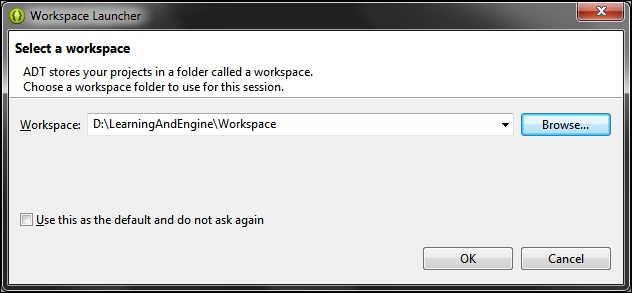
Now, run the Eclipse IDE. From the eclipse folder, run the eclipse.exe file. After the splash, the first thing you will see is the workspace selection window. This is shown in the following screenshot:

If you have never worked with Eclipse, note that a workspace is both a virtual space on your screen (the layout) and a directory where your projects and some metadata that Eclipse keeps about your projects are stored. Choose any directory you want, but make sure it is one with easy access. You can have multiple workspaces. If you check the Use this as the default and do not ask again checkbox, you will be working with this workspace by default and this dialog box won't appear again at the start.
Tip
The workspace selection dialog box is always available by navigating to File | Switch Workspace menu in Eclipse.
After the start, close the Welcome screen and you will be presented with the Eclipse default layout. Parts of the layout can be dragged and dropped to different locations. Also, you can have different perspectives (presets of the opened windows and tabs) for each workspace. We will be using the Java perspective for most of the time but we will also use Dalvik Debug Monitor Server (DDMS) and the Debug perspective for debugging and tuning our application. The perspectives are available by navigating to Window | Open Perspective.
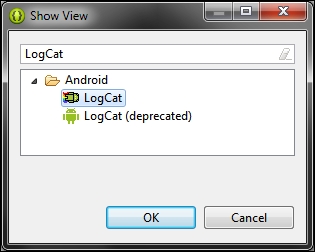
Stay in the Java perspective, but go to Window | Show View | Other… and search for LogCat, as shown in the following screenshot:

LogCat is a log console. The Android system has a logging system that allows developers to print categorized text messages to LogCat from their apps. This is very useful for game developers because the text output to the screen can be very limited. The ADT takes care of getting the LogCat output from the connected Android device.
The Eclipse IDE can be a bit difficult to grasp from the start. However, as a Java developer, you have probably used it before or have used a similar one. Most of the IDEs nowadays are very similar. Try to familiarize yourself with Eclipse before proceeding to the next step.


