Search icon CANCEL
Subscription
0
Cart icon
Your Cart (0 item)
Close icon
You have no products in your basket yet
Arrow left icon
Explore Products
Best Sellers
New Releases
Books
Videos
Audiobooks
Learning Hub
Newsletter Hub
Free Learning
Arrow right icon
timer SALE ENDS IN
0 Days
:
00 Hours
:
00 Minutes
:
00 Seconds
Arrow up icon
GO TO TOP
Learn Blender Simulations the Right Way

You're reading from   Learn Blender Simulations the Right Way Create attractive and realistic animations with Mantaflow, rigid and soft bodies, and Dynamic Paint

Arrow left icon
Product type Paperback
Published in Nov 2022
Publisher Packt
ISBN-13 9781803234151
Length 368 pages
Edition 1st Edition
Tools
Concepts
Arrow right icon
Author (1):
Arrow left icon
Stephen Pearson Stephen Pearson
Author Profile Icon Stephen Pearson
Stephen Pearson
Arrow right icon
View More author details
Toc

Table of Contents (21) Chapters Close

Preface 1. Part 1: Using Mantaflow for Fire, Smoke, and Fluids
2. Chapter 1: An Introduction to Mantaflow FREE CHAPTER 3. Chapter 2: Understanding Domains, Flows, and Effectors 4. Chapter 3: Creating a Realistic Campfire Simulation 5. Chapter 4: Creating a Waterfall Using Mantaflow 6. Chapter 5: Creating a Realistic Explosion 7. Part 2: Simulating Physics with Soft Bodies and Cloth
8. Chapter 6: Getting Started with Soft Bodies 9. Chapter 7: Creating a Soft Body Obstacle Course 10. Chapter 8: Introduction to Cloth Simulations 11. Chapter 9: Creating a Realistic Flag 12. Part 3: Diving into Rigid Bodies
13. Chapter 10: An Introduction to Rigid Bodies 14. Chapter 11: Creating a Rigid Body Physics Course 15. Part 4: Understanding Dynamic Paint in Blender
16. Chapter 12: Introduction to Dynamic Paint 17. Chapter 13: Creating a Paintbrush Effect 18. Chapter 14: Creating a Raindrop Effect 19. Index 20. Other Books You May Enjoy

Setting up the render

This tutorial is almost done! The final steps we need to do are set up the render, animate the camera following the paintbrush, and render the animation. Let’s start by taking a look at the Eevee settings and changing them to make the whole scene look much better:

  1. In the Render panel, let’s turn on Ambient Occlusion to darken the areas in the hair particles.
  2. Let’s also enable Screen Space Reflections to get nice reflections in the wet paint.
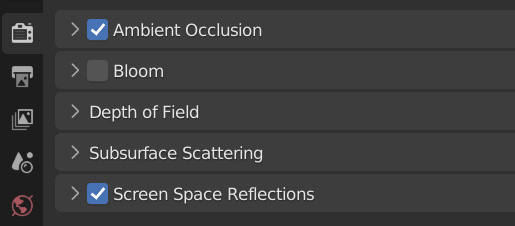
Figure 13.38 – Eevee render settings

Figure 13.38 – Eevee render settings

  1. In the Color Management tab, let’s set Look to High Contrast. This will really make the colors in our scene pop!
  2. For the Camera animation, I recommend jumping to Frame 1, positioning Camera to the view you want, and then adding a keyframe. You can do this by selecting Camera, hitting I, and selecting Location & Rotation.
  3. Around Frame 100, rotate and move Camera so that it’s facing the...
lock icon The rest of the chapter is locked
Register for a free Packt account to unlock a world of extra content!
A free Packt account unlocks extra newsletters, articles, discounted offers, and much more. Start advancing your knowledge today.
Unlock this book and the full library FREE for 7 days
Get unlimited access to 7000+ expert-authored eBooks and videos courses covering every tech area you can think of
Renews at $19.99/month. Cancel anytime