Search icon CANCEL
Arrow left icon
Explore Products
Best Sellers
New Releases
Books
Videos
Audiobooks
Learning Hub
Conferences
Free Learning
Arrow right icon
Arrow up icon
GO TO TOP
Hands-On Linux Administration on Azure

You're reading from   Hands-On Linux Administration on Azure Develop, maintain, and automate applications on the Azure cloud platform

Arrow left icon
Product type Paperback
Published in Feb 2020
Publisher Packt
ISBN-13 9781839215520
Length 508 pages
Edition 2nd Edition
Languages
Tools
Arrow right icon
Authors (3):
Arrow left icon
Rithin Skaria Rithin Skaria
Author Profile Icon Rithin Skaria
Rithin Skaria
Frederik Vos Frederik Vos
Author Profile Icon Frederik Vos
Frederik Vos
Kamesh Ganesan Kamesh Ganesan
Author Profile Icon Kamesh Ganesan
Kamesh Ganesan
Arrow right icon
View More author details
Toc

Table of Contents (14) Chapters Close

Preface 1. Chapter 1: Exploring the Microsoft Azure Cloud 2. Chapter 2: Getting Started with the Azure Cloud FREE CHAPTER 3. Chapter 3: Basic Linux Administration 4. Chapter 4: Managing Azure 5. Chapter 5: Advanced Linux Administration 6. Chapter 6: Managing Linux Security and Identities 7. Chapter 7: Deploying Your Virtual Machines 8. Chapter 8: Exploring Continuous Configuration Automation 9. Chapter 9: Container Virtualization in Azure 10. Chapter 10: Working with Azure Kubernetes Service 11. Chapter 11: Troubleshooting and Monitoring Your Workloads 12. Chapter 12: Appendix 13. Index

Azure Container Instances

Now that we are able to run a container in a VM, we can go one step further: we can use the Azure Container Instances service to run it without managing servers.

You can do that using the Azure portal. In the left-hand navigation bar, select All Services and search for Container instances. Once you are in Container instances, click on Add to create a new container instance and the portal will redirect you to the following window:
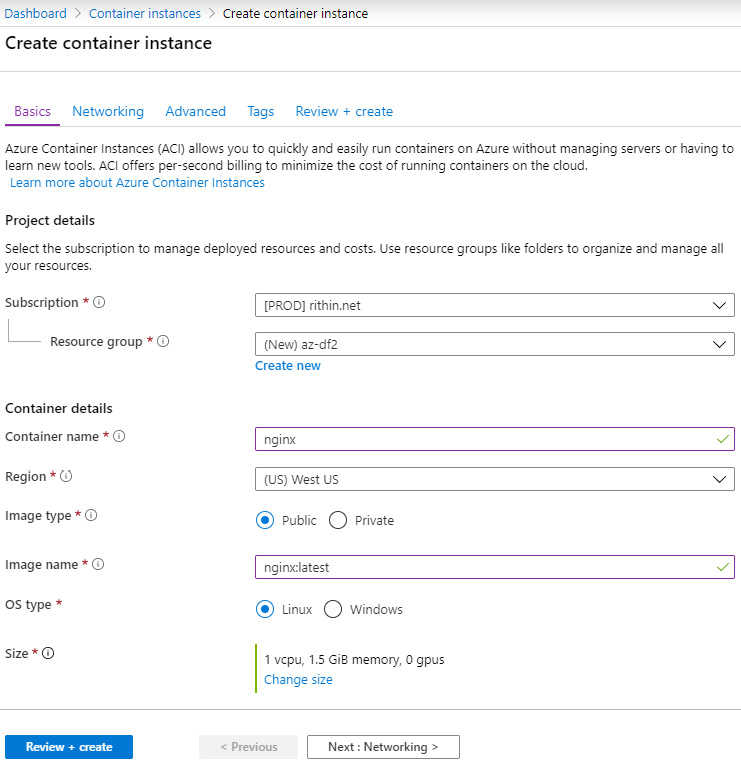
Creating a new container instance on the Azure Container Instances portal
Figure 9.16: Creating a Docker container instance

You can create a resource group or use an existing one. Set the container name to nginx, set Image type to Public because we are going to pull a public image, set the image name to nginx:latest, set OS type to Linux, and choose the desired resource requirement for the container. Hit Next and in the Networking section, we will expose port 80 for HTTP traffic as shown in the following screenshot. Also, you can add a DNS label and opt for a public IP address...

lock icon The rest of the chapter is locked
Register for a free Packt account to unlock a world of extra content!
A free Packt account unlocks extra newsletters, articles, discounted offers, and much more. Start advancing your knowledge today.
Unlock this book and the full library FREE for 7 days
Get unlimited access to 7000+ expert-authored eBooks and videos courses covering every tech area you can think of
Renews at $19.99/month. Cancel anytime