


Updating the physics settings
In the previous chapter, we included all the variations of enemies in the project and created a couple of scripts to spawn and update them. Now, we are going to expand enemy support by adding a custom layer for them and setting up the layer collision matrix and camera’s Occlusion Culling to use the new layer.
Let's start by creating the new layer:
- Click Edit | Project Settings….
- In the Project Settings window, select the Tags and Layers option from the left panel.
- Add the Enemy value to User Layer 9.
- Save the project.
The following figure shows the current custom layers that we have added so far to our project:
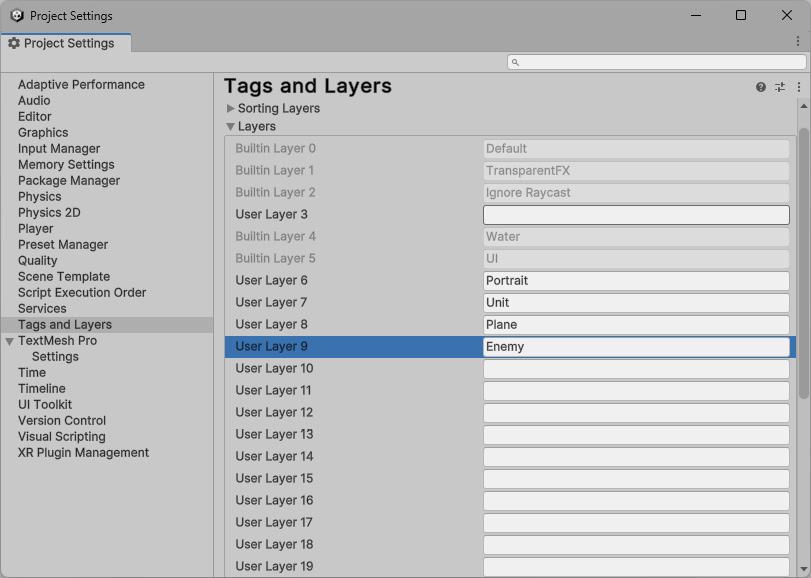
Figure 10.1 – Adding Enemy to the Layers settings
It is important that the Portrait, Unit, Plane, and Enemy custom layers are added to the corresponding User Layer. When setting a layer to a Occlusion Culling, for example, the Unity Engine uses User Layer as an index, and for that reason, it is not recommended to change or move layers once they have been created and used, to avoid unexpected behaviors and issues.
The next setting we are going to update is physics. Besides updating the Layer Collision Matrix, we are also going to change one very special option here that is required to make the collision detection work better with the NavMesh system. Let us set up the new layer in the physics configuration:
- Open the Project Settings window and, in the left panel, click on Physics.
- Change the Contact Pairs Mode property to Enable All Contact Pairs.
- Expand the Layer Collision Matrix property and uncheck the intersections where the Enemy column meets the Enemy, Portrait, and Plane rows.
- Save the project.
Each new custom layer that we add will create a new intersection in the Layer Collision Matrix section, making it a good practice to always check the settings in the Physics configuration. The current layer configuration in the following figure is what we have so far, and the goal is to disable the collision between GameObjects within the same Unit layer or in the same Enemy layer:

Figure 10.2 – Updating the Physics settings
Note that we have previously unchecked all the intersections between the Portrait layer and any other layer in the project because the Portrait layer is only applied to the selected unit shown on the UI and no physics is required there since it is only used for the portrait camera rendering.
Besides the Layer Collision Matrix, there is another Physics setting that we need to change as well, Contact Pairs Mode, which is how the engine manages the collision and trigger events between two GameObjects with Rigidbody components attached. The Default Contact Pairs option, which was the previous default value, will ignore the collision between two kinematic Rigidbody components. However, as we are going to see later, in the Managing the collision and chase behavior section, we are going to enable the kinematic property for our units and enemies; otherwise, the default collision will conflict with the NavMesh by pushing and pulling the GameObjects at the same time as the pathfinder is trying to do so.
To avoid collision detection issues, we changed Contact Pairs Mode to Enable All Contact Pairs – this will make collisions between any combinations of kinematic and non-kinematic GameObjects be detected but without the physics force being applied. The intersection between the Enemy and Unit layers with the Plane layer can also be unchecked because, without physics at play, we do not need collision detection with the ground.
Now that we have created the new Enemy layer, we also need to add it to the Occlusion Culling property of a few cameras to make the GameObjects visible once we set the layer to them:
- In the Project view, locate the
MiniMapCamerafile in the Prefabs | UI path and double-click on it to open the Prefab in Edit Mode. - In the Inspector view, on the Camera component, click on the Occlusion Culling property and select the Enemy layer.
- In the Project view, double-click to open the Playground scene and, in the Hierarchy view, click on the GameObject named Main Camera.
- With the camera selected, in the Inspector view, on the Camera component, click on the Occlusion Culling property and select the Enemy layer. Save the scene changes.
- In the Project view, double-click to open the Level01 scene and repeat the previous step to add the Enemy layer to Main Camera as well.
The MiniMapCamera Prefab is responsible for rendering the map from the top, and, without selecting the Enemy layer, we would not be able to see the enemies in the mini-map. The same applies to Main Camera in each scene – they all must have the Enemy layer in Occlusion Culling to make the GameObject visible to the player.
The following shows all the layers selected in Occlusion Culling for MiniMapCamera.

Figure 10.3 – Adding the Enemy tag to Occlusion Culling
The only scene that is not required to have the Enemy layer selected in the camera is GameUI because that specific scene has only the UI layer selected since it is the only thing that should be rendered in this scene. If you have created any other level scenes, remember to select the Enemy layer for Occlusion Culling as well.
Now that we have added the new layer and updated the physics settings, we can move to the battle code, starting with the damage calculation and a few changes to our existing code for both unit and enemy components.


