Chapter 5. Unwrapping the Low Resolution Mesh
In this chapter, we will cover the following recipes:
- Preparing the low resolution mesh for unwrapping
- UV unwrapping the mesh
- Editing the UV islands
- Using the Smart UV Project tool
- Modifying the mesh and the UV islands
- Setting up additional UV layers
- Exporting the UV Map layout
Introduction
So, at this point, we have sculpted our high resolution character and through the retopology process, we have obtained a low resolution copy, which is easier to use for rigging, texturing, and animation.
There are several ways to apply textures to a mesh in Blender, as in any other 3D package. In our case, we are going to use UV Mapping, which is certainly one of the most commonly used and efficient methods for organic shapes.
Before the unwrapping process, the mesh must be prepared to make the task easier.
Preparing the low resolution mesh for unwrapping
In this recipe, we'll fix the last details such as the position of some of the character's parts (for instance, the closed mouth) and in general, anything that is needed to facilitate the unwrapping.
Getting ready
To be more precise, before the unwrapping, we must perform the following tasks in the right order:
- Join the teeth and talons to the body.
- Create the vertex group for the mandible.
- Open the mouth.
- Mark the seams to unwrap the body.
So, open the Gidiosaurus_retopology.blend file and deactivate the layer with the armor to hide it; select the
Gidiosaurus object and save the file as Gidiosaurus_unwrap.blend.
How to do it…
The simplest of the four tasks just so happens to be the first, joining the body with the teeth and talons.
To join the body parts, follow these steps:
- Select the Talons item in the Outliner, and then hold Shift and select the Fangs_bottom, Fangs_upper, and Gidiosaurus_lowres items.
- Press Ctrl + J to join them.
- Right away we will notice that, because the retopologized mesh didn't have any material assigned, the whole object gets the only material available, which is the
Enamelmaterial we had assigned to the talons and teeth earlier. - To fix this, assign a new material, or you can also assign the already existing
Bodymaterial, to the retopologized mesh before the joining operation. - Alternatively, after the joining, click on the + icon to the side of the material names, and then select the New button in the Material window to create a new material. Now, enter Edit Mode, put the mouse pointer on the Gidiosaurus mesh, and press the L key to select all the connected vertices. Because the talons and teeth vertices are joined, but not connected to the face vertices, they don't get selected; for the same reason, you have to repeat the operation three times to select the head, arm, hips, and leg vertices:

The head, arm and hip/leg vertices selected in Edit Mode
- Click on the Assign button and go out of the Edit Mode. Now, edit the name and color of the new material or whatever, or else switch it with the
Bodyone.The second task is a bit more complex and is covered in more detail in Chapter 7, Skinning the Low Resolution Mesh, which is about the skinning process. However, we need to explore this subject a little bit now, as it will help us operate on a small portion of the mesh easily.
To create a vertex group to open the mouth, follow these steps:
- Go to the Side view and zoom in on the head of the character.
- Go to the Object Data window; under the Vertex Groups subpanel, add a new group and rename it
mand(short for mandible). - Press Ctrl + Tab to go into Weight Paint mode (or left-click on the mode button on the 3D window toolbar to switch from Edit Mode to Weight Paint mode); press Z to go into Wireframe viewport shading mode so that you can see the edges of the topology.
- By using a combination of vertex selection mode, both in Edit Mode and by painting with Weight and Strength as 1.000 in the Weight Paint mode, assign vertices to the group of the mandible area and the part of the neck; obviously, you have to include the vertices of the inner bottom jaw, as well as the tongue and bottom teeth:

The visualization of the mand vertex group
- Press Ctrl + Tab to exit the Weight Paint mode.
Note that a vertex group can be edited at a later time, so it will be easier to set the exact amount of weight on the vertices by looking at the Lattice modifier feedback, which is the next step.
So, to open the mouth, perform the following steps:
- Add an Empty object to the center of the scene (Shift + A | Empty | Plain Axes).
- Go to the Side view (press the 3 key on the numpad). Move the Empty to the position where the mandible should join the skull (to be precise, I placed it at this location: X = 0.0000, Y = -0.3206, and Z = 2.2644; go to the Properties 3D view sidepanel, and under the Transform subpanel, enter the values in the first three slots under the Location item).
- To ensure that the Empty cannot be moved anymore, click on the lock icon on the right-hand side of its slot in the Outliner and also rename it to
Empty_rot_mand:
The Empty_rot_mand in place
- With the Empty still selected, press Shift + S | Cursor to Selected.
- Add a Lattice object to the scene (Shift + A | Lattice), and in the Object Data window, set Interpolation Type for U, V, and W to Linear; select the Gidiosaurus object and go to the Objects Modifier window; assign a Lattice modifier. Move it before the Subdivision Surface modifier.
- In the Object field, select the Lattice item; in the Vertex Group field, select the mand item.
- In the Side view, select the Lattice object, go into Edit Mode, and select all the vertices and rotate them 35 degrees counterclockwise around the x axis:

Rotating the Lattice to open the mouth
As you can see, the Lattice only affects the vertices inside the mand vertex group; however, there is a clear indentation on the throat where the mand vertex group ends abruptly, so now we must blur this boundary to keep the smooth curved transition from the bottom jaw to the neck, and remove the abrupt edge.
- Go back into the Weight Paint mode (Ctrl + Tab) and click on the Brush icon at the top of the Tools tab to switch the Draw brush with the Blur brush, and then start to blur the boundaries of the mand vertex group.
- Sometimes, blurring the edge weights is not enough, so go back to the Draw brush, set the Strength to 0.500 (or whatever value you find works best), and paint on the vertices; then refine the transition again with the Blur brush:

Blurring and painting the weights
- To make the job easier and faster, you can temporarily disable the Lattice modifier, as well as the Subdivision Surface modifier.
- When you are done, go out of the Weight Paint mode, apply the Lattice modifier, and delete the Lattice object.
- Make sure to keep the Empty_rot_mand, which that will turn out to be useful when rigging the character. For now, just hide or move it onto a different layer.
At this point, we can obviously edit the throat area vertices as usual: relaxing and tweaking them and so on. Actually, this is the right moment to tweak all the vertices and any areas that couldn't be done before, such as the inside of the mouth, the inner cheeks, and so forth, because now we are going to do the last preparation task before the unwrapping.
To mark seams for the unwrapping of the body, we have to perform the following steps. Because our low resolution mesh is actually still only one half side, we don't need to place seams as median cuts, we only need to divide different areas (for example, the inside of the mouth from the outside of the mouth) and unroll cylindrical parts such as the arms, fingers, and teeth:
- Go into Edit Mode and zoom in to the character's head; press Ctrl + Tab to call the Mesh Select Mode pop-up menu and select the Edge item, and then start to select the edge-loop inside the mouth (Alt + right-click to select an edge-loop); start from the bottom jaw, switching direction at the end of the mouth rim to go upward, and finish on the inside of the upper jaw:

The selected edge-loops inside the mouth
- Press Ctrl + E to open the Edges pop-up menu and select the Mark Seam item. Alternatively, click on the Shading / UVs tab in the Tool Shelf, to the left-hand side of the screen, and in the UVs subpanel, click on the Mark Seam button under the UV Mapping item:

Marking the seams
- Repeat the procedure for the arm; try to place the seams in the less visible areas:

The seams on the arm
- Do the same for the pelvis and leg; divide them into two parts with the seams and also try to place the seams inside the natural body folds, if possible:

The seams on the pelvis/leg parts
- It is important to try to place the seams to divide parts that would get unwrapped badly if treated as a single object; for example, the inner nostril and tongue from the inner mouth:

The seams inside the head
- The final seams to add are for the teeth and talons, which would otherwise get badly unwrapped as squares:

The seams of the small parts
- Save the file.
Getting ready
To be more precise, before the unwrapping, we must perform the following tasks in the right order:
- Join the teeth and talons to the body.
- Create the vertex group for the mandible.
- Open the mouth.
- Mark the seams to unwrap the body.
So, open the Gidiosaurus_retopology.blend file and deactivate the layer with the armor to hide it; select the
Gidiosaurus object and save the file as Gidiosaurus_unwrap.blend.
How to do it…
The simplest of the four tasks just so happens to be the first, joining the body with the teeth and talons.
To join the body parts, follow these steps:
- Select the Talons item in the Outliner, and then hold Shift and select the Fangs_bottom, Fangs_upper, and Gidiosaurus_lowres items.
- Press Ctrl + J to join them.
- Right away we will notice that, because the retopologized mesh didn't have any material assigned, the whole object gets the only material available, which is the
Enamelmaterial we had assigned to the talons and teeth earlier. - To fix this, assign a new material, or you can also assign the already existing
Bodymaterial, to the retopologized mesh before the joining operation. - Alternatively, after the joining, click on the + icon to the side of the material names, and then select the New button in the Material window to create a new material. Now, enter Edit Mode, put the mouse pointer on the Gidiosaurus mesh, and press the L key to select all the connected vertices. Because the talons and teeth vertices are joined, but not connected to the face vertices, they don't get selected; for the same reason, you have to repeat the operation three times to select the head, arm, hips, and leg vertices:

The head, arm and hip/leg vertices selected in Edit Mode
- Click on the Assign button and go out of the Edit Mode. Now, edit the name and color of the new material or whatever, or else switch it with the
Bodyone.The second task is a bit more complex and is covered in more detail in Chapter 7, Skinning the Low Resolution Mesh, which is about the skinning process. However, we need to explore this subject a little bit now, as it will help us operate on a small portion of the mesh easily.
To create a vertex group to open the mouth, follow these steps:
- Go to the Side view and zoom in on the head of the character.
- Go to the Object Data window; under the Vertex Groups subpanel, add a new group and rename it
mand(short for mandible). - Press Ctrl + Tab to go into Weight Paint mode (or left-click on the mode button on the 3D window toolbar to switch from Edit Mode to Weight Paint mode); press Z to go into Wireframe viewport shading mode so that you can see the edges of the topology.
- By using a combination of vertex selection mode, both in Edit Mode and by painting with Weight and Strength as 1.000 in the Weight Paint mode, assign vertices to the group of the mandible area and the part of the neck; obviously, you have to include the vertices of the inner bottom jaw, as well as the tongue and bottom teeth:

The visualization of the mand vertex group
- Press Ctrl + Tab to exit the Weight Paint mode.
Note that a vertex group can be edited at a later time, so it will be easier to set the exact amount of weight on the vertices by looking at the Lattice modifier feedback, which is the next step.
So, to open the mouth, perform the following steps:
- Add an Empty object to the center of the scene (Shift + A | Empty | Plain Axes).
- Go to the Side view (press the 3 key on the numpad). Move the Empty to the position where the mandible should join the skull (to be precise, I placed it at this location: X = 0.0000, Y = -0.3206, and Z = 2.2644; go to the Properties 3D view sidepanel, and under the Transform subpanel, enter the values in the first three slots under the Location item).
- To ensure that the Empty cannot be moved anymore, click on the lock icon on the right-hand side of its slot in the Outliner and also rename it to
Empty_rot_mand:
The Empty_rot_mand in place
- With the Empty still selected, press Shift + S | Cursor to Selected.
- Add a Lattice object to the scene (Shift + A | Lattice), and in the Object Data window, set Interpolation Type for U, V, and W to Linear; select the Gidiosaurus object and go to the Objects Modifier window; assign a Lattice modifier. Move it before the Subdivision Surface modifier.
- In the Object field, select the Lattice item; in the Vertex Group field, select the mand item.
- In the Side view, select the Lattice object, go into Edit Mode, and select all the vertices and rotate them 35 degrees counterclockwise around the x axis:

Rotating the Lattice to open the mouth
As you can see, the Lattice only affects the vertices inside the mand vertex group; however, there is a clear indentation on the throat where the mand vertex group ends abruptly, so now we must blur this boundary to keep the smooth curved transition from the bottom jaw to the neck, and remove the abrupt edge.
- Go back into the Weight Paint mode (Ctrl + Tab) and click on the Brush icon at the top of the Tools tab to switch the Draw brush with the Blur brush, and then start to blur the boundaries of the mand vertex group.
- Sometimes, blurring the edge weights is not enough, so go back to the Draw brush, set the Strength to 0.500 (or whatever value you find works best), and paint on the vertices; then refine the transition again with the Blur brush:

Blurring and painting the weights
- To make the job easier and faster, you can temporarily disable the Lattice modifier, as well as the Subdivision Surface modifier.
- When you are done, go out of the Weight Paint mode, apply the Lattice modifier, and delete the Lattice object.
- Make sure to keep the Empty_rot_mand, which that will turn out to be useful when rigging the character. For now, just hide or move it onto a different layer.
At this point, we can obviously edit the throat area vertices as usual: relaxing and tweaking them and so on. Actually, this is the right moment to tweak all the vertices and any areas that couldn't be done before, such as the inside of the mouth, the inner cheeks, and so forth, because now we are going to do the last preparation task before the unwrapping.
To mark seams for the unwrapping of the body, we have to perform the following steps. Because our low resolution mesh is actually still only one half side, we don't need to place seams as median cuts, we only need to divide different areas (for example, the inside of the mouth from the outside of the mouth) and unroll cylindrical parts such as the arms, fingers, and teeth:
- Go into Edit Mode and zoom in to the character's head; press Ctrl + Tab to call the Mesh Select Mode pop-up menu and select the Edge item, and then start to select the edge-loop inside the mouth (Alt + right-click to select an edge-loop); start from the bottom jaw, switching direction at the end of the mouth rim to go upward, and finish on the inside of the upper jaw:

The selected edge-loops inside the mouth
- Press Ctrl + E to open the Edges pop-up menu and select the Mark Seam item. Alternatively, click on the Shading / UVs tab in the Tool Shelf, to the left-hand side of the screen, and in the UVs subpanel, click on the Mark Seam button under the UV Mapping item:

Marking the seams
- Repeat the procedure for the arm; try to place the seams in the less visible areas:

The seams on the arm
- Do the same for the pelvis and leg; divide them into two parts with the seams and also try to place the seams inside the natural body folds, if possible:

The seams on the pelvis/leg parts
- It is important to try to place the seams to divide parts that would get unwrapped badly if treated as a single object; for example, the inner nostril and tongue from the inner mouth:

The seams inside the head
- The final seams to add are for the teeth and talons, which would otherwise get badly unwrapped as squares:

The seams of the small parts
- Save the file.
How to do it…
The simplest of the four tasks just so happens to be the first, joining the body with the teeth and talons.
To join the body parts, follow these steps:
- Select the Talons item in the Outliner, and then hold Shift and select the Fangs_bottom, Fangs_upper, and Gidiosaurus_lowres items.
- Press Ctrl + J to join them.
- Right away we will notice that, because the retopologized mesh didn't have any material assigned, the whole object gets the only material available, which is the
Enamelmaterial we had assigned to the talons and teeth earlier. - To fix this, assign a new material, or you can also assign the already existing
Bodymaterial, to the retopologized mesh before the joining operation. - Alternatively, after the joining, click on the + icon to the side of the material names, and then select the New button in the Material window to create a new material. Now, enter Edit Mode, put the mouse pointer on the Gidiosaurus mesh, and press the L key to select all the connected vertices. Because the talons and teeth vertices are joined, but not connected to the face vertices, they don't get selected; for the same reason, you have to repeat the operation three times to select the head, arm, hips, and leg vertices:

The head, arm and hip/leg vertices selected in Edit Mode
- Click on the Assign button and go out of the Edit Mode. Now, edit the name and color of the new material or whatever, or else switch it with the
Bodyone.The second task is a bit more complex and is covered in more detail in Chapter 7, Skinning the Low Resolution Mesh, which is about the skinning process. However, we need to explore this subject a little bit now, as it will help us operate on a small portion of the mesh easily.
To create a vertex group to open the mouth, follow these steps:
- Go to the Side view and zoom in on the head of the character.
- Go to the Object Data window; under the Vertex Groups subpanel, add a new group and rename it
mand(short for mandible). - Press Ctrl + Tab to go into Weight Paint mode (or left-click on the mode button on the 3D window toolbar to switch from Edit Mode to Weight Paint mode); press Z to go into Wireframe viewport shading mode so that you can see the edges of the topology.
- By using a combination of vertex selection mode, both in Edit Mode and by painting with Weight and Strength as 1.000 in the Weight Paint mode, assign vertices to the group of the mandible area and the part of the neck; obviously, you have to include the vertices of the inner bottom jaw, as well as the tongue and bottom teeth:

The visualization of the mand vertex group
- Press Ctrl + Tab to exit the Weight Paint mode.
Note that a vertex group can be edited at a later time, so it will be easier to set the exact amount of weight on the vertices by looking at the Lattice modifier feedback, which is the next step.
So, to open the mouth, perform the following steps:
- Add an Empty object to the center of the scene (Shift + A | Empty | Plain Axes).
- Go to the Side view (press the 3 key on the numpad). Move the Empty to the position where the mandible should join the skull (to be precise, I placed it at this location: X = 0.0000, Y = -0.3206, and Z = 2.2644; go to the Properties 3D view sidepanel, and under the Transform subpanel, enter the values in the first three slots under the Location item).
- To ensure that the Empty cannot be moved anymore, click on the lock icon on the right-hand side of its slot in the Outliner and also rename it to
Empty_rot_mand:
The Empty_rot_mand in place
- With the Empty still selected, press Shift + S | Cursor to Selected.
- Add a Lattice object to the scene (Shift + A | Lattice), and in the Object Data window, set Interpolation Type for U, V, and W to Linear; select the Gidiosaurus object and go to the Objects Modifier window; assign a Lattice modifier. Move it before the Subdivision Surface modifier.
- In the Object field, select the Lattice item; in the Vertex Group field, select the mand item.
- In the Side view, select the Lattice object, go into Edit Mode, and select all the vertices and rotate them 35 degrees counterclockwise around the x axis:

Rotating the Lattice to open the mouth
As you can see, the Lattice only affects the vertices inside the mand vertex group; however, there is a clear indentation on the throat where the mand vertex group ends abruptly, so now we must blur this boundary to keep the smooth curved transition from the bottom jaw to the neck, and remove the abrupt edge.
- Go back into the Weight Paint mode (Ctrl + Tab) and click on the Brush icon at the top of the Tools tab to switch the Draw brush with the Blur brush, and then start to blur the boundaries of the mand vertex group.
- Sometimes, blurring the edge weights is not enough, so go back to the Draw brush, set the Strength to 0.500 (or whatever value you find works best), and paint on the vertices; then refine the transition again with the Blur brush:

Blurring and painting the weights
- To make the job easier and faster, you can temporarily disable the Lattice modifier, as well as the Subdivision Surface modifier.
- When you are done, go out of the Weight Paint mode, apply the Lattice modifier, and delete the Lattice object.
- Make sure to keep the Empty_rot_mand, which that will turn out to be useful when rigging the character. For now, just hide or move it onto a different layer.
At this point, we can obviously edit the throat area vertices as usual: relaxing and tweaking them and so on. Actually, this is the right moment to tweak all the vertices and any areas that couldn't be done before, such as the inside of the mouth, the inner cheeks, and so forth, because now we are going to do the last preparation task before the unwrapping.
To mark seams for the unwrapping of the body, we have to perform the following steps. Because our low resolution mesh is actually still only one half side, we don't need to place seams as median cuts, we only need to divide different areas (for example, the inside of the mouth from the outside of the mouth) and unroll cylindrical parts such as the arms, fingers, and teeth:
- Go into Edit Mode and zoom in to the character's head; press Ctrl + Tab to call the Mesh Select Mode pop-up menu and select the Edge item, and then start to select the edge-loop inside the mouth (Alt + right-click to select an edge-loop); start from the bottom jaw, switching direction at the end of the mouth rim to go upward, and finish on the inside of the upper jaw:

The selected edge-loops inside the mouth
- Press Ctrl + E to open the Edges pop-up menu and select the Mark Seam item. Alternatively, click on the Shading / UVs tab in the Tool Shelf, to the left-hand side of the screen, and in the UVs subpanel, click on the Mark Seam button under the UV Mapping item:

Marking the seams
- Repeat the procedure for the arm; try to place the seams in the less visible areas:

The seams on the arm
- Do the same for the pelvis and leg; divide them into two parts with the seams and also try to place the seams inside the natural body folds, if possible:

The seams on the pelvis/leg parts
- It is important to try to place the seams to divide parts that would get unwrapped badly if treated as a single object; for example, the inner nostril and tongue from the inner mouth:

The seams inside the head
- The final seams to add are for the teeth and talons, which would otherwise get badly unwrapped as squares:

The seams of the small parts
- Save the file.
UV unwrapping the mesh
At this point, everything is ready for the unwrapping.
Getting ready
Put the mouse pointer on the bottom or on the top horizontal borders of the 3D window. As the mouse pointer changes to a double-arrow icon, right-click and in the Area Options pop-up menu select the Split Area item; then, left-click to obtain two windows and switch the left one to UV/Image Editor.

The two windows
How to do it…
To unwrap the mesh in Blender, several options are available; however, the one we are going to use now is the basic unwrap, the result of which we will edit and refine later:
- Ensure that the UV/Image Editor window is not set to Render Result, otherwise it won't display the UV islands.
- Select the Gidiosaurus_lowres object and enter Edit Mode. Select all the vertices (A key) and press the U key; in the UV Mapping pop-up menu, select the first item, Unwrap:

Unwrapping the mesh
After a while, the UV layer of the unwrapped mesh appears in the UV/Image Editor window; as you can see, several things can be improved. Moreover, we are still using only half of a mesh.
- Go out of the Edit Mode and go to the Object Modifiers window; apply the Mirror modifier.
- Go back into Edit Mode and press 1 on the numpad to go to the Front view; press Ctrl + R and place a median seam through the head part of the mesh, as well as through the pelvis part:

A new loop cut
- Press Ctrl + Tab to switch to vertex selection and press Z to go into the Wireframe viewport shading mode, and then box-select the vertices on the left-hand side of the mesh (which is the side created by the Mirror modifier).
- Go to the UV/Image Editor window; if not already selected, press A to select all the UV islands of the UV layer, and then press Ctrl + M | X | Enter to mirror these selected islands.
- Press G to move them (temporarily) outside the default U0/V0 tile space, as shown in the following screenshot:

The selected half body vertices and the corresponding UV islands outside the U0/V0 tile space
- Go to the 3D view and press A twice to select all the vertices; go to the UV/Image Editor window and press Ctrl + A to average the size of all the islands reciprocally.
- Select all the islands and press Ctrl + P to automatically pack all of them inside the UV tile.
- If you are not satisfied with the result of the Pack islands tool, adjust the position (G key), rotation (R key), and scale (S key) of the islands; group together the similar ones (for example, the teeth, talons, arms, and so on), but try to place them to fill the image tile space as much as possible. To select one island, just put the mouse over it and press L, and Shift + L to multiselect. Use the X and Y keys to constrain the movements of the islands on the corresponding axis:

Adjusting the UV islands' position
- When you are done, ensure that all the vertices of all the islands in the UV/Image Editor window are selected, and click on the New button on the toolbar of the UV/Image Editor window; in the New Image pop-up panel, set Width and Height to 3072 pixels, and Generated Type should be set to UV Grid. Then, click on the OK button to confirm.
- Go to the 3D window and press Z to go in the Solid viewport shading mode. Then, go to the Properties 3D view sidepanel and under the Shading subpanel, check the Textured Solid item.
- Go out of the Edit Mode and save the file:

Assigning a grid image to the unwrapped UV islands
This should be enough; even if the halves of the mesh are disconnected, Blender can perfectly solve the mesh painting without visible seams.
However, if we look at the character shown in the Textured Solid mode in the 3D view, it's clear that the unwrap of some part of the mesh could be better; for example, you can see a difference in the size of the mapped grid in the head/neck area, inside the mouth, and on the arms and legs (look at the arrows in the following images):
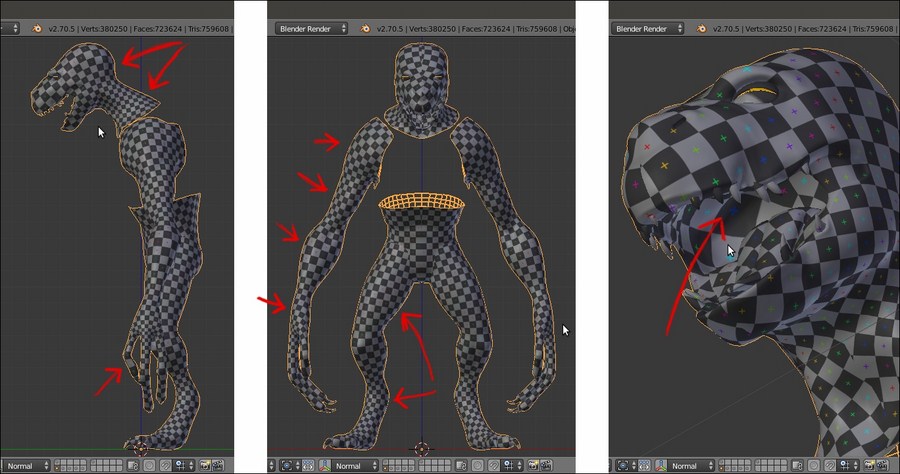
Differences in the mapped grid image
Although this is not a very big issue, the unwrap can be refined further to avoid distortions as much as possible, as well as potential future problems when we'll paint the character textures; we are going to see this in the next recipe.
Getting ready
Put the mouse pointer on the bottom or on the top horizontal borders of the 3D window. As the mouse pointer changes to a double-arrow icon, right-click and in the Area Options pop-up menu select the Split Area item; then, left-click to obtain two windows and switch the left one to UV/Image Editor.

The two windows
How to do it…
To unwrap the mesh in Blender, several options are available; however, the one we are going to use now is the basic unwrap, the result of which we will edit and refine later:
- Ensure that the UV/Image Editor window is not set to Render Result, otherwise it won't display the UV islands.
- Select the Gidiosaurus_lowres object and enter Edit Mode. Select all the vertices (A key) and press the U key; in the UV Mapping pop-up menu, select the first item, Unwrap:

Unwrapping the mesh
After a while, the UV layer of the unwrapped mesh appears in the UV/Image Editor window; as you can see, several things can be improved. Moreover, we are still using only half of a mesh.
- Go out of the Edit Mode and go to the Object Modifiers window; apply the Mirror modifier.
- Go back into Edit Mode and press 1 on the numpad to go to the Front view; press Ctrl + R and place a median seam through the head part of the mesh, as well as through the pelvis part:

A new loop cut
- Press Ctrl + Tab to switch to vertex selection and press Z to go into the Wireframe viewport shading mode, and then box-select the vertices on the left-hand side of the mesh (which is the side created by the Mirror modifier).
- Go to the UV/Image Editor window; if not already selected, press A to select all the UV islands of the UV layer, and then press Ctrl + M | X | Enter to mirror these selected islands.
- Press G to move them (temporarily) outside the default U0/V0 tile space, as shown in the following screenshot:

The selected half body vertices and the corresponding UV islands outside the U0/V0 tile space
- Go to the 3D view and press A twice to select all the vertices; go to the UV/Image Editor window and press Ctrl + A to average the size of all the islands reciprocally.
- Select all the islands and press Ctrl + P to automatically pack all of them inside the UV tile.
- If you are not satisfied with the result of the Pack islands tool, adjust the position (G key), rotation (R key), and scale (S key) of the islands; group together the similar ones (for example, the teeth, talons, arms, and so on), but try to place them to fill the image tile space as much as possible. To select one island, just put the mouse over it and press L, and Shift + L to multiselect. Use the X and Y keys to constrain the movements of the islands on the corresponding axis:

Adjusting the UV islands' position
- When you are done, ensure that all the vertices of all the islands in the UV/Image Editor window are selected, and click on the New button on the toolbar of the UV/Image Editor window; in the New Image pop-up panel, set Width and Height to 3072 pixels, and Generated Type should be set to UV Grid. Then, click on the OK button to confirm.
- Go to the 3D window and press Z to go in the Solid viewport shading mode. Then, go to the Properties 3D view sidepanel and under the Shading subpanel, check the Textured Solid item.
- Go out of the Edit Mode and save the file:

Assigning a grid image to the unwrapped UV islands
This should be enough; even if the halves of the mesh are disconnected, Blender can perfectly solve the mesh painting without visible seams.
However, if we look at the character shown in the Textured Solid mode in the 3D view, it's clear that the unwrap of some part of the mesh could be better; for example, you can see a difference in the size of the mapped grid in the head/neck area, inside the mouth, and on the arms and legs (look at the arrows in the following images):

Differences in the mapped grid image
Although this is not a very big issue, the unwrap can be refined further to avoid distortions as much as possible, as well as potential future problems when we'll paint the character textures; we are going to see this in the next recipe.
How to do it…
To unwrap the mesh in Blender, several options are available; however, the one we are going to use now is the basic unwrap, the result of which we will edit and refine later:
- Ensure that the UV/Image Editor window is not set to Render Result, otherwise it won't display the UV islands.
- Select the Gidiosaurus_lowres object and enter Edit Mode. Select all the vertices (A key) and press the U key; in the UV Mapping pop-up menu, select the first item, Unwrap:

Unwrapping the mesh
After a while, the UV layer of the unwrapped mesh appears in the UV/Image Editor window; as you can see, several things can be improved. Moreover, we are still using only half of a mesh.
- Go out of the Edit Mode and go to the Object Modifiers window; apply the Mirror modifier.
- Go back into Edit Mode and press 1 on the numpad to go to the Front view; press Ctrl + R and place a median seam through the head part of the mesh, as well as through the pelvis part:

A new loop cut
- Press Ctrl + Tab to switch to vertex selection and press Z to go into the Wireframe viewport shading mode, and then box-select the vertices on the left-hand side of the mesh (which is the side created by the Mirror modifier).
- Go to the UV/Image Editor window; if not already selected, press A to select all the UV islands of the UV layer, and then press Ctrl + M | X | Enter to mirror these selected islands.
- Press G to move them (temporarily) outside the default U0/V0 tile space, as shown in the following screenshot:

The selected half body vertices and the corresponding UV islands outside the U0/V0 tile space
- Go to the 3D view and press A twice to select all the vertices; go to the UV/Image Editor window and press Ctrl + A to average the size of all the islands reciprocally.
- Select all the islands and press Ctrl + P to automatically pack all of them inside the UV tile.
- If you are not satisfied with the result of the Pack islands tool, adjust the position (G key), rotation (R key), and scale (S key) of the islands; group together the similar ones (for example, the teeth, talons, arms, and so on), but try to place them to fill the image tile space as much as possible. To select one island, just put the mouse over it and press L, and Shift + L to multiselect. Use the X and Y keys to constrain the movements of the islands on the corresponding axis:

Adjusting the UV islands' position
- When you are done, ensure that all the vertices of all the islands in the UV/Image Editor window are selected, and click on the New button on the toolbar of the UV/Image Editor window; in the New Image pop-up panel, set Width and Height to 3072 pixels, and Generated Type should be set to UV Grid. Then, click on the OK button to confirm.
- Go to the 3D window and press Z to go in the Solid viewport shading mode. Then, go to the Properties 3D view sidepanel and under the Shading subpanel, check the Textured Solid item.
- Go out of the Edit Mode and save the file:

Assigning a grid image to the unwrapped UV islands
This should be enough; even if the halves of the mesh are disconnected, Blender can perfectly solve the mesh painting without visible seams.
However, if we look at the character shown in the Textured Solid mode in the 3D view, it's clear that the unwrap of some part of the mesh could be better; for example, you can see a difference in the size of the mapped grid in the head/neck area, inside the mouth, and on the arms and legs (look at the arrows in the following images):

Differences in the mapped grid image
Although this is not a very big issue, the unwrap can be refined further to avoid distortions as much as possible, as well as potential future problems when we'll paint the character textures; we are going to see this in the next recipe.
Editing the UV islands
We are now going to join the two UV islands' halves together, in order to improve the final look of the texturing; we are also going to modify, if possible, a little of the island proportions in order to obtain a more regular flow of the UV vertices, and fix the distortions we have seen in the last image of the previous recipe.
We are going to the use the pin tool, which is normally used in conjunction with the Live Unwrap tool.
Getting ready
First, we'll try to recalculate the unwrap of some of the islands by modifying the seams of the mesh.
Before we start though, let's see if we can improve some of the visibility of the UV islands in the UV/Image Editor:
- Put the mouse cursor in the UV/Image Editor window and press the N key.
- In the Properties sidepanel that appears by pressing the N key on the right-hand side of the window, go to the Display subpanel and click on the Black or White button (depending on your preference) under the UV item. Check also the Smooth item box.
- Also, check the Stretch item, which even though it was made for a different purpose, can increase the visibility of the islands a lot.
- Press N again to get rid of the Properties sidepanel.
All these options enabled should make the islands more easily readable in the UV/Image Editor window:
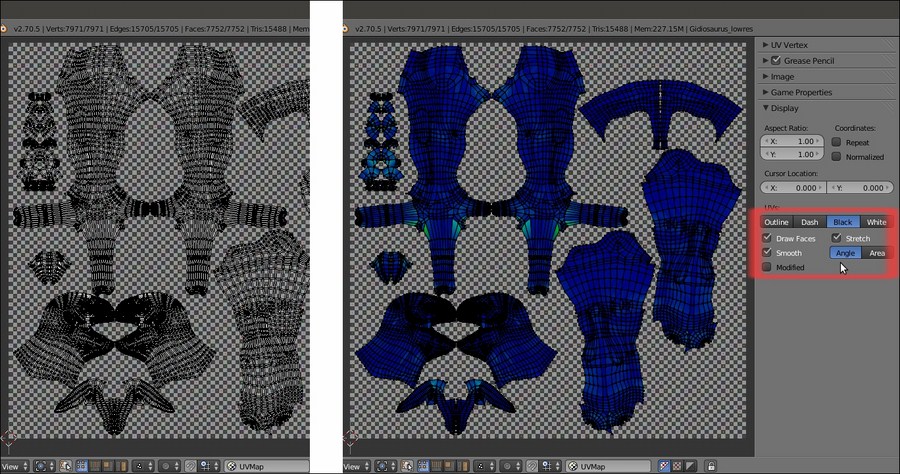
The UV islands made more easily readable by the enabled items
How to do it…
Now we can start with the editing; initially, we are going to freeze the islands that we don't want to modify because their unwrap is either satisfactory, or we will deal with it later. So, perform the following steps:
- Press A to select all the islands, then by putting the mouse pointer on the two pelvis island halves and pressing Shift + L, multi-deselect them; press the P key to pin the remaining selected UV islands and then A to deselect everything:

To the right-hand side, the pinned UV islands
- Zoom in on the islands of the pelvis, select both the left and right outer edge-loops, as shown in the following left image, and press P to pin them.
- Go to the 3D view and clear only the front part of the median seam on the pelvis. To do this, start to clear the seam from the front edges, go down and stop where it crosses the horizontal seam that passes the bottom part of the groin and legs, and leave the back part of the vertical median seam still marked:

Pinning the extreme vertices in the UV/Image Editor, and editing the seam on the mesh
- Go into Face selection mode and select all the faces of the pelvis; put the mouse pointer in the 3D view and press U | Unwrap (alternatively, go into the UV/Image Editor and press E):

Unwrapping again with the pinning and a different seam
The island will keep the previous position because of the pinned edges, and is now unwrapped as one single piece (with the obvious exception of the seam on the back).
- We won't modify the pelvis island any further, so select all its vertices and press P to pin all of them and then deselect them.
- Press A in the 3D view to select all the faces of the mesh and make all the islands visible in the UV/Image Editor. Note that they are all pinned at the moment, so just select the vertices you want to unpin (Alt + P) in the islands of the tongue and inner mouth. Then, clear the median seam in the corresponding pieces on the mesh, and press E again:

Re-unwrapping the tongue and inner mouth areas
- Select the UV vertices of the resulting islands and unpin them all; next, pin just one vertex at the top of the islands and one at the bottom, and unwrap again. This will result in a more organically distributed unwrap of the parts:

Re-unwrapping again with a different pinning
- Select all the faces of the mesh, and then all the islands in the UV/Image Editor window. Press Ctrl + A to average their relative size and adjust their position in the default tile space:

The rearranged UV islands
Now, let's work on the head piece that, as in every character, should be the most important and well-finished piece.
At the moment, the face is made using two separate islands; although this won't be visible in the final textured rendering of our character, it's always better, if possible, to join them in order to have a single piece, especially in the front mesh faces. Due to the elongated snout of the character, if we were to unwrap the head as a single piece simply without the median seam, we wouldn't get a nice evenly mapped result, so we must divide the whole head into more pieces.
Actually, we can take advantage of the fact that the Gidiosaurus is wearing a helmet and that most of the head will be covered by it; this allows us to easily split the face from the rest of the mesh, hiding the seams under the helmet.
- Go into Edge selection mode and mark the seams, dividing the face from the cranium and neck as shown in the following screenshots. Select the crossing edge-loops, and then clear the unnecessary parts:

New seams for the character's head part 1
- Also clear the median seam in the upper face part, and under the seam on the bottom jaw, leaving it only on the front mandible and on the back of the cranium and neck:

New seams for the character's head part 2
- Go in the Face selection mode and select only the face section of the mesh, and then press E to unwrap. The new unwrap comes upside down, so select all the UV vertices and rotate the island by 180 degrees:

The character's face unwrapped
- Select the cranium/neck section on the mesh and repeat the process:

The rest of the head mesh unwrapped as a whole piece
- Now, select all the faces of the mesh and all the islands in the UV/Image Editor, and press Ctrl + A to average their reciprocal size.
- Once again, adjust the position of the islands inside the UV tile (Ctrl + P to automatically pack them inside the available space, and then tweak their position, rotation, and scale):

The character's UV islands packed inside the default U0/V0 tile space
How it works…
Starting from the UV unwrap in the previous recipe, we improved some of the islands by joining together the halves representing common mesh parts. When doing this, we tried to retain the already good parts of the unwrap by pinning the UV vertices that we didn't want to modify; this way, the new unwrap process was forced to calculate the position of the unpinned vertices using the constraints of the pinned ones (pelvis, tongue, and inner mouth). In other cases, we totally cleared the old seams on the model and marked new ones, in order to have a completely new unwrap of the mesh part (the head), we also used the character furniture (such as the armor) to hide the seams (which in any case, won't be visible at all).
There's more…
At this point, looking at the UV/Image Editor window containing the islands, it's evident that if we want to keep several parts in proportion to each other, some of the islands are a little too small to give a good amount of detail when texturing; for example, the Gidiosaurus's face.
A technique for a good unwrap that is the current standard in the industry is UDIM UV Mapping, which means U-Dimension; basically, after the usual unwrap, the islands are scaled bigger and placed outside the default U0/V0 tile space.
Look at the following screenshots, showing the Blender UV/Image Editor window:
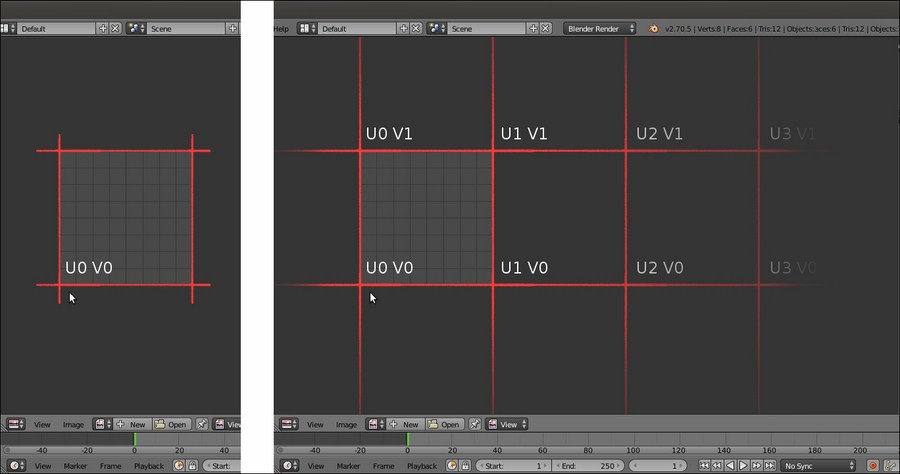
The default U0/V0 tile space and the possible consecutive other tile spaces
On the left-hand side, you can see, highlighted with red lines, the single UV tile that at present is the standard for Blender, which is identified by the UV coordinates 0 and 0: that is, U (horizontal) = 0 and V (vertical) = 0.
Although not visible in the UV/Image Editor window, all the other possible consecutive tiles can be identified by the corresponding UV coordinates, as shown on the right-hand side of the preceding screenshot (again, highlighted with red lines). So, adjacent to the tile U0/V0, we can have the row with the tiles U1/V0, U2/V0, and so on, but we can also go upwards: U0/V1, U1/V1, U2/V1, and so on.
To help you identify the tiles, Blender will show you the amount of pixels and also the number of tiles you are moving the islands in the toolbar of the UV/Image Editor window. In the following screenshot, the arm islands have been moved horizontally (on the negative x axis) by -3072.000 pixels; this is correct because that's exactly the X size of the grid image we loaded in the previous recipes. In fact, in the toolbar of the UV/Image Editor window, while moving the islands we can read D: -3072.000 (pixels) and (inside brackets) 1.0000 (tile) along X; effectively, 3072 pixels = 1 tile.
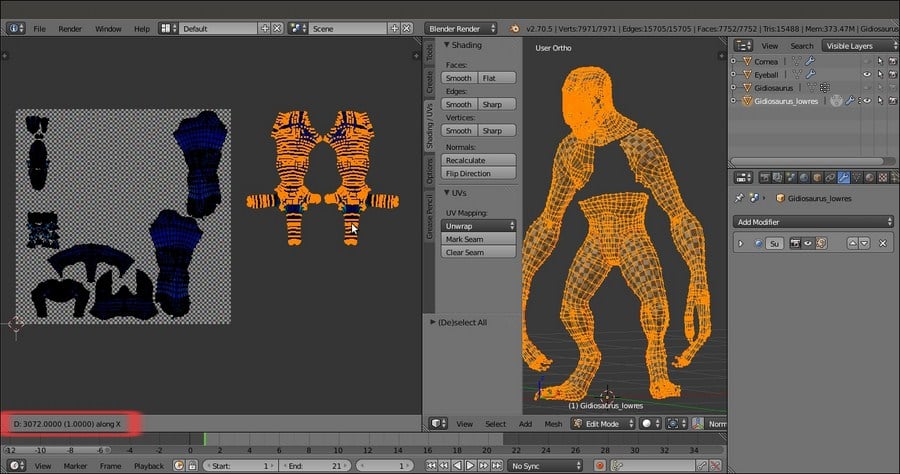
Moving the arm islands to the U1/V0 tile space
When moving UV islands from tile to tile, remember to check that the Constrain to Image Bounds item in the UVs menu on the toolbar of the UV/Image Editor window is disabled; also, enabling the Normalized item inside the Display subpanel under the N key Properties sidepanel of the same editor window will display the UV coordinates from 0.0 to 1.0, rather than in pixels. More, pressing the Ctrl key while moving the islands will constrain the movement to intervals, making it easy to translate them to exactly 1 tile space.
Because at the moment Blender doesn't support the UDIM UV Mapping standard, simply moving an island outside the default U0/V0 tile, for example to U1/V0, will repeat the image you loaded in the U0/V0 tile and on the faces associated with the moved islands. To solve this, it's necessary, after moving the islands, to assign a different material, if necessary with its own different image textures, to each group of vertices/faces associated with each tile space. So, if you shared your islands over 4 tiles, you need to assign 4 different materials to your object, and each material must load the proper image texture.
The goal of this process is obviously to obtain bigger islands mapped with bigger texture images, by selecting all the islands, scaling them bigger together using the largest ones as a guide, and then tweaking their position and distribution.
One last thing: it is also better to unwrap the corneas and eyes (which are separate objects from the Gidiosaurus body mesh) and add their islands to the tiles where you put the face, mouth, teeth, and so on (use the Draw Other Objects tool in the View menu of the UV/Image Editor window to also show the UV islands of the other nonjoined unwrapped objects):
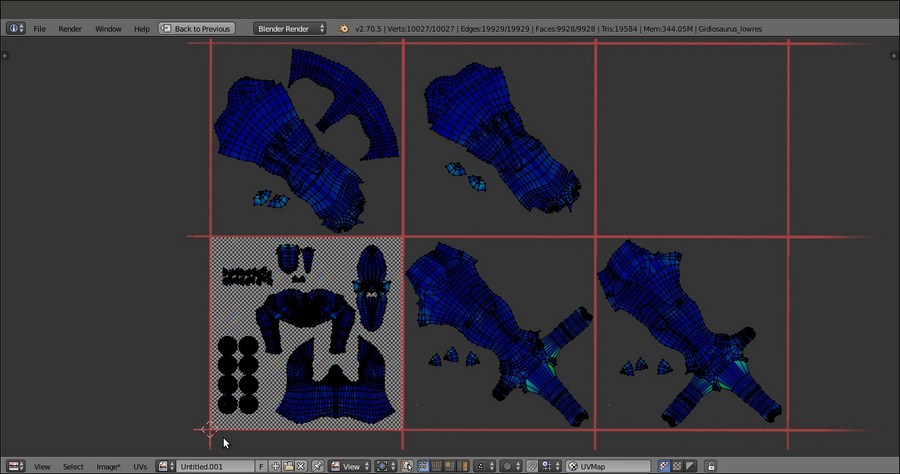
UV islands unwrapped, following the UDIM UV Mapping standard
In our case, we assigned the Gidiosaurus body islands to 5 different tiles, U0/V0, U1/V0, U2/V0, U0/V1, and U1/V1, so we'll have to assign 5 different materials. However, we will cover this in a later recipe.
Note that for exposition purposes only, in the preceding screenshot, you can see the cornea and eye islands together with the Gidiosaurus body islands because I temporarily joined the objects; however, it's usually better to maintain the eyes and corneas as separate objects from the main body.
Getting ready
First, we'll try to recalculate the unwrap of some of the islands by modifying the seams of the mesh.
Before we start though, let's see if we can improve some of the visibility of the UV islands in the UV/Image Editor:
- Put the mouse cursor in the UV/Image Editor window and press the N key.
- In the Properties sidepanel that appears by pressing the N key on the right-hand side of the window, go to the Display subpanel and click on the Black or White button (depending on your preference) under the UV item. Check also the Smooth item box.
- Also, check the Stretch item, which even though it was made for a different purpose, can increase the visibility of the islands a lot.
- Press N again to get rid of the Properties sidepanel.
All these options enabled should make the islands more easily readable in the UV/Image Editor window:

The UV islands made more easily readable by the enabled items
How to do it…
Now we can start with the editing; initially, we are going to freeze the islands that we don't want to modify because their unwrap is either satisfactory, or we will deal with it later. So, perform the following steps:
- Press A to select all the islands, then by putting the mouse pointer on the two pelvis island halves and pressing Shift + L, multi-deselect them; press the P key to pin the remaining selected UV islands and then A to deselect everything:

To the right-hand side, the pinned UV islands
- Zoom in on the islands of the pelvis, select both the left and right outer edge-loops, as shown in the following left image, and press P to pin them.
- Go to the 3D view and clear only the front part of the median seam on the pelvis. To do this, start to clear the seam from the front edges, go down and stop where it crosses the horizontal seam that passes the bottom part of the groin and legs, and leave the back part of the vertical median seam still marked:

Pinning the extreme vertices in the UV/Image Editor, and editing the seam on the mesh
- Go into Face selection mode and select all the faces of the pelvis; put the mouse pointer in the 3D view and press U | Unwrap (alternatively, go into the UV/Image Editor and press E):

Unwrapping again with the pinning and a different seam
The island will keep the previous position because of the pinned edges, and is now unwrapped as one single piece (with the obvious exception of the seam on the back).
- We won't modify the pelvis island any further, so select all its vertices and press P to pin all of them and then deselect them.
- Press A in the 3D view to select all the faces of the mesh and make all the islands visible in the UV/Image Editor. Note that they are all pinned at the moment, so just select the vertices you want to unpin (Alt + P) in the islands of the tongue and inner mouth. Then, clear the median seam in the corresponding pieces on the mesh, and press E again:

Re-unwrapping the tongue and inner mouth areas
- Select the UV vertices of the resulting islands and unpin them all; next, pin just one vertex at the top of the islands and one at the bottom, and unwrap again. This will result in a more organically distributed unwrap of the parts:

Re-unwrapping again with a different pinning
- Select all the faces of the mesh, and then all the islands in the UV/Image Editor window. Press Ctrl + A to average their relative size and adjust their position in the default tile space:

The rearranged UV islands
Now, let's work on the head piece that, as in every character, should be the most important and well-finished piece.
At the moment, the face is made using two separate islands; although this won't be visible in the final textured rendering of our character, it's always better, if possible, to join them in order to have a single piece, especially in the front mesh faces. Due to the elongated snout of the character, if we were to unwrap the head as a single piece simply without the median seam, we wouldn't get a nice evenly mapped result, so we must divide the whole head into more pieces.
Actually, we can take advantage of the fact that the Gidiosaurus is wearing a helmet and that most of the head will be covered by it; this allows us to easily split the face from the rest of the mesh, hiding the seams under the helmet.
- Go into Edge selection mode and mark the seams, dividing the face from the cranium and neck as shown in the following screenshots. Select the crossing edge-loops, and then clear the unnecessary parts:

New seams for the character's head part 1
- Also clear the median seam in the upper face part, and under the seam on the bottom jaw, leaving it only on the front mandible and on the back of the cranium and neck:

New seams for the character's head part 2
- Go in the Face selection mode and select only the face section of the mesh, and then press E to unwrap. The new unwrap comes upside down, so select all the UV vertices and rotate the island by 180 degrees:

The character's face unwrapped
- Select the cranium/neck section on the mesh and repeat the process:

The rest of the head mesh unwrapped as a whole piece
- Now, select all the faces of the mesh and all the islands in the UV/Image Editor, and press Ctrl + A to average their reciprocal size.
- Once again, adjust the position of the islands inside the UV tile (Ctrl + P to automatically pack them inside the available space, and then tweak their position, rotation, and scale):

The character's UV islands packed inside the default U0/V0 tile space
How it works…
Starting from the UV unwrap in the previous recipe, we improved some of the islands by joining together the halves representing common mesh parts. When doing this, we tried to retain the already good parts of the unwrap by pinning the UV vertices that we didn't want to modify; this way, the new unwrap process was forced to calculate the position of the unpinned vertices using the constraints of the pinned ones (pelvis, tongue, and inner mouth). In other cases, we totally cleared the old seams on the model and marked new ones, in order to have a completely new unwrap of the mesh part (the head), we also used the character furniture (such as the armor) to hide the seams (which in any case, won't be visible at all).
There's more…
At this point, looking at the UV/Image Editor window containing the islands, it's evident that if we want to keep several parts in proportion to each other, some of the islands are a little too small to give a good amount of detail when texturing; for example, the Gidiosaurus's face.
A technique for a good unwrap that is the current standard in the industry is UDIM UV Mapping, which means U-Dimension; basically, after the usual unwrap, the islands are scaled bigger and placed outside the default U0/V0 tile space.
Look at the following screenshots, showing the Blender UV/Image Editor window:

The default U0/V0 tile space and the possible consecutive other tile spaces
On the left-hand side, you can see, highlighted with red lines, the single UV tile that at present is the standard for Blender, which is identified by the UV coordinates 0 and 0: that is, U (horizontal) = 0 and V (vertical) = 0.
Although not visible in the UV/Image Editor window, all the other possible consecutive tiles can be identified by the corresponding UV coordinates, as shown on the right-hand side of the preceding screenshot (again, highlighted with red lines). So, adjacent to the tile U0/V0, we can have the row with the tiles U1/V0, U2/V0, and so on, but we can also go upwards: U0/V1, U1/V1, U2/V1, and so on.
To help you identify the tiles, Blender will show you the amount of pixels and also the number of tiles you are moving the islands in the toolbar of the UV/Image Editor window. In the following screenshot, the arm islands have been moved horizontally (on the negative x axis) by -3072.000 pixels; this is correct because that's exactly the X size of the grid image we loaded in the previous recipes. In fact, in the toolbar of the UV/Image Editor window, while moving the islands we can read D: -3072.000 (pixels) and (inside brackets) 1.0000 (tile) along X; effectively, 3072 pixels = 1 tile.

Moving the arm islands to the U1/V0 tile space
When moving UV islands from tile to tile, remember to check that the Constrain to Image Bounds item in the UVs menu on the toolbar of the UV/Image Editor window is disabled; also, enabling the Normalized item inside the Display subpanel under the N key Properties sidepanel of the same editor window will display the UV coordinates from 0.0 to 1.0, rather than in pixels. More, pressing the Ctrl key while moving the islands will constrain the movement to intervals, making it easy to translate them to exactly 1 tile space.
Because at the moment Blender doesn't support the UDIM UV Mapping standard, simply moving an island outside the default U0/V0 tile, for example to U1/V0, will repeat the image you loaded in the U0/V0 tile and on the faces associated with the moved islands. To solve this, it's necessary, after moving the islands, to assign a different material, if necessary with its own different image textures, to each group of vertices/faces associated with each tile space. So, if you shared your islands over 4 tiles, you need to assign 4 different materials to your object, and each material must load the proper image texture.
The goal of this process is obviously to obtain bigger islands mapped with bigger texture images, by selecting all the islands, scaling them bigger together using the largest ones as a guide, and then tweaking their position and distribution.
One last thing: it is also better to unwrap the corneas and eyes (which are separate objects from the Gidiosaurus body mesh) and add their islands to the tiles where you put the face, mouth, teeth, and so on (use the Draw Other Objects tool in the View menu of the UV/Image Editor window to also show the UV islands of the other nonjoined unwrapped objects):

UV islands unwrapped, following the UDIM UV Mapping standard
In our case, we assigned the Gidiosaurus body islands to 5 different tiles, U0/V0, U1/V0, U2/V0, U0/V1, and U1/V1, so we'll have to assign 5 different materials. However, we will cover this in a later recipe.
Note that for exposition purposes only, in the preceding screenshot, you can see the cornea and eye islands together with the Gidiosaurus body islands because I temporarily joined the objects; however, it's usually better to maintain the eyes and corneas as separate objects from the main body.
How to do it…
Now we can start with the editing; initially, we are going to freeze the islands that we don't want to modify because their unwrap is either satisfactory, or we will deal with it later. So, perform the following steps:
- Press A to select all the islands, then by putting the mouse pointer on the two pelvis island halves and pressing Shift + L, multi-deselect them; press the P key to pin the remaining selected UV islands and then A to deselect everything:

To the right-hand side, the pinned UV islands
- Zoom in on the islands of the pelvis, select both the left and right outer edge-loops, as shown in the following left image, and press P to pin them.
- Go to the 3D view and clear only the front part of the median seam on the pelvis. To do this, start to clear the seam from the front edges, go down and stop where it crosses the horizontal seam that passes the bottom part of the groin and legs, and leave the back part of the vertical median seam still marked:

Pinning the extreme vertices in the UV/Image Editor, and editing the seam on the mesh
- Go into Face selection mode and select all the faces of the pelvis; put the mouse pointer in the 3D view and press U | Unwrap (alternatively, go into the UV/Image Editor and press E):

Unwrapping again with the pinning and a different seam
The island will keep the previous position because of the pinned edges, and is now unwrapped as one single piece (with the obvious exception of the seam on the back).
- We won't modify the pelvis island any further, so select all its vertices and press P to pin all of them and then deselect them.
- Press A in the 3D view to select all the faces of the mesh and make all the islands visible in the UV/Image Editor. Note that they are all pinned at the moment, so just select the vertices you want to unpin (Alt + P) in the islands of the tongue and inner mouth. Then, clear the median seam in the corresponding pieces on the mesh, and press E again:

Re-unwrapping the tongue and inner mouth areas
- Select the UV vertices of the resulting islands and unpin them all; next, pin just one vertex at the top of the islands and one at the bottom, and unwrap again. This will result in a more organically distributed unwrap of the parts:

Re-unwrapping again with a different pinning
- Select all the faces of the mesh, and then all the islands in the UV/Image Editor window. Press Ctrl + A to average their relative size and adjust their position in the default tile space:

The rearranged UV islands
Now, let's work on the head piece that, as in every character, should be the most important and well-finished piece.
At the moment, the face is made using two separate islands; although this won't be visible in the final textured rendering of our character, it's always better, if possible, to join them in order to have a single piece, especially in the front mesh faces. Due to the elongated snout of the character, if we were to unwrap the head as a single piece simply without the median seam, we wouldn't get a nice evenly mapped result, so we must divide the whole head into more pieces.
Actually, we can take advantage of the fact that the Gidiosaurus is wearing a helmet and that most of the head will be covered by it; this allows us to easily split the face from the rest of the mesh, hiding the seams under the helmet.
- Go into Edge selection mode and mark the seams, dividing the face from the cranium and neck as shown in the following screenshots. Select the crossing edge-loops, and then clear the unnecessary parts:

New seams for the character's head part 1
- Also clear the median seam in the upper face part, and under the seam on the bottom jaw, leaving it only on the front mandible and on the back of the cranium and neck:

New seams for the character's head part 2
- Go in the Face selection mode and select only the face section of the mesh, and then press E to unwrap. The new unwrap comes upside down, so select all the UV vertices and rotate the island by 180 degrees:

The character's face unwrapped
- Select the cranium/neck section on the mesh and repeat the process:

The rest of the head mesh unwrapped as a whole piece
- Now, select all the faces of the mesh and all the islands in the UV/Image Editor, and press Ctrl + A to average their reciprocal size.
- Once again, adjust the position of the islands inside the UV tile (Ctrl + P to automatically pack them inside the available space, and then tweak their position, rotation, and scale):

The character's UV islands packed inside the default U0/V0 tile space
How it works…
Starting from the UV unwrap in the previous recipe, we improved some of the islands by joining together the halves representing common mesh parts. When doing this, we tried to retain the already good parts of the unwrap by pinning the UV vertices that we didn't want to modify; this way, the new unwrap process was forced to calculate the position of the unpinned vertices using the constraints of the pinned ones (pelvis, tongue, and inner mouth). In other cases, we totally cleared the old seams on the model and marked new ones, in order to have a completely new unwrap of the mesh part (the head), we also used the character furniture (such as the armor) to hide the seams (which in any case, won't be visible at all).
There's more…
At this point, looking at the UV/Image Editor window containing the islands, it's evident that if we want to keep several parts in proportion to each other, some of the islands are a little too small to give a good amount of detail when texturing; for example, the Gidiosaurus's face.
A technique for a good unwrap that is the current standard in the industry is UDIM UV Mapping, which means U-Dimension; basically, after the usual unwrap, the islands are scaled bigger and placed outside the default U0/V0 tile space.
Look at the following screenshots, showing the Blender UV/Image Editor window:

The default U0/V0 tile space and the possible consecutive other tile spaces
On the left-hand side, you can see, highlighted with red lines, the single UV tile that at present is the standard for Blender, which is identified by the UV coordinates 0 and 0: that is, U (horizontal) = 0 and V (vertical) = 0.
Although not visible in the UV/Image Editor window, all the other possible consecutive tiles can be identified by the corresponding UV coordinates, as shown on the right-hand side of the preceding screenshot (again, highlighted with red lines). So, adjacent to the tile U0/V0, we can have the row with the tiles U1/V0, U2/V0, and so on, but we can also go upwards: U0/V1, U1/V1, U2/V1, and so on.
To help you identify the tiles, Blender will show you the amount of pixels and also the number of tiles you are moving the islands in the toolbar of the UV/Image Editor window. In the following screenshot, the arm islands have been moved horizontally (on the negative x axis) by -3072.000 pixels; this is correct because that's exactly the X size of the grid image we loaded in the previous recipes. In fact, in the toolbar of the UV/Image Editor window, while moving the islands we can read D: -3072.000 (pixels) and (inside brackets) 1.0000 (tile) along X; effectively, 3072 pixels = 1 tile.

Moving the arm islands to the U1/V0 tile space
When moving UV islands from tile to tile, remember to check that the Constrain to Image Bounds item in the UVs menu on the toolbar of the UV/Image Editor window is disabled; also, enabling the Normalized item inside the Display subpanel under the N key Properties sidepanel of the same editor window will display the UV coordinates from 0.0 to 1.0, rather than in pixels. More, pressing the Ctrl key while moving the islands will constrain the movement to intervals, making it easy to translate them to exactly 1 tile space.
Because at the moment Blender doesn't support the UDIM UV Mapping standard, simply moving an island outside the default U0/V0 tile, for example to U1/V0, will repeat the image you loaded in the U0/V0 tile and on the faces associated with the moved islands. To solve this, it's necessary, after moving the islands, to assign a different material, if necessary with its own different image textures, to each group of vertices/faces associated with each tile space. So, if you shared your islands over 4 tiles, you need to assign 4 different materials to your object, and each material must load the proper image texture.
The goal of this process is obviously to obtain bigger islands mapped with bigger texture images, by selecting all the islands, scaling them bigger together using the largest ones as a guide, and then tweaking their position and distribution.
One last thing: it is also better to unwrap the corneas and eyes (which are separate objects from the Gidiosaurus body mesh) and add their islands to the tiles where you put the face, mouth, teeth, and so on (use the Draw Other Objects tool in the View menu of the UV/Image Editor window to also show the UV islands of the other nonjoined unwrapped objects):

UV islands unwrapped, following the UDIM UV Mapping standard
In our case, we assigned the Gidiosaurus body islands to 5 different tiles, U0/V0, U1/V0, U2/V0, U0/V1, and U1/V1, so we'll have to assign 5 different materials. However, we will cover this in a later recipe.
Note that for exposition purposes only, in the preceding screenshot, you can see the cornea and eye islands together with the Gidiosaurus body islands because I temporarily joined the objects; however, it's usually better to maintain the eyes and corneas as separate objects from the main body.
How it works…
Starting from the UV unwrap in the previous recipe, we improved some of the islands by joining together the halves representing common mesh parts. When doing this, we tried to retain the already good parts of the unwrap by pinning the UV vertices that we didn't want to modify; this way, the new unwrap process was forced to calculate the position of the unpinned vertices using the constraints of the pinned ones (pelvis, tongue, and inner mouth). In other cases, we totally cleared the old seams on the model and marked new ones, in order to have a completely new unwrap of the mesh part (the head), we also used the character furniture (such as the armor) to hide the seams (which in any case, won't be visible at all).
There's more…
At this point, looking at the UV/Image Editor window containing the islands, it's evident that if we want to keep several parts in proportion to each other, some of the islands are a little too small to give a good amount of detail when texturing; for example, the Gidiosaurus's face.
A technique for a good unwrap that is the current standard in the industry is UDIM UV Mapping, which means U-Dimension; basically, after the usual unwrap, the islands are scaled bigger and placed outside the default U0/V0 tile space.
Look at the following screenshots, showing the Blender UV/Image Editor window:

The default U0/V0 tile space and the possible consecutive other tile spaces
On the left-hand side, you can see, highlighted with red lines, the single UV tile that at present is the standard for Blender, which is identified by the UV coordinates 0 and 0: that is, U (horizontal) = 0 and V (vertical) = 0.
Although not visible in the UV/Image Editor window, all the other possible consecutive tiles can be identified by the corresponding UV coordinates, as shown on the right-hand side of the preceding screenshot (again, highlighted with red lines). So, adjacent to the tile U0/V0, we can have the row with the tiles U1/V0, U2/V0, and so on, but we can also go upwards: U0/V1, U1/V1, U2/V1, and so on.
To help you identify the tiles, Blender will show you the amount of pixels and also the number of tiles you are moving the islands in the toolbar of the UV/Image Editor window. In the following screenshot, the arm islands have been moved horizontally (on the negative x axis) by -3072.000 pixels; this is correct because that's exactly the X size of the grid image we loaded in the previous recipes. In fact, in the toolbar of the UV/Image Editor window, while moving the islands we can read D: -3072.000 (pixels) and (inside brackets) 1.0000 (tile) along X; effectively, 3072 pixels = 1 tile.

Moving the arm islands to the U1/V0 tile space
When moving UV islands from tile to tile, remember to check that the Constrain to Image Bounds item in the UVs menu on the toolbar of the UV/Image Editor window is disabled; also, enabling the Normalized item inside the Display subpanel under the N key Properties sidepanel of the same editor window will display the UV coordinates from 0.0 to 1.0, rather than in pixels. More, pressing the Ctrl key while moving the islands will constrain the movement to intervals, making it easy to translate them to exactly 1 tile space.
Because at the moment Blender doesn't support the UDIM UV Mapping standard, simply moving an island outside the default U0/V0 tile, for example to U1/V0, will repeat the image you loaded in the U0/V0 tile and on the faces associated with the moved islands. To solve this, it's necessary, after moving the islands, to assign a different material, if necessary with its own different image textures, to each group of vertices/faces associated with each tile space. So, if you shared your islands over 4 tiles, you need to assign 4 different materials to your object, and each material must load the proper image texture.
The goal of this process is obviously to obtain bigger islands mapped with bigger texture images, by selecting all the islands, scaling them bigger together using the largest ones as a guide, and then tweaking their position and distribution.
One last thing: it is also better to unwrap the corneas and eyes (which are separate objects from the Gidiosaurus body mesh) and add their islands to the tiles where you put the face, mouth, teeth, and so on (use the Draw Other Objects tool in the View menu of the UV/Image Editor window to also show the UV islands of the other nonjoined unwrapped objects):

UV islands unwrapped, following the UDIM UV Mapping standard
In our case, we assigned the Gidiosaurus body islands to 5 different tiles, U0/V0, U1/V0, U2/V0, U0/V1, and U1/V1, so we'll have to assign 5 different materials. However, we will cover this in a later recipe.
Note that for exposition purposes only, in the preceding screenshot, you can see the cornea and eye islands together with the Gidiosaurus body islands because I temporarily joined the objects; however, it's usually better to maintain the eyes and corneas as separate objects from the main body.
There's more…
At this point, looking at the UV/Image Editor window containing the islands, it's evident that if we want to keep several parts in proportion to each other, some of the islands are a little too small to give a good amount of detail when texturing; for example, the Gidiosaurus's face.
A technique for a good unwrap that is the current standard in the industry is UDIM UV Mapping, which means U-Dimension; basically, after the usual unwrap, the islands are scaled bigger and placed outside the default U0/V0 tile space.
Look at the following screenshots, showing the Blender UV/Image Editor window:

The default U0/V0 tile space and the possible consecutive other tile spaces
On the left-hand side, you can see, highlighted with red lines, the single UV tile that at present is the standard for Blender, which is identified by the UV coordinates 0 and 0: that is, U (horizontal) = 0 and V (vertical) = 0.
Although not visible in the UV/Image Editor window, all the other possible consecutive tiles can be identified by the corresponding UV coordinates, as shown on the right-hand side of the preceding screenshot (again, highlighted with red lines). So, adjacent to the tile U0/V0, we can have the row with the tiles U1/V0, U2/V0, and so on, but we can also go upwards: U0/V1, U1/V1, U2/V1, and so on.
To help you identify the tiles, Blender will show you the amount of pixels and also the number of tiles you are moving the islands in the toolbar of the UV/Image Editor window. In the following screenshot, the arm islands have been moved horizontally (on the negative x axis) by -3072.000 pixels; this is correct because that's exactly the X size of the grid image we loaded in the previous recipes. In fact, in the toolbar of the UV/Image Editor window, while moving the islands we can read D: -3072.000 (pixels) and (inside brackets) 1.0000 (tile) along X; effectively, 3072 pixels = 1 tile.

Moving the arm islands to the U1/V0 tile space
When moving UV islands from tile to tile, remember to check that the Constrain to Image Bounds item in the UVs menu on the toolbar of the UV/Image Editor window is disabled; also, enabling the Normalized item inside the Display subpanel under the N key Properties sidepanel of the same editor window will display the UV coordinates from 0.0 to 1.0, rather than in pixels. More, pressing the Ctrl key while moving the islands will constrain the movement to intervals, making it easy to translate them to exactly 1 tile space.
Because at the moment Blender doesn't support the UDIM UV Mapping standard, simply moving an island outside the default U0/V0 tile, for example to U1/V0, will repeat the image you loaded in the U0/V0 tile and on the faces associated with the moved islands. To solve this, it's necessary, after moving the islands, to assign a different material, if necessary with its own different image textures, to each group of vertices/faces associated with each tile space. So, if you shared your islands over 4 tiles, you need to assign 4 different materials to your object, and each material must load the proper image texture.
The goal of this process is obviously to obtain bigger islands mapped with bigger texture images, by selecting all the islands, scaling them bigger together using the largest ones as a guide, and then tweaking their position and distribution.
One last thing: it is also better to unwrap the corneas and eyes (which are separate objects from the Gidiosaurus body mesh) and add their islands to the tiles where you put the face, mouth, teeth, and so on (use the Draw Other Objects tool in the View menu of the UV/Image Editor window to also show the UV islands of the other nonjoined unwrapped objects):

UV islands unwrapped, following the UDIM UV Mapping standard
In our case, we assigned the Gidiosaurus body islands to 5 different tiles, U0/V0, U1/V0, U2/V0, U0/V1, and U1/V1, so we'll have to assign 5 different materials. However, we will cover this in a later recipe.
Note that for exposition purposes only, in the preceding screenshot, you can see the cornea and eye islands together with the Gidiosaurus body islands because I temporarily joined the objects; however, it's usually better to maintain the eyes and corneas as separate objects from the main body.
Using the Smart UV Project tool
Now, we are going to use a much easier and faster method to do the unwrapping of the Armor: the Smart UV Project tool.
Getting ready
The first thing to do is to prepare the armor pieces for the unwrap process, so perform the following steps:
- Starting from the last
Gidiosaurus_unwrap.blendfile you saved, click on the 13th scene layer to reveal the armor and at the same time, hide the Gidiosaurus_lowres object. - Go to the Outliner and select the first item, the Breastplate; then, use Shift to multiselect all the other visible objects.
- Press Ctrl + J to join them into a single object, and then in the Outliner, rename the result as
Armor. - Go to the Object Modifiers window and expand the Mirror modifier subpanel; be sure that the Clipping item is activated and click on the Apply button:

The Armor as a single object and the Mirror modifier
How to do it…
Here is the unwrap process:
- Press Tab to go into Edit Mode and press the A key to select all the vertices of the Armor.
- With the mouse cursor in the 3D view, press the U key, and in the UV Mapping pop-up menu that just appeared, select the second item from the top, Smart UV Project.
- A second pop-up appears with some options that you can leave as they are, besides Angle Limit (the maximum angle in the mesh used by the tool to separate the islands), which by default is set to 66.00; raise it to the maximum, which is 89.00, and then click on the big OK button:

The Smart UV Project tool
The mesh has been divided into several smaller unwrapped parts and is automatically packed inside the U0/V0 UV tile.
- Select all the islands in the UV/Image Editor window, click on the small double-arrow icon on the toolbar, close to the New and Open buttons, and select the Untitled.001 image (the same grid image we used for the Gidiosaurus unwrap).
- Press Tab to go out of Edit Mode:

The unwrapped Armor
Considering the amount of tiny islands that the tool created, it's better to separate the big armor parts (basically, the plates) from the smaller ones (belts, borders, and so on) and re-unwrap them with the Smart UV Project tool, as we did for the Gidiosaurus body in the previous recipe; then, place them into two adjacent tiles:

The Armor islands inside the U0/V0 and U1/V0 tiles
Getting ready
The first thing to do is to prepare the armor pieces for the unwrap process, so perform the following steps:
- Starting from the last
Gidiosaurus_unwrap.blendfile you saved, click on the 13th scene layer to reveal the armor and at the same time, hide the Gidiosaurus_lowres object. - Go to the Outliner and select the first item, the Breastplate; then, use Shift to multiselect all the other visible objects.
- Press Ctrl + J to join them into a single object, and then in the Outliner, rename the result as
Armor. - Go to the Object Modifiers window and expand the Mirror modifier subpanel; be sure that the Clipping item is activated and click on the Apply button:

The Armor as a single object and the Mirror modifier
How to do it…
Here is the unwrap process:
- Press Tab to go into Edit Mode and press the A key to select all the vertices of the Armor.
- With the mouse cursor in the 3D view, press the U key, and in the UV Mapping pop-up menu that just appeared, select the second item from the top, Smart UV Project.
- A second pop-up appears with some options that you can leave as they are, besides Angle Limit (the maximum angle in the mesh used by the tool to separate the islands), which by default is set to 66.00; raise it to the maximum, which is 89.00, and then click on the big OK button:

The Smart UV Project tool
The mesh has been divided into several smaller unwrapped parts and is automatically packed inside the U0/V0 UV tile.
- Select all the islands in the UV/Image Editor window, click on the small double-arrow icon on the toolbar, close to the New and Open buttons, and select the Untitled.001 image (the same grid image we used for the Gidiosaurus unwrap).
- Press Tab to go out of Edit Mode:

The unwrapped Armor
Considering the amount of tiny islands that the tool created, it's better to separate the big armor parts (basically, the plates) from the smaller ones (belts, borders, and so on) and re-unwrap them with the Smart UV Project tool, as we did for the Gidiosaurus body in the previous recipe; then, place them into two adjacent tiles:

The Armor islands inside the U0/V0 and U1/V0 tiles
How to do it…
Here is the unwrap process:
- Press Tab to go into Edit Mode and press the A key to select all the vertices of the Armor.
- With the mouse cursor in the 3D view, press the U key, and in the UV Mapping pop-up menu that just appeared, select the second item from the top, Smart UV Project.
- A second pop-up appears with some options that you can leave as they are, besides Angle Limit (the maximum angle in the mesh used by the tool to separate the islands), which by default is set to 66.00; raise it to the maximum, which is 89.00, and then click on the big OK button:

The Smart UV Project tool
The mesh has been divided into several smaller unwrapped parts and is automatically packed inside the U0/V0 UV tile.
- Select all the islands in the UV/Image Editor window, click on the small double-arrow icon on the toolbar, close to the New and Open buttons, and select the Untitled.001 image (the same grid image we used for the Gidiosaurus unwrap).
- Press Tab to go out of Edit Mode:

The unwrapped Armor
Considering the amount of tiny islands that the tool created, it's better to separate the big armor parts (basically, the plates) from the smaller ones (belts, borders, and so on) and re-unwrap them with the Smart UV Project tool, as we did for the Gidiosaurus body in the previous recipe; then, place them into two adjacent tiles:

The Armor islands inside the U0/V0 and U1/V0 tiles
Modifying the mesh and the UV islands
At this point, when we look at the Gidiosaurus mesh, we realize that some detail in the model is still missing; for example, the lower teeth. In fact, we modeled the mouth closed and the lower teeth, enclosed in the upper mouth rim, weren't visible.
It's now time to add them; in fact, even though we have already done the unwrapping stage, it's still possible to modify the mesh further and also update the UV islands accordingly.
Getting ready
Start from the last Gidiosaurus_unwrap.blend file you saved:
- Press N to open the Properties 3D view sidepanel, and disable the Textured Solid item under the Shading subpanel.
- Click on the 11th scene layer button to reveal the Gidiosaurus_lowres object and select it; go into the Side view, zoom in to the head, and enter Edit Mode. Press the A key to select all the vertices of the mesh.
- Put the mouse pointer inside the UV/Image Editor, select all the UV vertices (again the A key), and pin them by pressing the P key; then deselect everything (the A key once more).
How to do it…
We can now start to add new teeth:
- Select the vertices of one lower tooth and press Shift + D to duplicate it; using the Transform Orientation widget set to Normal, scale it smaller, rotate and modify it a bit, and then move it in a new position along the mandible rim:

The new added tooth
- Repeat the process to create the bottom teeth row on the left-hand side of the mandible:

Adding the missing teeth
- Go out of the Edit Mode and put the 3D Cursor at the pivot point of the mesh (coincidentally, at the center of the scene), and then press the period key (.) to set the Pivot Point around the 3D Cursor.
- Press 1 on the numpad to go in the Front view, enter Edit Mode again, and select all the new teeth; press Shift + D to duplicate them, and then right-click; then, press Ctrl + M | X | Enter to mirror them on the x axis to the right-hand side of the mandible.
- Press Ctrl + N to recalculate the normals and go out of the Edit Mode:

The new teeth mirrored on the x axis
Now, we must adjust the rim of the mandible where we added the new teeth, in order to create the alveoli.
- Go back into the Edit Mode and start to add vertical edge-loops on the lower mouth rim, in order to create more geometry for the alveoli:

Adding new edge-loops
- Click on the Options tab under the Tool Shelf to the left-hand side of the 3D window and enable the X Mirror item under the Mesh Options subpanel.
- Tweak the vertices to create the alveoli around the new teeth; enable the Subdivision Surface modifier visibility during Edit Mode in order to have better feedback:

Modeling the alveoli
- Press Alt + S to scale the teeth vertices on their normals, in order to thicken them, and add edge-loops where needed to make the transition from the alveoli to inner mouth as natural as possible.
When you are done, it's time to update the unwrapped UV layer with the new modifications.
- In Edit Mode, first select the vertices of the new teeth. Because we made them by duplicating one of the already unwrapped fangs, the new teeth will share the same UV island. In the UV/Image Editor, press A to select all their UV vertices and Alt + P to unpin them, and then press E for a new unwrap.
- Scale the new teeth islands to 0.200, and then select the original teeth on the mesh; adjust the size and position of the new islands based on the old ones and then pin them.
- Now, switch to the Face selection mode and select the Gidiosaurus face; in the UV/Image Editor window, unpin all the vertices of its island (Alt + P), and then pin only the vertices of certain areas such as the eyes, nose, and upper outside edge-loop (P key).
With this method, the unwrap of all the new geometry gets recalculated together with the old one. Thanks to the pinned UV vertices, it will keep the previous size and position as much as possible. In the following image, you can see the face island before (left) and after (right):

The updated unwrap
Note that you need to recalculate the unwrap for all the islands involved in the mesh's modification, and then save the file.
Getting ready
Start from the last Gidiosaurus_unwrap.blend file you saved:
- Press N to open the Properties 3D view sidepanel, and disable the Textured Solid item under the Shading subpanel.
- Click on the 11th scene layer button to reveal the Gidiosaurus_lowres object and select it; go into the Side view, zoom in to the head, and enter Edit Mode. Press the A key to select all the vertices of the mesh.
- Put the mouse pointer inside the UV/Image Editor, select all the UV vertices (again the A key), and pin them by pressing the P key; then deselect everything (the A key once more).
How to do it…
We can now start to add new teeth:
- Select the vertices of one lower tooth and press Shift + D to duplicate it; using the Transform Orientation widget set to Normal, scale it smaller, rotate and modify it a bit, and then move it in a new position along the mandible rim:

The new added tooth
- Repeat the process to create the bottom teeth row on the left-hand side of the mandible:

Adding the missing teeth
- Go out of the Edit Mode and put the 3D Cursor at the pivot point of the mesh (coincidentally, at the center of the scene), and then press the period key (.) to set the Pivot Point around the 3D Cursor.
- Press 1 on the numpad to go in the Front view, enter Edit Mode again, and select all the new teeth; press Shift + D to duplicate them, and then right-click; then, press Ctrl + M | X | Enter to mirror them on the x axis to the right-hand side of the mandible.
- Press Ctrl + N to recalculate the normals and go out of the Edit Mode:

The new teeth mirrored on the x axis
Now, we must adjust the rim of the mandible where we added the new teeth, in order to create the alveoli.
- Go back into the Edit Mode and start to add vertical edge-loops on the lower mouth rim, in order to create more geometry for the alveoli:

Adding new edge-loops
- Click on the Options tab under the Tool Shelf to the left-hand side of the 3D window and enable the X Mirror item under the Mesh Options subpanel.
- Tweak the vertices to create the alveoli around the new teeth; enable the Subdivision Surface modifier visibility during Edit Mode in order to have better feedback:

Modeling the alveoli
- Press Alt + S to scale the teeth vertices on their normals, in order to thicken them, and add edge-loops where needed to make the transition from the alveoli to inner mouth as natural as possible.
When you are done, it's time to update the unwrapped UV layer with the new modifications.
- In Edit Mode, first select the vertices of the new teeth. Because we made them by duplicating one of the already unwrapped fangs, the new teeth will share the same UV island. In the UV/Image Editor, press A to select all their UV vertices and Alt + P to unpin them, and then press E for a new unwrap.
- Scale the new teeth islands to 0.200, and then select the original teeth on the mesh; adjust the size and position of the new islands based on the old ones and then pin them.
- Now, switch to the Face selection mode and select the Gidiosaurus face; in the UV/Image Editor window, unpin all the vertices of its island (Alt + P), and then pin only the vertices of certain areas such as the eyes, nose, and upper outside edge-loop (P key).
With this method, the unwrap of all the new geometry gets recalculated together with the old one. Thanks to the pinned UV vertices, it will keep the previous size and position as much as possible. In the following image, you can see the face island before (left) and after (right):

The updated unwrap
Note that you need to recalculate the unwrap for all the islands involved in the mesh's modification, and then save the file.
How to do it…
We can now start to add new teeth:
- Select the vertices of one lower tooth and press Shift + D to duplicate it; using the Transform Orientation widget set to Normal, scale it smaller, rotate and modify it a bit, and then move it in a new position along the mandible rim:

The new added tooth
- Repeat the process to create the bottom teeth row on the left-hand side of the mandible:

Adding the missing teeth
- Go out of the Edit Mode and put the 3D Cursor at the pivot point of the mesh (coincidentally, at the center of the scene), and then press the period key (.) to set the Pivot Point around the 3D Cursor.
- Press 1 on the numpad to go in the Front view, enter Edit Mode again, and select all the new teeth; press Shift + D to duplicate them, and then right-click; then, press Ctrl + M | X | Enter to mirror them on the x axis to the right-hand side of the mandible.
- Press Ctrl + N to recalculate the normals and go out of the Edit Mode:

The new teeth mirrored on the x axis
Now, we must adjust the rim of the mandible where we added the new teeth, in order to create the alveoli.
- Go back into the Edit Mode and start to add vertical edge-loops on the lower mouth rim, in order to create more geometry for the alveoli:

Adding new edge-loops
- Click on the Options tab under the Tool Shelf to the left-hand side of the 3D window and enable the X Mirror item under the Mesh Options subpanel.
- Tweak the vertices to create the alveoli around the new teeth; enable the Subdivision Surface modifier visibility during Edit Mode in order to have better feedback:

Modeling the alveoli
- Press Alt + S to scale the teeth vertices on their normals, in order to thicken them, and add edge-loops where needed to make the transition from the alveoli to inner mouth as natural as possible.
When you are done, it's time to update the unwrapped UV layer with the new modifications.
- In Edit Mode, first select the vertices of the new teeth. Because we made them by duplicating one of the already unwrapped fangs, the new teeth will share the same UV island. In the UV/Image Editor, press A to select all their UV vertices and Alt + P to unpin them, and then press E for a new unwrap.
- Scale the new teeth islands to 0.200, and then select the original teeth on the mesh; adjust the size and position of the new islands based on the old ones and then pin them.
- Now, switch to the Face selection mode and select the Gidiosaurus face; in the UV/Image Editor window, unpin all the vertices of its island (Alt + P), and then pin only the vertices of certain areas such as the eyes, nose, and upper outside edge-loop (P key).
With this method, the unwrap of all the new geometry gets recalculated together with the old one. Thanks to the pinned UV vertices, it will keep the previous size and position as much as possible. In the following image, you can see the face island before (left) and after (right):

The updated unwrap
Note that you need to recalculate the unwrap for all the islands involved in the mesh's modification, and then save the file.
Setting up additional UV layers
Up until now, we have set just one UV layer whose name is, by default, UVMap (go to the Object Data window and look under the UV Maps subpanel):

The UV Maps subpanel with the UV Map coordinates layer
Actually, in Blender, it is possible to set more than one UV coordinates layer on the same object in order to mix different UV projections that can eventually also be baked into a single image map.
The names of the UV layers under the UV Maps subpanel are important, because they specify which one of the projections a material has to use for the mapping of a texture. By clicking on the + icon to the side of the UV Maps subpanel, it is possible to add a new UV layer (whose name, in this case, will be UVMap.001 by default; of course it's possible to change these names by using Ctrl + clicking on them and typing the new ones).
Getting ready
We are now going to add a new UV layer to the Gidiosaurus object:
- Ensure that the Gidiosaurus object is selected and go to the Object Data window under the main Properties panel to the right-hand of the screen.
- Go to the UV Maps subpanel and click on the + icon to the right-hand side of the names window; a new UV layer is added to the list, right under the first one, and its name is UVMap.001 (in case you don't see it, it may be because the window is too small; just put the mouse cursor on the = sign at the bottom of the window and drag it down to enlarge it):

The new UV coordinates layer
- Use Ctrl + left-click on the UVMap.001 item and rename it as UVMap_scales. Then, press Enter to confirm.
How to do it…
Now we must set the projection of the UV layer:
- Go into Edit Mode, switch to the Face selection mode, put the mouse pointer on the mesh, and press the L key to select all the faces of the skin of the Gidiosaurus mesh.
- Go to the UV/Image Editor window, select all the visible islands and unpin them (Alt + P).
- Click on the Image item on the toolbar and select the Open Image item in the pop-up menu (or else, put the mouse cursor in the UV/Image Editor window and press Alt + O); browse to the
texturesfolder and load thescales_tiles.pngimage. - With the mouse pointer in 3D view, press U and from the UV Mapping pop-up menu, select the Cube Projection item.
- In the UV/Image Editor window, select all the islands and scale them 5 times bigger (A | S | 5 | Enter):

The Cube Projection mapping
- Go out of the Edit Mode and into the Properties 3D view sidepanel, enable the Textured Solid item under the Shading subpanel to see the result of the unwrapping in the 3D viewport:

The scales_tiles.png image mapped on the model using the second UV coordinates layer
At this point, as you can see in the UV Maps subpanel, the Gidiosaurus object has 2 different UV coordinate layers, UVMap and UVMap_scales. We will use the UVMap_scales layer to map the scales image texture on the body and thereby to bake it on the first UVMap layer; this will be the one we'll use in the end for the rendering of the model. However, we'll see this in detail in the texturing and baking recipes.
Repeat the process for the Armor.
- Add a new UV layer and rename it UVMap_rust; go into Edit Mode, select all the vertices and all the islands in the UV/Image Editor window, and load the
iron_tiles.pngimage. - Switch to the Face selection mode, and in the 3D view, press U and select Reset (the last item) from the pop-up menu. Then press U again, and this time select the Cube Projection item.
- Go out of Edit Mode.
As you can see, there are a few visible seams. This will be easily fixed during the texturing stage, but for the moment we are done:

The second UV coordinates layer for the Armor
Getting ready
We are now going to add a new UV layer to the Gidiosaurus object:
- Ensure that the Gidiosaurus object is selected and go to the Object Data window under the main Properties panel to the right-hand of the screen.
- Go to the UV Maps subpanel and click on the + icon to the right-hand side of the names window; a new UV layer is added to the list, right under the first one, and its name is UVMap.001 (in case you don't see it, it may be because the window is too small; just put the mouse cursor on the = sign at the bottom of the window and drag it down to enlarge it):

The new UV coordinates layer
- Use Ctrl + left-click on the UVMap.001 item and rename it as UVMap_scales. Then, press Enter to confirm.
How to do it…
Now we must set the projection of the UV layer:
- Go into Edit Mode, switch to the Face selection mode, put the mouse pointer on the mesh, and press the L key to select all the faces of the skin of the Gidiosaurus mesh.
- Go to the UV/Image Editor window, select all the visible islands and unpin them (Alt + P).
- Click on the Image item on the toolbar and select the Open Image item in the pop-up menu (or else, put the mouse cursor in the UV/Image Editor window and press Alt + O); browse to the
texturesfolder and load thescales_tiles.pngimage. - With the mouse pointer in 3D view, press U and from the UV Mapping pop-up menu, select the Cube Projection item.
- In the UV/Image Editor window, select all the islands and scale them 5 times bigger (A | S | 5 | Enter):

The Cube Projection mapping
- Go out of the Edit Mode and into the Properties 3D view sidepanel, enable the Textured Solid item under the Shading subpanel to see the result of the unwrapping in the 3D viewport:

The scales_tiles.png image mapped on the model using the second UV coordinates layer
At this point, as you can see in the UV Maps subpanel, the Gidiosaurus object has 2 different UV coordinate layers, UVMap and UVMap_scales. We will use the UVMap_scales layer to map the scales image texture on the body and thereby to bake it on the first UVMap layer; this will be the one we'll use in the end for the rendering of the model. However, we'll see this in detail in the texturing and baking recipes.
Repeat the process for the Armor.
- Add a new UV layer and rename it UVMap_rust; go into Edit Mode, select all the vertices and all the islands in the UV/Image Editor window, and load the
iron_tiles.pngimage. - Switch to the Face selection mode, and in the 3D view, press U and select Reset (the last item) from the pop-up menu. Then press U again, and this time select the Cube Projection item.
- Go out of Edit Mode.
As you can see, there are a few visible seams. This will be easily fixed during the texturing stage, but for the moment we are done:

The second UV coordinates layer for the Armor
How to do it…
Now we must set the projection of the UV layer:
- Go into Edit Mode, switch to the Face selection mode, put the mouse pointer on the mesh, and press the L key to select all the faces of the skin of the Gidiosaurus mesh.
- Go to the UV/Image Editor window, select all the visible islands and unpin them (Alt + P).
- Click on the Image item on the toolbar and select the Open Image item in the pop-up menu (or else, put the mouse cursor in the UV/Image Editor window and press Alt + O); browse to the
texturesfolder and load thescales_tiles.pngimage. - With the mouse pointer in 3D view, press U and from the UV Mapping pop-up menu, select the Cube Projection item.
- In the UV/Image Editor window, select all the islands and scale them 5 times bigger (A | S | 5 | Enter):

The Cube Projection mapping
- Go out of the Edit Mode and into the Properties 3D view sidepanel, enable the Textured Solid item under the Shading subpanel to see the result of the unwrapping in the 3D viewport:

The scales_tiles.png image mapped on the model using the second UV coordinates layer
At this point, as you can see in the UV Maps subpanel, the Gidiosaurus object has 2 different UV coordinate layers, UVMap and UVMap_scales. We will use the UVMap_scales layer to map the scales image texture on the body and thereby to bake it on the first UVMap layer; this will be the one we'll use in the end for the rendering of the model. However, we'll see this in detail in the texturing and baking recipes.
Repeat the process for the Armor.
- Add a new UV layer and rename it UVMap_rust; go into Edit Mode, select all the vertices and all the islands in the UV/Image Editor window, and load the
iron_tiles.pngimage. - Switch to the Face selection mode, and in the 3D view, press U and select Reset (the last item) from the pop-up menu. Then press U again, and this time select the Cube Projection item.
- Go out of Edit Mode.
As you can see, there are a few visible seams. This will be easily fixed during the texturing stage, but for the moment we are done:

The second UV coordinates layer for the Armor
Exporting the UV Map layout
In this last recipe, we are going to see how to export the UV coordinate layers outside Blender, in order to be used as a guide to paint textures inside any 2D image editing software.
Getting ready
We have seen that the Gidiosaurus object and also the Armor object have more than one UV coordinate layer, so the first thing to do is to be sure to have set the right layer as the active one.
To do this, simply click on the name of the chosen layer inside the UV Maps subpanel under the Object Data window; if you are in Edit Mode, by clicking on the different names, you can also see the different layers switch in real time in the UV/Image Editor window.
How to do it…
After you have selected the desired UV layer, do the following:
- Click on the UVs item in the toolbar of the UV/Image Editor window, and from the menu, select the Export UV Layout item (the top item).
- You can browse the directory where the
.blendfile is saved, as the directory opens, at the bottom-left side of the screen is the Export UV Layout option panel where you can decide on several items: the size and format of the exported image, and the opacity of the islands (by default, for mysterious reasons, it is set to 25 percent rather than 100 percent). Moreover, you can decide if you want to export all the islands of the selected object or only the visible ones, and also if you want the modifiers applied to the islands (for example, the Subdivision Surface modifier). - Browse to the folder where you decided to save the UV layout of your model, or click on the side of the path in the upper line after the slash, and write the name of a new directory. Press Enter and click on the pop-up panel with the OK? Create New Directory message to confirm (this actually creates a brand new directory).
- Write the name of the UV layout in the second line and click on the Export UV Layout button at the top-right of the screen.
Note that if you want to export all the different tiles placed outside of the default U0/V0 tile space, as illustrated in the There's more… section of the Editing the UV islands recipe, at least for the moment, you have to temporarily (using Ctrl) move each island at a time to the default U0/V0 tile space and export it.


