Slipping outside of Trim Mode
Slipping allows you to adjust a shot in your Sequence to reveal earlier or later material from its source clip without changing the shot's duration.
The previous section discussed Slipping a shot in Trim Mode and, as usual, the helpful engineers at Avid have programmed Media Composer to be able to Slip a shot in more than one way. This second method also provides you with a syncing ability that's not inherently available with Slipping in Trim Mode.
While you will not be in Trim Mode, you will be using the Trim Keys on the keyboard. For emphasis, this feature only works when using the Trim Keys on the keyboard when not in Trim Mode .
The "how" part is very easy, and the steps are below. After the steps, are an explanation, and an example that will provide some context for you:
Park the Position Indicator (the blue line) on a Segment.
Enable only the track(s) you want to Slip.
Press any of the Trim Keys on the keyboard to Slip the segment(s). By default, you'll find the Trim Keys on the M, comma, period, and forward slash keys.
Remember that Slipping allows you to adjust a shot in your Sequence to reveal earlier or later material from its source clip without changing the shot's duration.
Imagine that the Segment you're Slipping is a window that reveals the selected frames from the Master Clip behind it (see the following screenshot). When you Slip a segment using the Trim Keys, it's as if the window is locked in place and you're shifting the Master Clip left or right behind it.

When you shift (Slip) the shot to the right, all the frames within it are shifted to the right, and the result is that the frame at the Head (beginning) of the shot will come from an earlier part of the Source Clip. In the previous screenshot, we can see frames 6, 7, 8, and 9 through the window. If we shifted the numbered frames to the right, then it would reveal frames 2, 3, 4, and 5.
When you shift (Slip) the Segment to the left, the result is that the frame at the Tail (end) of the Segment will come from a later part of the Source Clip. In the previous screenshot, we can see frames 6, 7, 8, and 9 through the window. If we shifted the numbered frames to the left, then it could reveal frames 11, 12, 13, and 14.
This is often confusing since this behavior is the opposite of when you're Slipping a shot using Trim Mode.
How to do it…
Let's take a look at a specific example where Slipping outside of Trim Mode is very helpful. In the example provided in a moment, you could achieve the same result by Slipping with Trim Mode. However, it would involve a bit more work on your part using at least one Marker, and who wants extra work, right? In the particular situation that I'll be describing, the Slipping outside of Trim Mode method would be the most direct path to the objective and also showcases the syncing ability that's not inherently available when Slipping in Trim Mode.
Here is the situation: You are editing a commercial for a company that makes tools. The ad features close-up shots of various tools (a drill, a saw, a hammer, and so on) that are being used in a workshop. Along with the images, you've edited in some upbeat music.
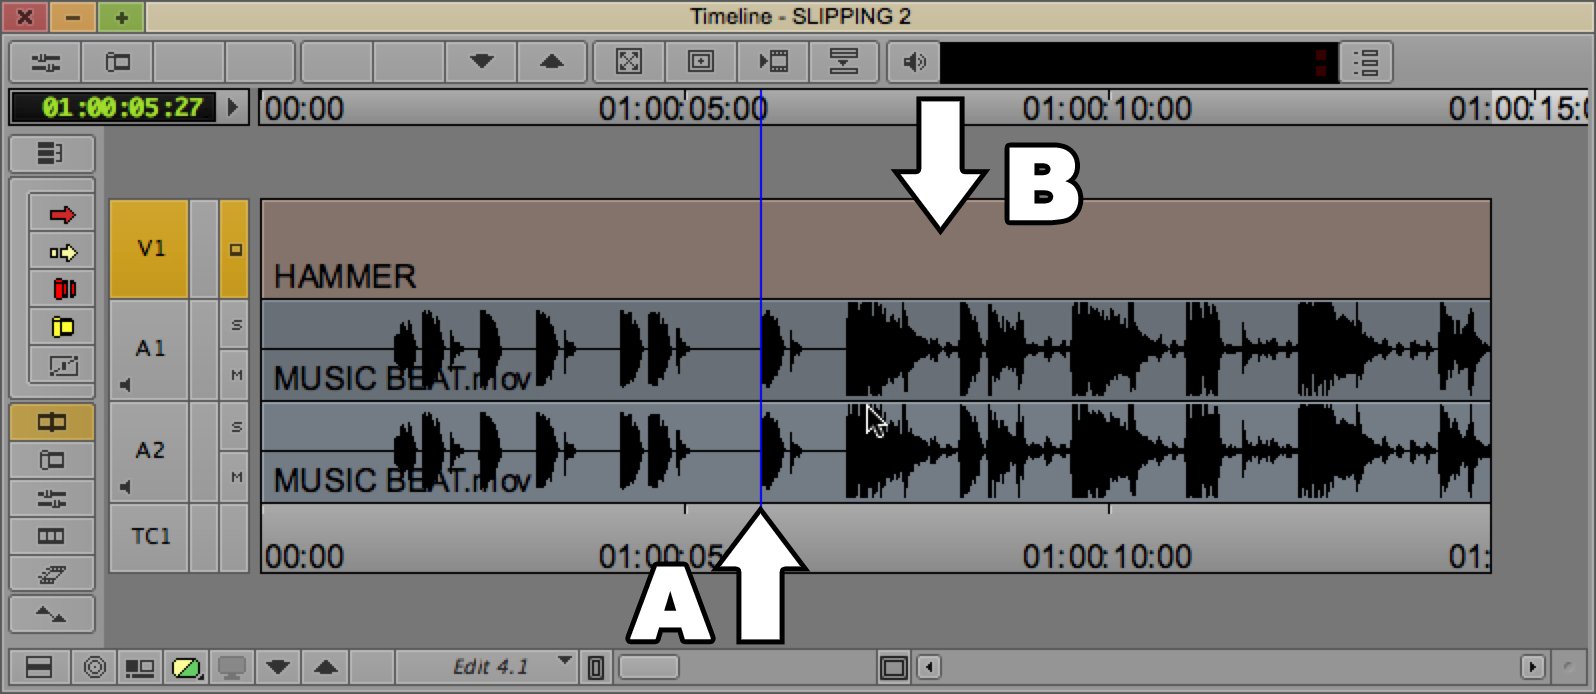
At one spot in the commercial, you notice that there is a loud drum beat (arrow A in the next screenshot), and about half a second later in the video the hammer strikes a nail (arrow "B" in the next screenshot). You think that it would work well if the hammer struck the nail at the same time as the drum beat. You decide to Slip the video segment of the hammer (without using Trim Mode) to sync with the drum beat.

Park the Position Indicator at the point where the drum beat occurs (arrow A in the screenshot above).
Enable only the V1 Track Selector (since you only want to slip the video).
Watch the image in the Record Monitor. You are seeing whatever frame is occurring where the Position Indicator (blue line) is placed.
Press the Trim One Frame Left key (by default on the comma key) several times. Keep tapping it until the image of the hammer hitting the nail appears in the Record Monitor and syncs with the drum beat.
You have now shifted (Slipped) the video segment to the left. In the Sequence, the shot of the hammer hitting the nail remains the same duration, but it now starts and ends on later frames from the Master Clip than it did before the Slip.


