Exploring authentication and authorization
Azure Databricks allows the user to perform access control to manage access to workspace objects, clusters, pools, and data tables. Admin users manage access control lists and also users with delegated permissions.
Clustering access control
By default, in Azure Databricks, all users can create or modify clusters. Before using cluster access control, an admin user must enable it. After this, there are two types of cluster permissions, which are as follows:
- The Allow Cluster Creation permission allows the creation of clusters.
- Cluster-level permissions allow you to manage clusters.
When cluster access control is enabled, only admins and users with Can Manage permissions can configure, create, terminate, or delete clusters.
Configuring cluster permissions
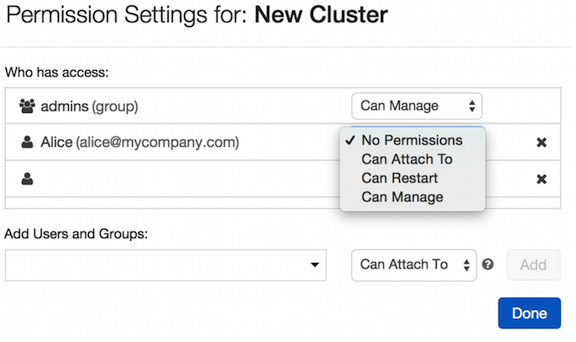
Cluster access control can be configured by clicking on the cluster button in the sidebar and, in the Actions options, selecting the Permissions button. This will prompt a permission dialog box where users can do the following:
- Apply granular access control to users and groups using the Add Users and Groups options.
- Manage granted access for users and groups.
These options are visible in Figure 1.39:

Figure 1.39 – Managing cluster permissions
Cluster permissions allow us to enforce fine-grained control over the computational resources used in our projects.
Folder permissions
Folders have five levels of permissions: No Permissions, Read, Run, Edit, and Manage. Any notebook or experiment will inherit the folder permissions that contain them.
Default folder permissions
Besides the current access control, these permissions are maintained:
- Objects in the Shared folder can be managed by anyone.
- Users can manage objects created by themselves.
When there is no workspace access control, users can only edit items in their Workspace folder.
With workspace access control enabled, the following permissions exist:
- Only admins can create items in the Workspace folder, but users can manage existing items.
- Permissions applied to a folder will be applied to the items it contains.
- Users keep having Manage permission to their home directories.
Understanding these permissions helps us to know in advance how possible changes in these policies could affect how users interact with the organization's data.
Notebook permissions
Notebooks have the same five permission levels as folders: No Permissions, Read, Run, Edit, and Manage.
Configuring notebook and folder permissions
Users can configure notebook permissions by clicking on the Permissions button in the notebook context bar. Select the folder and then click on Permissions from the drop-down menu:

Figure 1.40 – Notebook permissions
From there, you can grant permissions to users or groups as well as edit existing permissions:

Figure 1.41 – Access control on notebooks
Access control on notebooks can easily be applied in this way by selecting one of the options from the drop-down menu.
MLflow Model permissions
You can assign six permission levels to MLflow Models registered in the MLflow Model Registry: No Permissions, Read, Edit, Manage Staging Versions, Manage Production Versions, and Manage.
Default MLflow Model permissions
Besides the current workspace access control, these permissions are maintained:
- Models in the registry can be created by anyone.
- Administrators can manage any model in the registry.
When there is no workspace access control, users can manage any of the models in the registry.
With workspace access control enabled, the following permissions exist:
- Users can manage only the models they have created.
- Only administrators can manage models created by other users.
These options are applied to MLflow Models created in Azure Databricks.
Configuring MLflow Model permissions
One thing to keep in mind is that only administrators belong to the admins with the Manage permissions group, while the rest of the users belong to the all users group.
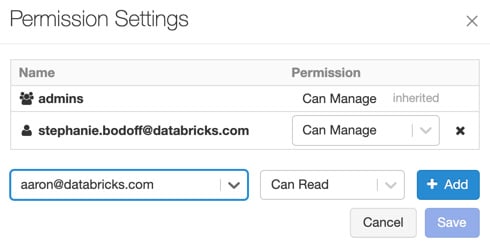
MLflow Model permissions can be modified by clicking on the model's icon in the sidebar, selecting the model name, clicking on the drop-down icon to the right of the model name, and finally selecting Permissions. This will show us a dialog box from which we can select specific users or groups and add specific permissions:

Figure 1.42 – MLflow permissions
You can update the permissions of a user or group by selecting the new permission from the Permission drop-down menu:

Figure 1.43 – MLflow access management
By selecting one of these options, we can control how MLflow experiments interact with our data and which users can create models that work with it.


