Search icon CANCEL
Arrow left icon
Explore Products
Best Sellers
New Releases
Books
Videos
Audiobooks
Learning Hub
Conferences
Free Learning
Arrow right icon
Arrow up icon
GO TO TOP
Deep Learning with PyTorch Quick Start Guide

You're reading from   Deep Learning with PyTorch Quick Start Guide Learn to train and deploy neural network models in Python

Arrow left icon
Product type Paperback
Published in Dec 2018
Publisher Packt
ISBN-13 9781789534092
Length 158 pages
Edition 1st Edition
Languages
Tools
Arrow right icon
Author (1):
Arrow left icon
David Julian David Julian
Author Profile Icon David Julian
David Julian
Arrow right icon
View More author details
Toc

Loading data

Most of the time you will spend on a deep learning project will be spent working with data and one of the main reasons that a deep learning project will fail is because of bad, or poorly understood data. This issue is often overlooked when we are working with well-known and well-constructed datasets. The focus here is on learning the models. The algorithms that make deep learning models work are complex enough themselves without this complexity being compounded by something that is only partially known, such as an unfamiliar dataset. Real-world data is noisy, incomplete, and error prone. These axes of confoundedness mean that if a deep learning algorithm is not giving sensible results, after errors of logic in the code are eliminated, bad data, or errors in our understanding of the data, are the likely culprit.

So putting aside our wrestle with data, and with an understanding that deep learning can provide valuable real-world insights, how do we learn deep learning? Our starting point is to eliminate as many of the variables that we can. This can be achieved by using data that is well known and representative of a specific problem; say, for example, classification. This enables us to have both a starting point for deep learning tasks, as well as a standard to test model ideas.

One of the most well-known datasets is the MNIST dataset of hand-written digits, where the usual task is to correctly classify each of the digits, from zero through nine. The best models get an error rate of around 0.2%. We could apply this well-performing model with a few adjustments, to any visual classification task, with varying results. It is unlikely we will get results anywhere near 0.2% and the reason is because the data is different. Understanding how to tweek a deep learning model to take into account these sometimes subtle differences in data, is one of the key skills of a successful deep learning practitioner.

Consider an image classification task of facial recognition from color photographs. The task is still classification but the differences in that data type and structure dictate how the model will need to change to take this into account. How this is done is at the heart of machine learning. For example, if we are working with color images, as opposed to black and white images, we will need two extra input channels. We will also need output channels for each of the possible classes. In a handwriting classification task, we need 10 output channels; one channel for each of the digits. For a facial recognition task, we would consider having an output channel for each target face (say, for criminals in a police database).

Clearly, an important consideration is data types and structures. The way image data is structured in an image is vastly different to that of, say, an audio signal, or output from a medical device. What if we are trying to classify people's names by the sound of their voice, or classify a disease by its symptoms? They are all classification tasks; however, in each specific case, the models that represent each of these will be vastly different. In order to build suitable models in each case, we will need to become intimately acquainted with the data we are using.

It is beyond the scope of this book to discuss the nuances and subtleties of each data type, format, and structure. What we can do is give you a brief insight into the tools, techniques, and best practice of data handling in PyTorch. Deep learning datasets are often very large and it is an important consideration to see how they are handled in memory. We need to be able to transform data, output data in batches, shuffle data, and perform many other operations on data before we feed it to a model. We need to be able to do all these things without loading the entire dataset into memory, since many datasets are simply too large. PyTorch takes an object approach when working with data, creating class objects for each specific activity. We will examine this in more detail in the coming sections.

PyTorch dataset loaders

Pytorch includes data loaders for several datasets to help you get started. The torch.dataloader is the class used for loading datasets. The following is a list of the included torch datasets and a brief description:

MNIST

Handwritten digits 1–9. A subset of NIST dataset of handwritten characters. Contains a training set of 60,000 test images and a test set of 10,000.

Fashion- MNIST

A drop-in dataset for MNIST. Contains images of fashion items; for example, T-shirt, trousers, pullover.

EMNIST

Based on NIST handwritten characters, including letters and numbers and split for 47, 26, and 10 class classification problems.

COCO

Over 100,000 images classified into everyday objects; for example, person, backpack, and bicycle. Each image can have more than one class.

LSUN

Used for large-scale scene classification of images; for example, bedroom, bridge, church.

Imagenet-12

Large-scale visual recognition dataset containing 1.2 million images and 1,000 categories. Implemented with ImageFolder class, where each class is in a folder.

CIFAR

60,000 low-res (32 32) color images in 10 mutually exclusive classes; for example, airplane, truck, and car.

STL10

Similar to CIFAR but with higher resolution and larger number of unlabeled images.

SVHN

600,000 images of street numbers obtained from Google Street View. Used for recognition of digits in real-world settings.

PhotoTour

Learning Local Image descriptors. Consists of gray scale images composed of 126 patches accompanied with a descriptor text file. Used for pattern recognition.

Here is a typical example of how we load one of these datasets into PyTorch:

CIFAR10 is a torch.utils.dataset object. Here, we are passing it four arguments. We specify a root directory relative to where the code is running, a Boolean, train, indicating if we want the test or training set loaded, a Boolean that, if set to True, will check to see if the dataset has previously been downloaded and if not download it, and a callable transform. In this case, the transform we select is ToTensor(). This is an inbuilt class of torchvision.transforms that makes the class return a tensor. We will discuss transforms in more detail later in the chapter.

The contents of the dataset can be retrieved by a simple index lookup. We can also check the length of the entire dataset with the len function. We can also loop through the dataset in order. The following code demonstrates this:

Displaying an image

The CIFAR10 dataset object returns a tuple containing an image object and a number representing the label of the image. We see from the size of the image data, that each sample is a 3 x 32 x 32 tensor, representing three color values for each of the 322 pixels in the image. It is important to know that this is not quite the same format used for matplotlib. A tensor treats an image in the format of [color, height, width], whereas a numpy image is in the format [height, width, color]. To plot an image, we need to swap axes using the permute() function, or alternatively convert it to a NumPy array and using the transpose function. Note that we do not need to convert the image to a NumPy array, as matplotlib will display the correctly permuted tensor. The following code should make this clear:

DataLoader

We will see that in a deep learning model, we may not always want to load images one at a time or load them in the same order each time. For this, and other reasons, it is often better to use the torch.utils.data.DataLoader object. DataLoader provides a multipurpose iterator to sample the data in a specified way, such as in batches, or shuffled. It is also a convenient place to assign workers in multiprocessor environments.

In the following example, we sample the dataset in batches of four samples each:

Here DataLoader returns a tuple of two tensors. The first tensor contains the image data of all four images in the batch. The second tensor are the images labels. Each batch consists of four image label, pairs, or samples. Calling next() on the iterator generates the next set of four samples. In machine learning terminology, each pass over the entire dataset is called an epoch. This technique is used extensively, as we will see to train and test deep learning models.

Creating a custom dataset

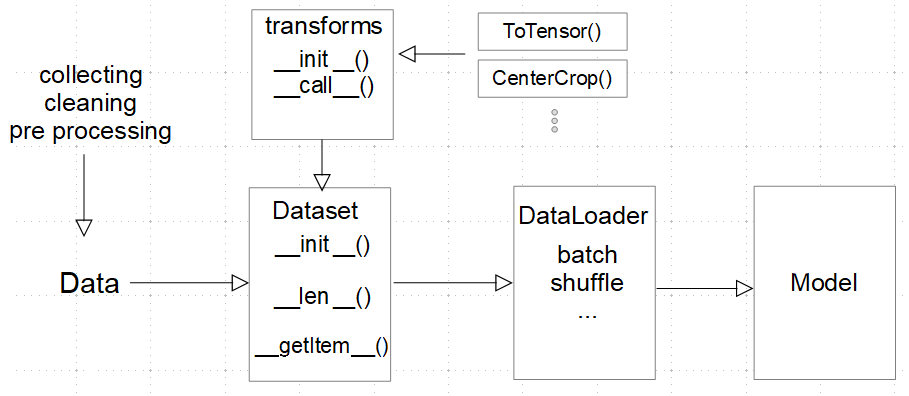
The Dataset class is an abstract class representing a dataset. Its purpose is to have a consistent way of representing the specific characteristics of a dataset. When we are working with unfamiliar datasets, creating a Dataset object is a good way to understand and represent the structure of the data. It is used with a data loader class to draw samples from a dataset in a clean and efficient manner. The following diagram illustrates how these classes are used:

Common actions we perform with a Dataset class include checking the data for consistency, applying transform methods, dividing the data into training and test sets, and loading individual samples.

In the following example, we are using a small toy dataset consisting of images of objects that are classified as either toys or not toys. This is representative of a simple image classification problem where a model is trained on a set of labeled images. A deep learning model will need the data with various transformations applied in a consistent manner. Samples may need to be drawn in batches and the dataset shuffled. Having a framework for representing these data tasks greatly simplifies and enhances deep learning models.

The complete dataset is available at http://www.vision.caltech.edu/pmoreels/Datasets/Giuseppe_Toys_03/.

For this example, I have created a smaller subset of the dataset, together with a labels.csv file. This is available in the data/GiuseppeToys folder in the GitHub repository for this book. The class representing this dataset is as follows:

The __init__ function is where we initialize all the properties of the class. Since it is only called once when we first create the instance to do all the things, we perform all the housekeeping functions, such as reading CSV files, setting the variables, and checking data for consistency. We only perform operations that occur across the entire dataset, so we do not download the payload (in this example, an image), but we make sure that the critical information about the dataset, such as directory paths, filenames, and dataset labels are stored in variables.

The __len__ function simply allows us to call Python's built-in len() function on the dataset. Here, we simply return the length of the list of label tuples, indicating the number of images in the dataset. We want to make sure that stays as simple and reliable as possible because we depend on it to correctly iterate through the dataset.

The __getitem__ function is an built-in Python function that we override in our Dataset class definition. This gives the Dataset class the functionality of Python sequence types, such as the use of indexing and slicing. This method gets called often—every time we do an index lookup—so make sure it only does what it needs to do to retrieve the sample.

To harness this functionality into our own dataset, we need to create an instance of our custom dataset as follows:

Transforms

As well as the ToTensor() transform, the torchvision package includes a number of transforms specifically for Python imaging library images. We can apply multiple transforms to a dataset object using the compose function as follows:

Compose objects are essentially a list of transforms that can then be passed to the dataset as a single variable. It is important to note that the image transforms can only be applied to PIL image data, not tensors. Since transforms in a compose are applied in the order that they are listed, it is important that the ToTensor transform occurs last. If it is placed before the PIL transforms in the Compose list, an error will be generated.

Finally, we can check that it all works by using DataLoader to load a batch of images with transforms, as we did before:

ImageFolder

We can see that the main function of the dataset object is to take a sample from a dataset, and the function of DataLoader is to deliver a sample, or a batch of samples, to a deep learning model for evaluation. One of the main things to consider when writing our own dataset object is how do we build a data structure in accessible memory from data that is organized in files on a disk. A common way we might want to organize data is in folders named by class. Let's say that, for this example, we have three folders named toy, notoy, and scenes, contained in a parent folder, images. Each of these folders represent the label of the files contained within them. We need to be able to load them while retaining them as separate labels. Happily, there is a class for this, and like most things in PyTorch, it is very easy to use. The class is torchvision.datasets.ImageFolder and it is used as follows:

Within the data/GiuseppeToys/images folder, there are three folders, toys, notoys, and scenes, containing images with their folder names indicating labels. Notice that the retrieved labels using DataLoader are represented by integers. Since, in this example, we have three folders, representing three labels, DataLoader returns integers 1 to 3, representing the image labels.

Concatenating datasets

It is clear that the need will arise to join datasets—we can do this with the torch.utils.data.ConcatDataset class. ConcatDataset takes a list of datasets and returns a concatenated dataset. In the following example, we add two more transforms, removing the blue and green color channel. We then create two more dataset objects, applying these transforms and, finally, concatenating all three datasets into one, as shown in the following code:

You have been reading a chapter from
Deep Learning with PyTorch Quick Start Guide
Published in: Dec 2018
Publisher: Packt
ISBN-13: 9781789534092
Register for a free Packt account to unlock a world of extra content!
A free Packt account unlocks extra newsletters, articles, discounted offers, and much more. Start advancing your knowledge today.
Unlock this book and the full library FREE for 7 days
Get unlimited access to 7000+ expert-authored eBooks and videos courses covering every tech area you can think of
Renews at €18.99/month. Cancel anytime