Search icon CANCEL
Subscription
0
Cart icon
Your Cart (0 item)
Close icon
You have no products in your basket yet
Arrow left icon
Explore Products
Best Sellers
New Releases
Books
Videos
Audiobooks
Learning Hub
Free Learning
Arrow right icon
Arrow up icon
GO TO TOP
Android Application Development Cookbook

You're reading from   Android Application Development Cookbook Over 100 recipes to help you solve the most common problems faced by Android Developers today

Arrow left icon
Product type Paperback
Published in Mar 2016
Publisher
ISBN-13 9781785886195
Length 428 pages
Edition 2nd Edition
Languages
Tools
Arrow right icon
Authors (2):
Arrow left icon
Rick Boyer Rick Boyer
Author Profile Icon Rick Boyer
Rick Boyer
Kyle Mew Kyle Mew
Author Profile Icon Kyle Mew
Kyle Mew
Arrow right icon
View More author details
Toc

Table of Contents (17) Chapters Close

Preface 1. Activities FREE CHAPTER 2. Layouts 3. Views, Widgets, and Styles 4. Menus 5. Exploring Fragments, AppWidgets, and the System UI 6. Working with Data 7. Alerts and Notifications 8. Using the Touchscreen and Sensors 9. Graphics and Animation 10. A First Look at OpenGL ES 11. Multimedia 12. Telephony, Networks, and the Web 13. Getting Location and Using Geofencing 14. Getting your app ready for the Play Store 15. The Backend as a Service Options Index

Drawing shapes on GLSurfaceView


The previous recipe set up the activity to use OpenGL. This recipe will continue by showing how to draw on OpenGLSurfaceView.

First, we need to define the shape. With OpenGL, it is important to realize the order in which the vertices of a shape are defined are very important, as they determine the front (face) and back of the shape. It's customary (and the default behavior) to define the vertices counter clockwise. (Though this behavior can be changed, it requires additional code and is not standard practice.)

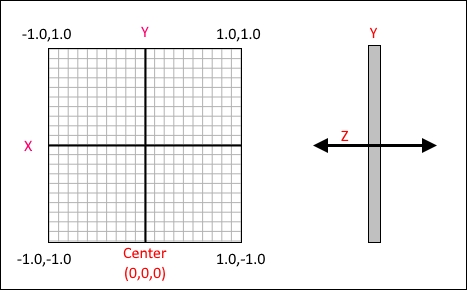
It's also important to understand the OpenGL screen coordinate system, as it differs from the Android canvas. The default coordinate system defines (0,0,0) as the center of the screen. The four edge points are as follows:

  • Top left: (-1.0, 1.0, 0)

  • Top right: (1.0, 1.0, 0)

  • Bottom left: (-1.0, -1.0, 0)

  • Bottom right: (1.0, -1.0, 0)

The Z axis comes straight out of the screen or straight behind.

Here is an illustration showing the X, Y, and Z axes:
We're going...

lock icon The rest of the chapter is locked
Register for a free Packt account to unlock a world of extra content!
A free Packt account unlocks extra newsletters, articles, discounted offers, and much more. Start advancing your knowledge today.
Unlock this book and the full library FREE for 7 days
Get unlimited access to 7000+ expert-authored eBooks and videos courses covering every tech area you can think of
Renews at $19.99/month. Cancel anytime
Banner background image