Search icon CANCEL
Arrow left icon
Explore Products
Best Sellers
New Releases
Books
Videos
Audiobooks
Learning Hub
Conferences
Free Learning
Arrow right icon
Arrow up icon
GO TO TOP
Photorealistic Materials and Textures in Blender Cycles

You're reading from   Photorealistic Materials and Textures in Blender Cycles Create impressive production-ready projects using one of the most powerful rendering engines

Arrow left icon
Product type Paperback
Published in Oct 2023
Publisher Packt
ISBN-13 9781805129639
Length 394 pages
Edition 4th Edition
Tools
Concepts
Arrow right icon
Author (1):
Arrow left icon
Arijan Belec Arijan Belec
Author Profile Icon Arijan Belec
Arijan Belec
Arrow right icon
View More author details
Toc

Table of Contents (21) Chapters Close

Preface 1. Part 1: Materials in Cycles FREE CHAPTER
2. Chapter 1: Creating Materials in Blender 3. Chapter 2: Introducing Material Nodes 4. Chapter 3: Mapping Images with Nodes 5. Part 2: Understanding Realistic Texturing
6. Chapter 4: Achieving Realism with Texture Maps 7. Chapter 5: Generating Texture Maps with Cycles 8. Chapter 6: Creating Bumpy Surfaces with Displacement Maps 9. Part 3: UV Mapping and Texture Painting
10. Chapter 7: UV-Unwrapping 3D Models for Texturing 11. Chapter 8: Baking Ambient Occlusion Maps 12. Chapter 9: Introducing Texture Painting 13. Chapter 10: Creating Photorealistic Textures on a 3D Model 14. Part 4: Lighting and Rendering
15. Chapter 11: Lighting a Scene in Cycles 16. Chapter 12: Creating Photorealistic Environments with HDRIs 17. Chapter 13: Preparing the Camera for Rendering 18. Chapter 14: Rendering with Cycles 19. Index 20. Other Books You May Enjoy

Understanding the default nodes

Let’s begin by studying the default nodes. In the Shader Editor window, we will find two nodes, as shown in Figure 2.1.
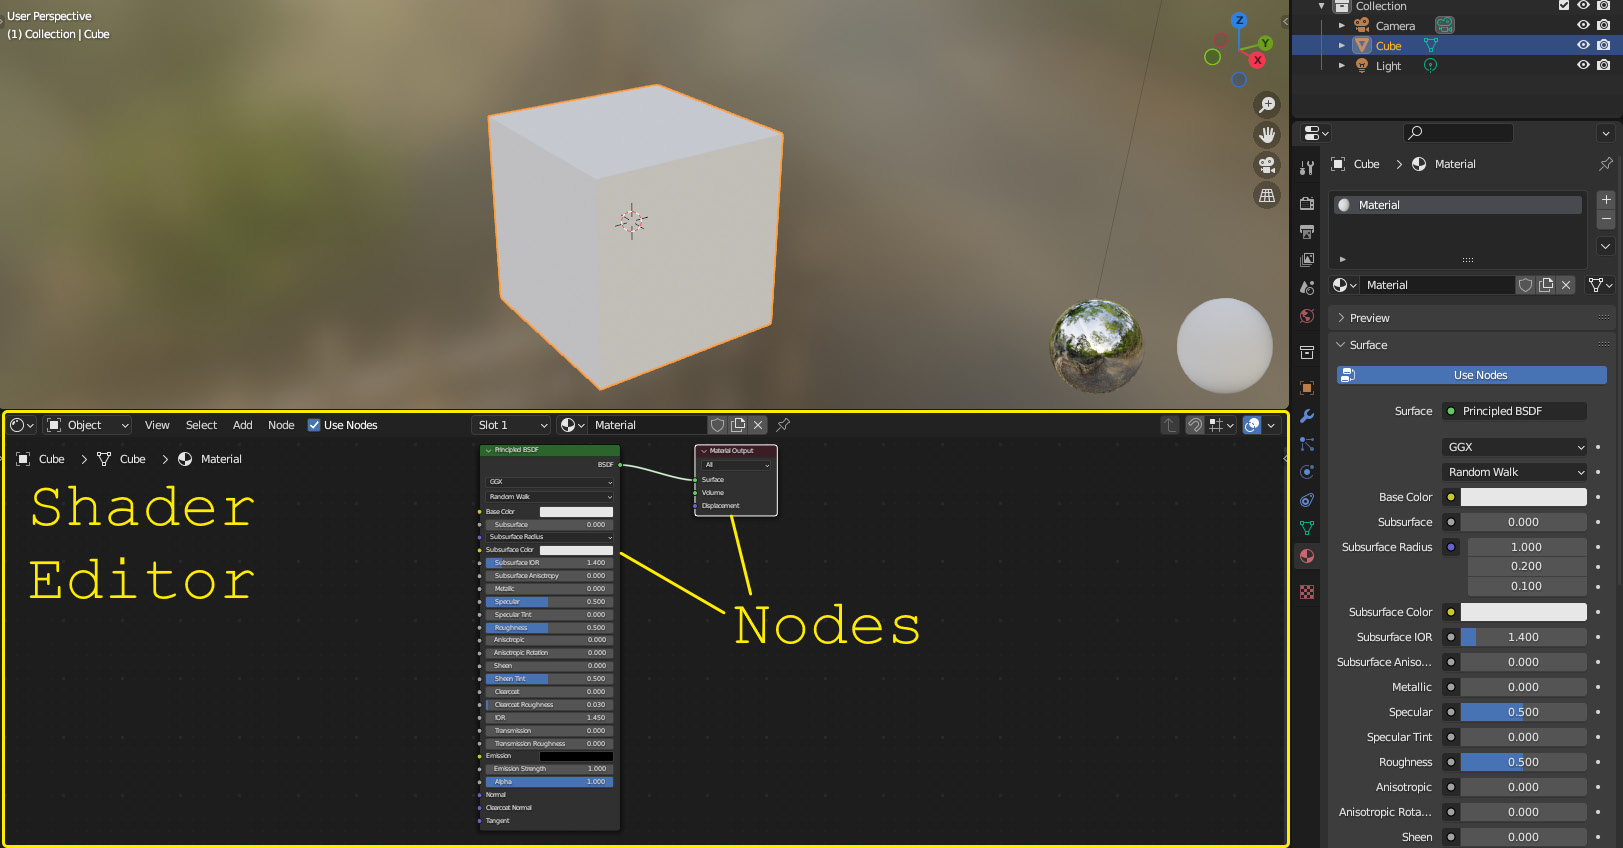
Figure 2.1 – Default nodes in the Shader Editor

Figure 2.1 – Default nodes in the Shader Editor

We will learn what these nodes are, what they can do, and how they work together to create materials.

The big node from Figure 2.1, with lots of sliders and buttons, is called the Principled BSDF node. You probably noticed that this node has almost all the sliders and properties from the Material Properties tab on the right side of the screen, as shown in Figure 2.2.
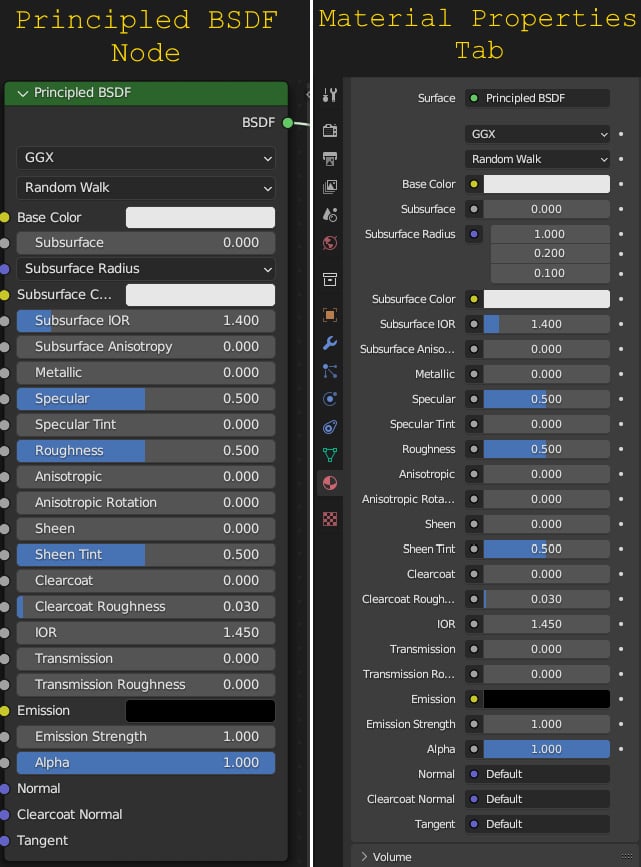
Figure 2.2 – The Principled BSDF node versus the Material Properties tab

Figure 2.2 – The Principled BSDF node versus the Material Properties tab

The reason that this node is the same as the Material Properties tab is because they serve the same purpose: to gather all the most important material properties and make them easy to control. This set of properties makes up the Principled BSDF shader.

The reason we...

lock icon The rest of the chapter is locked
Register for a free Packt account to unlock a world of extra content!
A free Packt account unlocks extra newsletters, articles, discounted offers, and much more. Start advancing your knowledge today.
Unlock this book and the full library FREE for 7 days
Get unlimited access to 7000+ expert-authored eBooks and videos courses covering every tech area you can think of
Renews at ₹800/month. Cancel anytime