Creating a Basic Graphics Window
It’s time to create your first basic graphics window in PyCharm. To do this, perform the following steps:
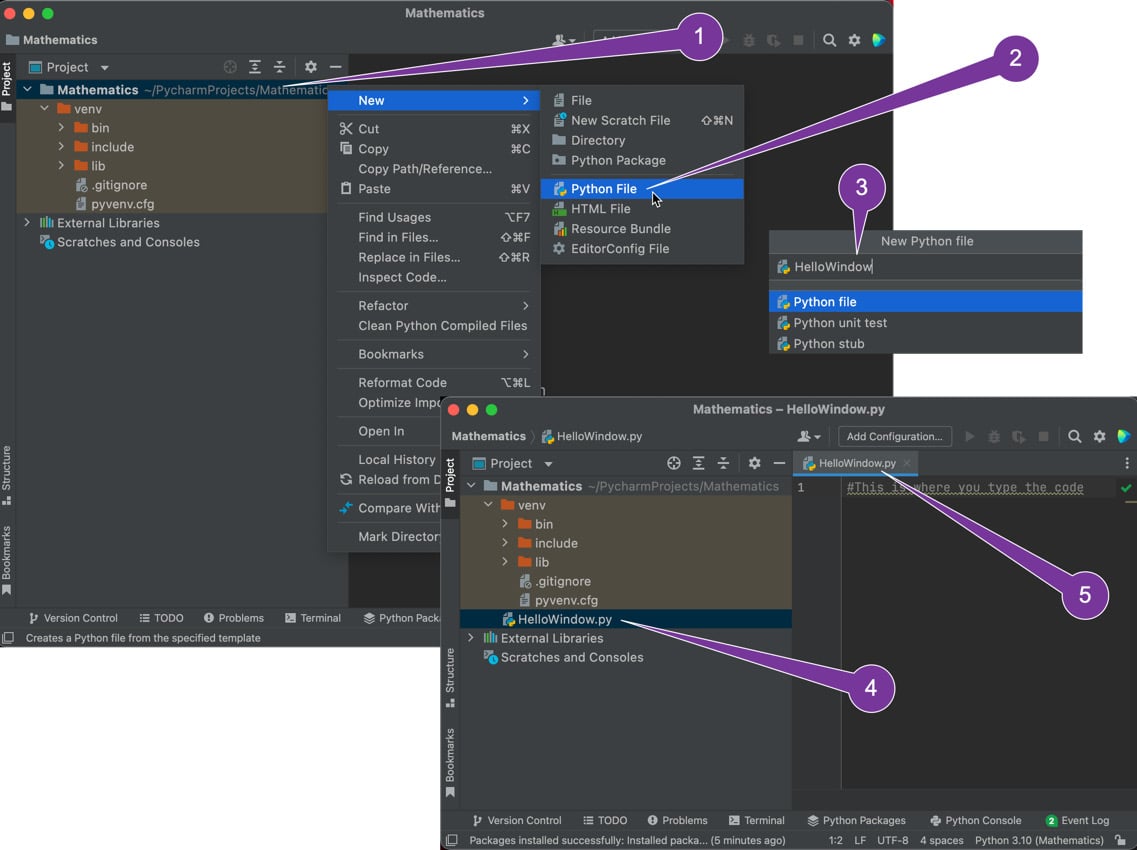
- Right-click on the project folder (1), as shown in Figure 1.5.

Figure 1.5: Creating a new Python script file (steps 1-5)
- Select New > Python File (2).
- In the popup window, enter the name of your new Python script (3). In this case, it will be
HelloWindow.py. There’s no need to add the.pysuffix as PyCharm will add this for you. Hit the Enter/Return key. - Once the file has been created, you will see it in the Project section of PyCharm (4).
- The file will also be open and displayed on the left as a tab title (5). The window below the tab is where you will type in your code as follows:
import pygame
pygame.init()
screen_width = 1000
screen_height = 800
screen = pygame.display.set_mode((screen_width,
screen_height))
The preceding code imports the Pygame library, so you can access the methods provided by Pygame to set up graphics windows and display images. The specific method used in this case is set_mode(), which creates and returns a display surface object.
Tool tip
There are no semi-colons at the end of lines in Python. Although, if you accidentally use one because it’s second nature to you as a programmer, then it’s very forgiving and ignores them.
The editor will also insist on variables and methods being written in snake_case (www.codingem.com/what-is-snake-case/) where separate works are joined by a delimiter, such as an underscore. You can see this format in the previous code in the variable named screen_width.
When complete, the window will look like Figure 1.6.

Figure 1.6: Code entered into PyCharm to generate a basic graphics window
It is not the aim of this book to teach you Python or the ins and outs of the Pygame library as we want to focus on mathematics; however, short explanations will be given as we add new features. In this case, the first line ensures that the functionality of the Pygame package is included with the code, which allows us to use the methods embedded inside Pygame. Next, we initialize the Pygame environment on line 2. Finally, we create a screen (a graphics window or surface also known as a display). The width of this window is 1,000 pixels by 800 pixels in height.
If you are unsure of what the parameters of a method are, simply mouse over/hover your cursor the method and PyCharm will pop open a hint box with more information about the method.
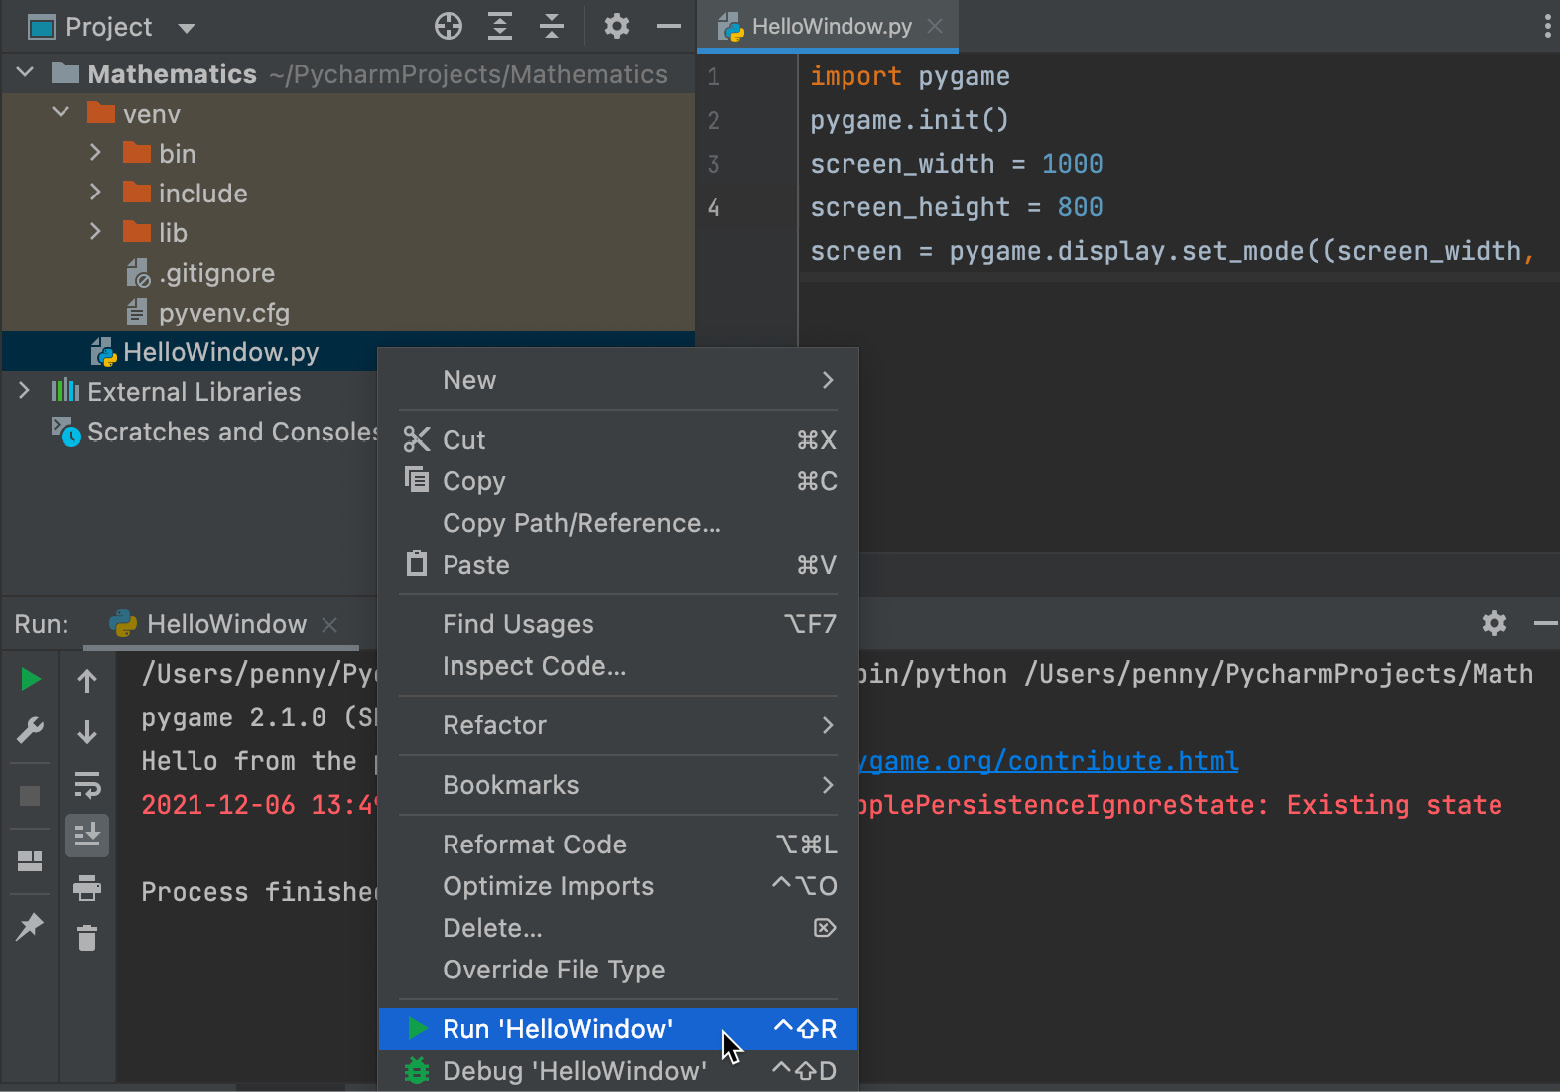
- The code can now be run. To do this, right-click on the
HelloWindow.pyfilename in the Project window and then select Run ‘HelloWindow’, as shown in Figure 1.7:

Figure 1.7: Running code for the first time
If you’ve typed in the code correctly, a window with dimensions of 1,000 x 800 will pop open and then immediately close. It might be too fast to see, so try running it again. You will know the program has been completed without error as the console now visible at the bottom of the PyCharm window will display an exit code of 0, as shown in Figure 1.8:

Figure 1.8: When a program runs without error, it will return an exit code of 0
Note that once you’ve run code for the first time, it becomes available as a run option in the top toolbar and can be easily run again using the green play button at the top of the PyCharm window. Ensure that the filename next to the button is the one you want to run, as shown in Figure 1.9:

Figure 1.9: Running the previous code again
- In its current state, the graphics window isn’t much help to us if it won’t stay open. Therefore, we need to force it to stay open. You see that as the code executes line by line, once it reaches the end, the compiler considers the program to be finished. All graphics windows need to be forced to stay open with an endless loop that runs until a specific condition is reached. Game engines inherently have this built in and call it the main game loop. As you will discover in Chapter 6, Updating and Drawing the Graphics Environment, the main loop is the heartbeat of all graphics programs. In this case, we must create our own. To do this, modify the code by adding the highlighted text to your program as follows:
import pygame
pygame.init()
screen_width = 1000
screen_height = 800
screen = pygame.display.set_mode((screen_width,
screen_height))
done = False
while not done:
for event in pygame.event.get():
if event.type == pygame.QUIT:
done = True
pygame.display.update()
pygame.quit()
Tool tip
Instead of relying on braces, for example, ‘{‘ and ‘}’ to segment code blocks, Python relies on indentation, and at the end of a line with a Boolean expression, you will always find a full colon (:).
You’ve just created an endless loop that will keep running until the window is manually closed by the user. The done variable is initially set to false, and only when it becomes true can the loop end. pygame.event.get() returns a list of events the window has received since the last loop. These can be keystrokes, mouse movements, or any other user input. In this case, we are looking for pygame.QUIT to have occurred. This event is signaled by the attempted closing of the window. The final pygame.quit() method safely closes down all Pygame processes before the window closes.
- Run the program again. This time, the graphics window will stay open. It can be closed using the regular window closing icons that appear on the top bar of the window (on the left in Mac OS and on the right in Windows).
- Because code will be reused and updated from chapter to chapter, the best way to organize it all would be to place all the code for a chapter into its own folder. So, let’s create a folder for
Chapter One. To do this, right-click on the Mathematics project folder at the top and then select New > Directory, as shown in Figure 1.10. Name the folder Chapter_One. - Drag and drop
HelloWindow.pyinto the new folder. PyCharm will ask you to refactor the code and it’s fine to go ahead and do so. You can now keep all the code from any chapter in one place even when the same script names are used. 
Figure 1.10: Creating a new directory inside PyCharm
And that’s it. Your first basic graphics window. Keep a copy of this code handy as you will need to use it as the basis of all projects from this point forward. Whenever we ask you to create a new Python file in PyCharm, this code will be the jumping-off point.
Hints
To further help you with creating a window, consider the following points:
- If you haven’t used Python before but are familiar with other programming languages, the absence of brackets and braces for the sectioning of code will feel a little odd at first. Instead of brackets, Python uses indentation. You can read more about this at www.geeksforgeeks.org/indentation-in-python/.
- Python does not need semicolons at the end of lines.
- Whenever you encounter methods or properties used in the code that you are unfamiliar with, it is a good exercise for your own independent learning to investigate these in the Python and Pygame API listings as follows:
- For Pygame, see www.pygame.org/docs/genindex.html.
- For Python, see docs.python.org/3/library/index.html.
- As you may have noticed as you were typing out the code, Python can be fussier than other programming languages when it comes to formatting and syntax. PyCharm will give you suggestions for most formatting issues by showing warning symbols at the end of problem lines or drawing a rippled line under methods and variables. A right-click on these will reveal suggestions for fixes. For a more extensive list, however, see www.python.org/dev/peps/pep-0008/.
This section has been a whirlwind of an introduction to opening a basic graphics window. Knowing how to achieve this is fundamental to the exercises in the remainder of this book or the start of your own graphics or game projects, as it is the key mechanic that supports all these types of applications. In the next section, we will expand on your knowledge of the graphics window by exploring its coordinates and layout.


