Search icon CANCEL
Subscription
0
Cart icon
Your Cart (0 item)
Close icon
You have no products in your basket yet
Save more on your purchases! discount-offer-chevron-icon
Savings automatically calculated. No voucher code required.
Arrow left icon
Explore Products
Best Sellers
New Releases
Books
Videos
Audiobooks
Learning Hub
Free Learning
Arrow right icon
Arrow up icon
GO TO TOP
Learn SwiftUI

You're reading from   Learn SwiftUI An introductory guide to creating intuitive cross-platform user interfaces using Swift 5

Arrow left icon
Product type Paperback
Published in Apr 2020
Publisher Packt
ISBN-13 9781839215421
Length 316 pages
Edition 1st Edition
Languages
Tools
Arrow right icon
Author (1):
Arrow left icon
Chris Barker Chris Barker
Author Profile Icon Chris Barker
Chris Barker
Arrow right icon
View More author details
Toc

Table of Contents (17) Chapters Close

Preface 1. Getting Started with SwiftUI 2. Understanding Declarative Syntax FREE CHAPTER 3. Building Layout and Structure 4. Creating Your First Application 5. Understanding Controls, Views, and Lists 6. Working with Navigation in SwiftUI 7. Creating a Form with States and Data Binding 8. Networking and Linking to Your Existing App Logic 9. Maps and Location Services 10. Updating for iPad with NavigationViewStyle 11. SwiftUI on watchOS 12. SwiftUI versus UIKit 13. Basic Animation in Views 14. Animations in Transitions 15. Testing in SwiftUI 16. Other Books You May Enjoy

Learning about existing UI frameworks

With all great programming languages come great frameworks—in particular, UI frameworks. In the case of Apple, UIKit has been the UI framework of choice since Objective-C, offering everything from labels, fonts, and buttons, to animation.

Written in Objective-C, UIKit has been the binding of the iPhone UI for all developers since the beginning. With a multitude of public APIs and documentation available to developers and solid support from the community, there has been little else to offer in terms of alternatives for Apple development.

Without UIKit, everyday interactions such as tap, pinch, and zoom gestures for drawing wouldn’t be available. UIKit is even responsible for accessibility, which we'll touch on later on in this book.

The binding between UIKit and Swift can be performed in two ways: programmatically or through the Interface Builder.

Creating the UI programmatically

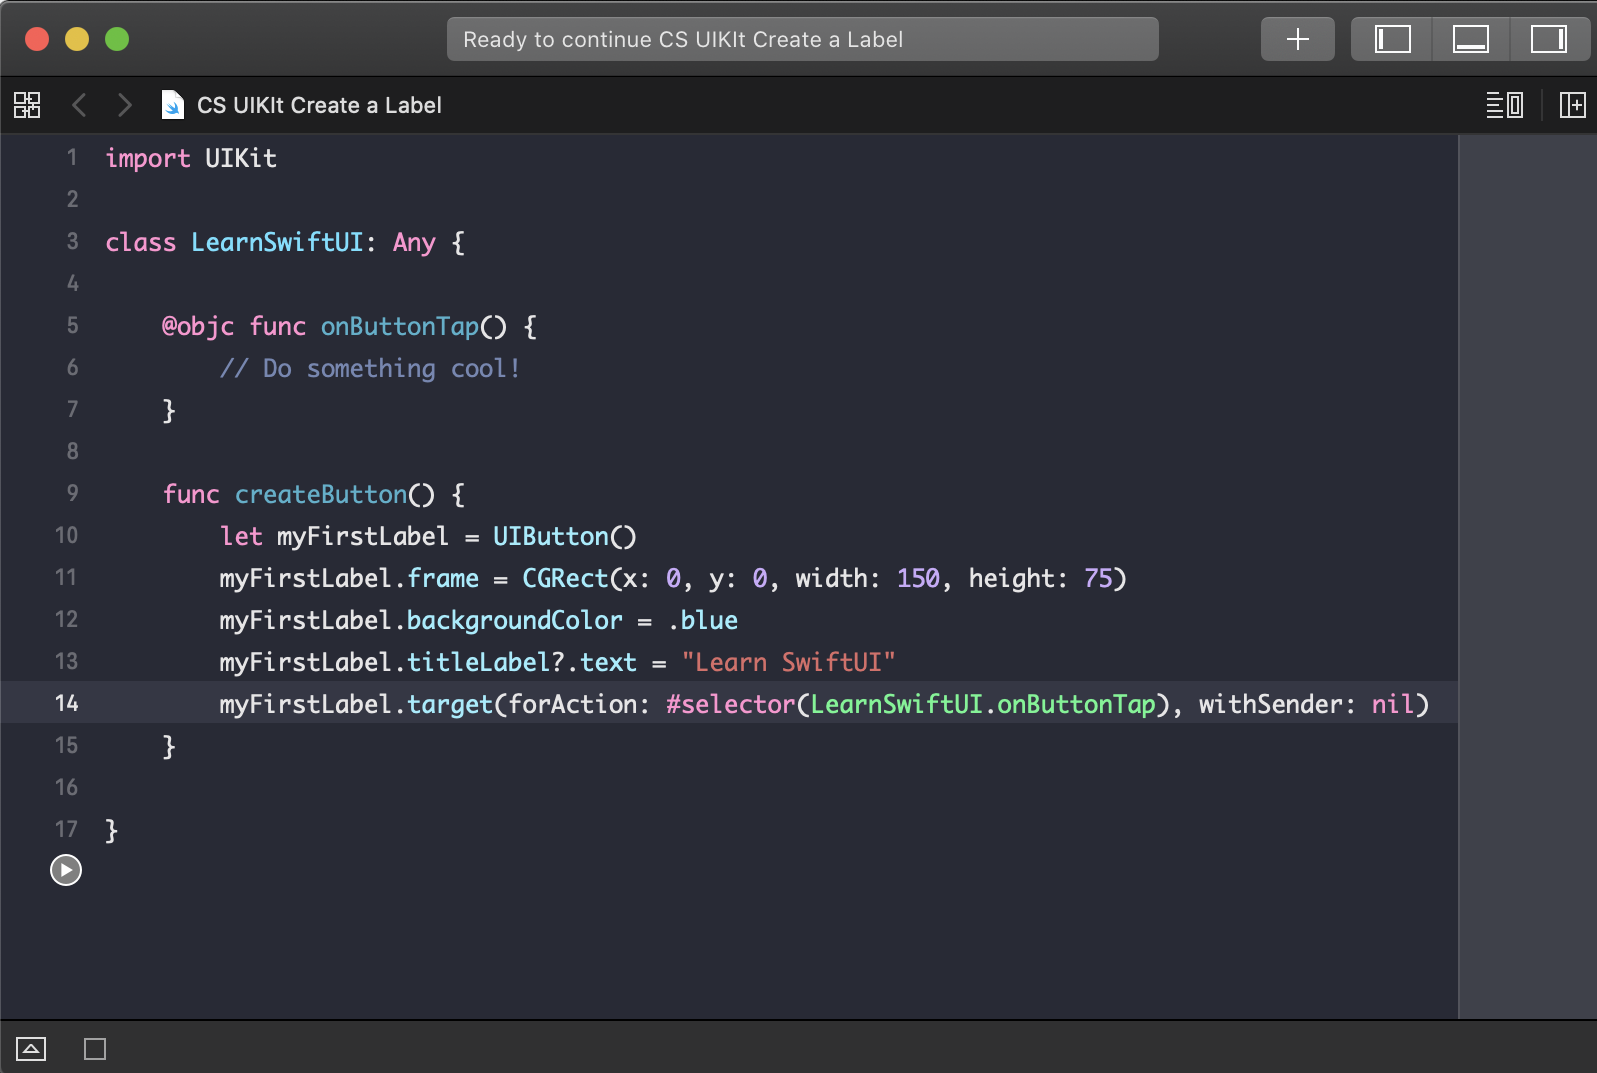
Creating the UI programmatically involves writing around five lines of code, such as in the following example:

As seen in the preceding screenshot, you first need to create an instance of the UIButton, set the frame (origin and size), set the background color, give the button's label some text, set a tap gesture (what happens when you tap the button), and then add the gesture to the button.

All this is done before we even place the button within our view hierarchy, not to mention writing the code to determine what happens when we tap the button.

All in all, quite a few lines of code—for something that could end up being a simple operation.

Creating a UI via Interface Builder

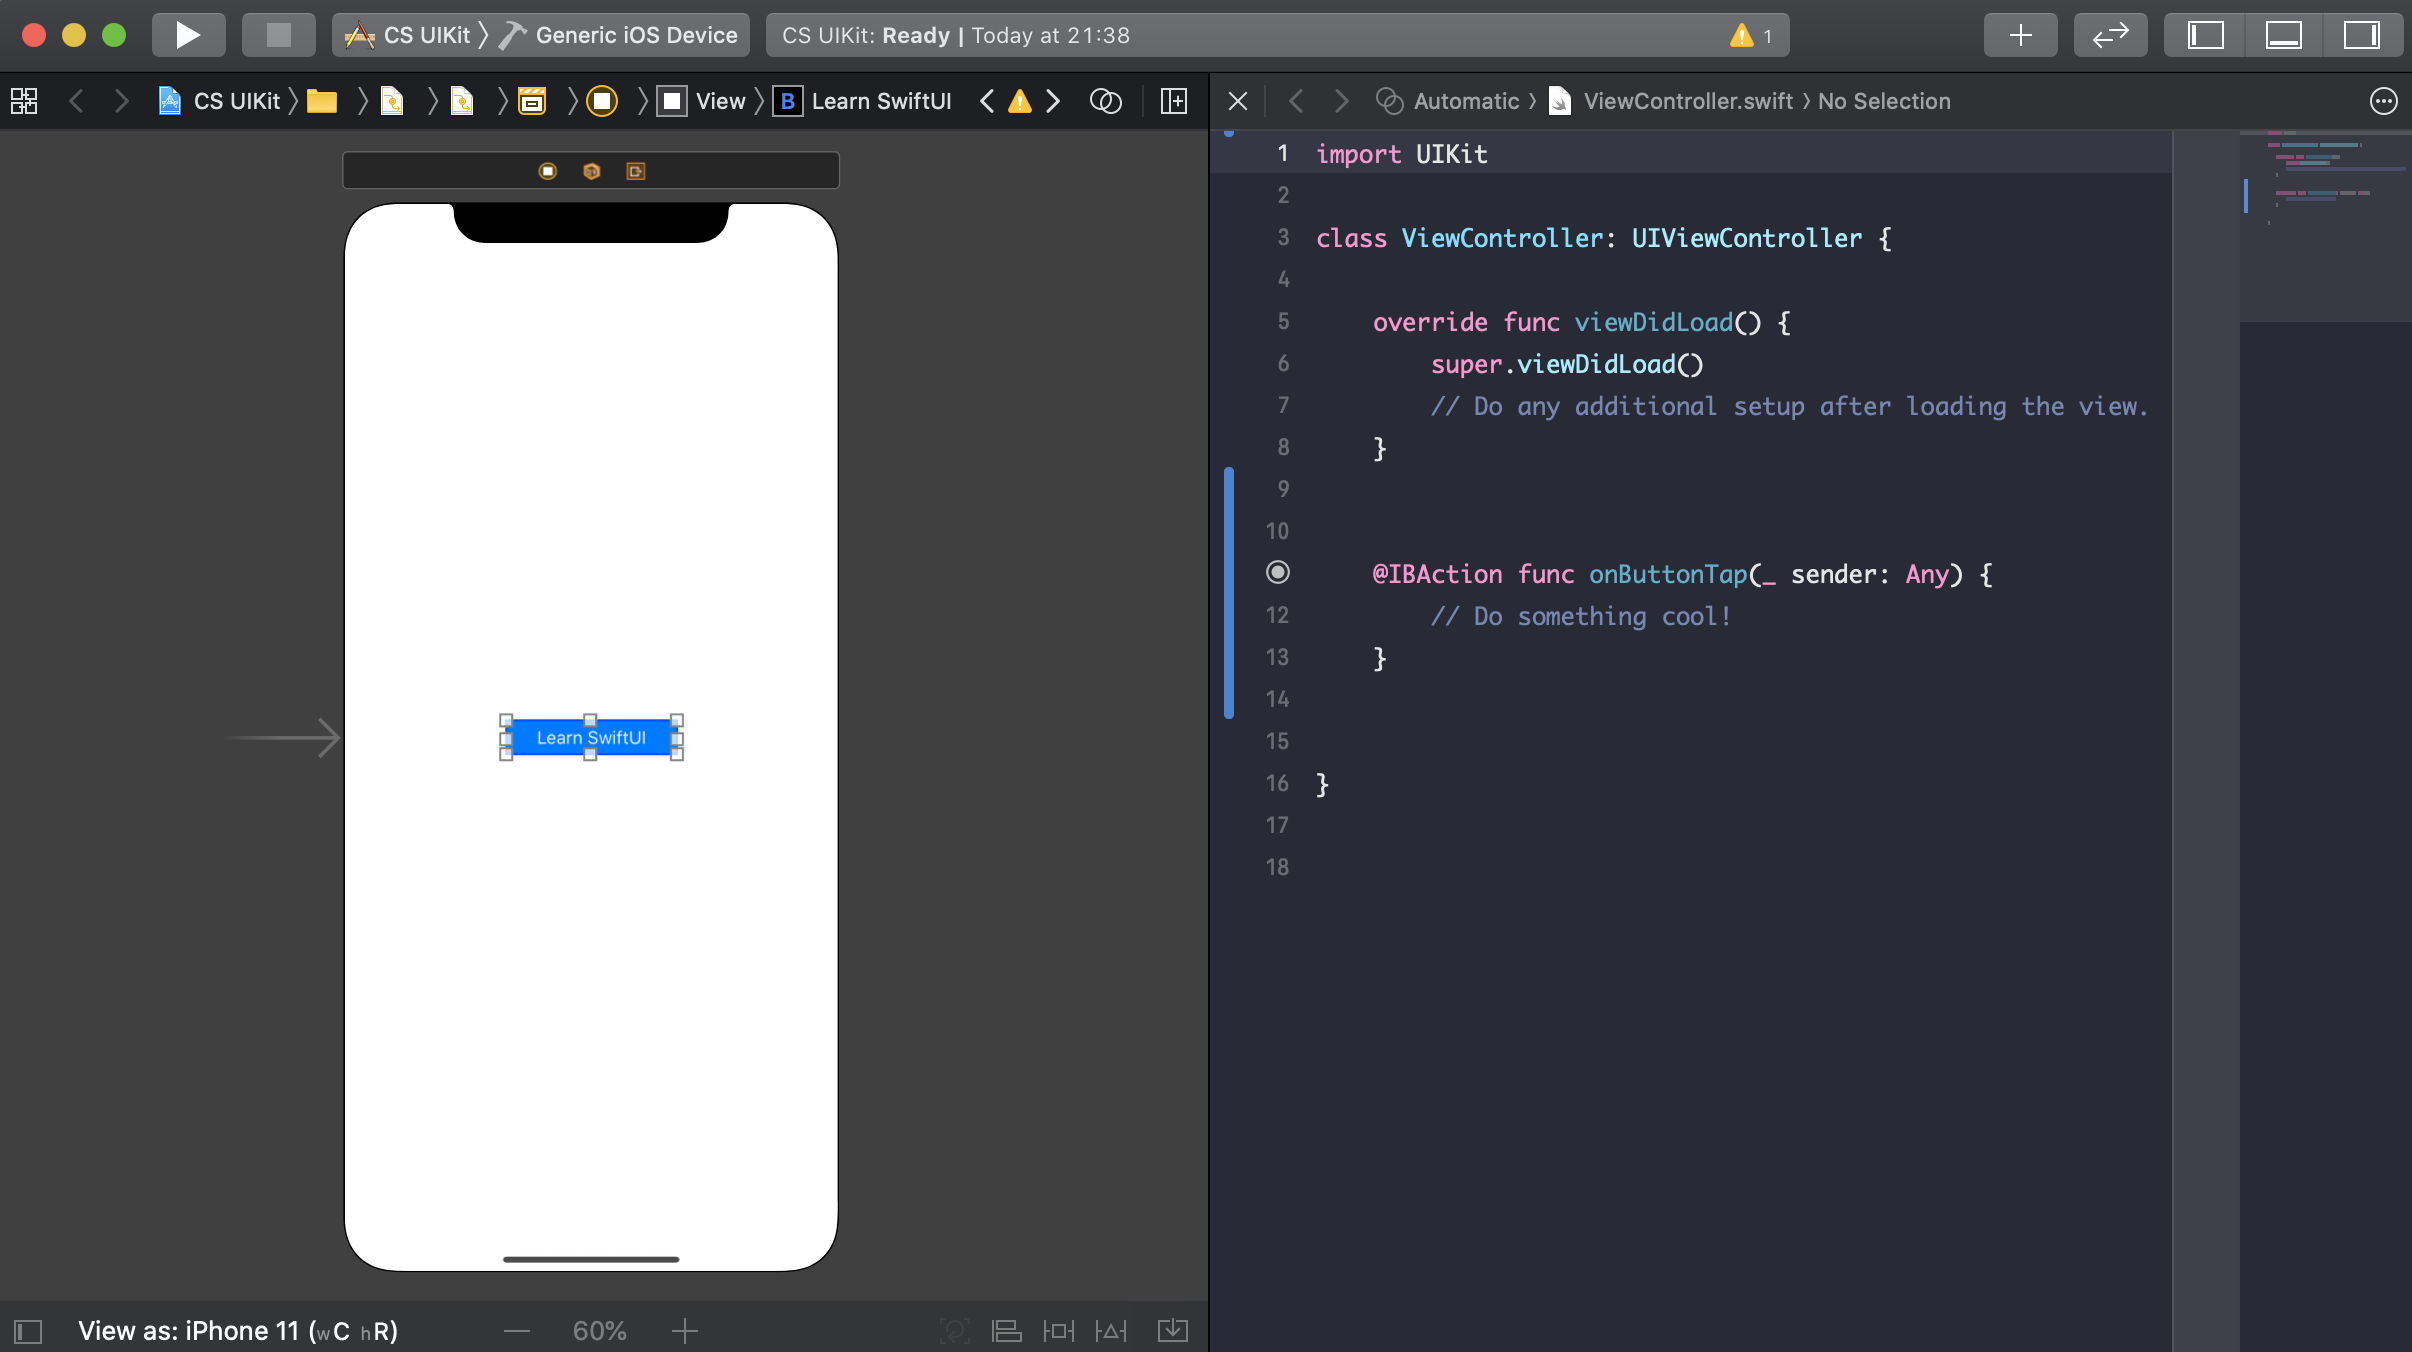
The second way is via Xcode's Interface Builder. Interface Builder is a built-in graphical user interface (GUI) that allows you to use either XML Interface Builder (XIB) files, NeXTSTEP Interface Builder (NIB) files, or Storyboards to design and create your layout with ease. With Interface Builder, you can simply drag and drop components such as Views (UIView), labels (UILabel), and Image Views (UIImageView) straight onto a canvas that can be wired straight into your code. The following is an example of how a button is created in Interface Builder and shows the code to handle the button's tap event:

Interface Builder was not always part of Xcode's integrated development environment (IDE). It was originally an independent application that ran in parallel with Xcode.

Although highly regarded by the Apple community, with the introduction of Swift UIKit slowly started to show its age. Swift's clean and compact syntax started to look bloated and untidy when asked to perform simple tasks, such as creating a frame for a button or performing an animation.

Many thought that this was simply how it was going to be from now on, with a focus on bringing UIKit to macOS deemed to be a greater necessity. But little did we know that Apple was about to change the way we build apps, for the foreseeable future.

In June 2019, at WWDC, Apple introduced us to SwiftUI.

lock icon The rest of the chapter is locked
Register for a free Packt account to unlock a world of extra content!
A free Packt account unlocks extra newsletters, articles, discounted offers, and much more. Start advancing your knowledge today.
Unlock this book and the full library FREE for 7 days
Get unlimited access to 7000+ expert-authored eBooks and videos courses covering every tech area you can think of
Renews at $19.99/month. Cancel anytime
Banner background image