Setting up a lab environment using Hyper-V
Hyper-V can be enabled in numerous ways on a Windows 10/11 operating system. With Hyper-V features built into Windows, this becomes an easy task to complete with only minor configuration changes needed. We will be running Hyper-V inside of a nested virtualization environment, and deeper details on this approach can be found at https://docs.microsoft.com/virtualization/hyper-v-on-windows/user-guide/nested-virtualization.
For the most straightforward and repeatable approach, we will be using instructions that help you enable Hyper-V using the Windows PowerShell method. Let’s begin the configuration using the following steps:
- We must first validate that the device we are using meets the following hardware requirements:
- The operating system must be running either Windows 10 or Windows 11 Enterprise, Pro, or Education versions; Windows Server (version 2012 R2 or later) can also be used
- The installed 64-bit processor (either AMD or Intel) supports Second Level Address Translation (SLAT)
- The installed CPU supports the VM Monitor Mode Extension (called VT-x on Intel-based CPUs)
- A minimum of 4 GB of memory installed
Important note
Virtual machines share memory with the Hyper-V host computing environment, so you will need enough memory to handle the workload for these labs. We recommend at least 8 GB of memory to successfully complete the lab exercises in this book.
- The following configurations will need to be enabled in the system BIOS (each manufacturer will have a slightly different way to enter the boot/BIOS configuration menus, so it is best to search for and identify configuration instructions pertaining to your specific device model):
- A feature called Virtualization Technology (each motherboard manufacturer may have a different label for this, e.g., Intel ® Virtualization Technology or Intel VT-d where appropriate)
- A feature called Hardware Enforced Data Execution Prevention
- Once the above requirements are met, we can continue with the setup of the intended device by opening Windows PowerShell as an administrator. This can be done by opening the Windows start menu, typing
PowerShell, and then right-clicking on the entry and selecting Run as Administrator. You may need to select Yes to accept the user account control popup to continue. - Enter the
systeminfocommand and hit Enter to run the command:- At the bottom of the returned result set, if you receive the message shown in Figure 1.10 saying
A hypervisor has been detected. Features required for Hyper-V will not be displayed, then you already have Hyper-V installed and can skip to Step 6 to continue network switch configuration for our Hyper-V lab:
- At the bottom of the returned result set, if you receive the message shown in Figure 1.10 saying

Figure 1.10 – Hyper-V requirements indicating that a hypervisor has been detected
- At the bottom of the result set returned, if you receive a list of four requirements as shown in Figure 1.11, confirm that all requirements result in a Yes response validating that all requirements for Hyper-V have been met on this device:

Figure 1.11 – Hyper-V requirements indicating that a hypervisor has not been detected
- Reusing the already open administrative Windows PowerShell, enter the following command to enable the Hyper-V components on your device:
Enable-WindowsOptionalFeature -Online -FeatureName Microsoft-Hyper-V -All
Important – when using Windows Server for your Hyper-V lab
If you choose to use Window Server as your operating system for this Hyper-V lab environment, you can utilize the following command to install both Hyper-V and the Hyper-V Management Console for use on Windows Server:
Install-WindowsFeature -Name Hyper-V -IncludeManagementTools
- When you are prompted to reboot the device, please choose Yes. Note that you may be required to reboot the device multiple times to complete the setup and configuration.
- If this is the first time you have installed Hyper-V on this device, you can proceed to Step 7:
- If you are unsure or have an existing virtual switch configured, reuse the already open administrative Windows PowerShell and enter the following command:
Get-VMSwitch
- Carefully review the results returned, per Figure 1.12, to determine whether any of the existing virtual switches have a
SwitchTypevalue ofExternal:
- If you are unsure or have an existing virtual switch configured, reuse the already open administrative Windows PowerShell and enter the following command:

Figure 1.12 – Running the Get-VMSwitch PowerShell command to determine the existing virtual switches
- Capture the name of the existing virtual switch that has a
SwitchTypevalue ofExternal– we will use this later in multiple important configuration changes in Step 9 that are specific to your configuration. Please skip to Step 9 to continue our configuration.
- Next, we will determine the network adapter for the device that you will utilize for connecting to the internet. Reusing the already open administrative Windows PowerShell, enter the following command and review the results returned in Figure 1.13:
(Get-NetAdapter | Where-Object {$_.Status -eq "Up" -and !$_.Virtual}).Name
Issuing the previous Get-NetAdapter command will present the results shown in Figure 1.13:

Figure 1.13 – Running a PowerShell command to determine a network adapter connected to the internet
The results in your open Windows PowerShell instance should successfully identify the name of the current network interface you are using for your internet connection on this device. Verify that this is the interface that you want to use for this lab setup.
Optional – If you intend to use another network interface for this internet connection, enter the following command in Windows PowerShell and review the results returned in Figure 1.14:

Figure 1.14 – Running a PowerShell command to determine a network adapter connected to the internet
In the preceding instance, NetAdapterName was identified as Ethernet 12, but we may want to use Ethernet 14 instead. In this case, we will update the following command to be used later in Step 9:
New-VMSwitch -Name AZ801PacktLabExternal -AllowManagementOS $true -NetAdapterName Ethernet 14
- Visit https://www.microsoft.com/evalcenter/evaluate-windows-server-2022-preview to download an evaluation copy of Windows Server 2022. The following steps will help you ensure that the newly downloaded evaluation software is safely unblocked for use on your system:
- Once the ISO file has finished downloading, you will need to rename the ISO to
Server2022.isofor our scripted lab deployment. - Locate and right-click on the newly downloaded file and select Properties. In the properties, click the General tab near the bottom. There is a security section where you will select the checkbox for Unblock. Select OK to continue:
- Once the ISO file has finished downloading, you will need to rename the ISO to

Figure 1.15 – Unblocking a recently downloaded ISO image file for use in our lab
- Copy the downloaded file into
C:\AZ801PacktLab\iso.
- Use PowerShell to create a demo VM:
- We will be utilizing the following PowerShell script to automatically build out all required network, disk, and virtual machine requirements for our AZ-801 local Hyper-V lab (this script is also located at https://github.com/cgill/Books/blob/main/AZ-801/CH1/CH1-BuildHVLab.ps1 for a copy-paste approach):
mkdir C:\AZ801PacktLab
Set-Location C:\AZ801PacktLab
$VMName='AZ801PacktLab-DC-01','AZ801PacktLab-HV-01','AZ801PacktLab-HV-02','AZ801PacktLab-FS-01'
$VMExternalSwitch='AZ801PacktLabExternal'
$VMInternalSwitch='AZ801PacktLabInternal'
$VMIso='c:\AZ801PacktLab\iso\Server2022.iso'
New-VMSwitch -Name $VMExternalSwitch -AllowManagementOS $true -NetAdapterName (Get-NetAdapter | Where-Object {$_.Status -eq "Up" -and !$_.Virtual}).Name
New-VMSwitch -name $VMInternalSwitch -SwitchType Internal
Foreach ($VM in $VMName) {
    New-VM -Name $VM -MemoryStartupBytes 2GB -BootDevice VHD -NewVHDPath ".\VMs\$VM.vhdx" -Path .\VMData -NewVHDSizeBytes 40GB -Generation 2 -Switch $VMInternalSwitch
    if($VM -match '-HV-') {
        Set-VMProcessor -VMName $VM -ExposeVirtualizationExtensions $true
        Set-VMMemory -VMName $VM -DynamicMemoryEnabled $false
        Get-VMNetworkAdapter -VMName $VM | Set-VMNetworkAdapter -MacAddressSpoofing On
    }
    Add-VMScsiController -VMName $VM
    Add-VMDvdDrive -Path $VMIso -VMName $VM -ControllerNumber 1 -ControllerLocation 0
    $VMDvd = Get-VMDvdDrive -VMName $VM
    Set-VMFirmware -VMName $VM -FirstBootDevice $VMDvd
    Set-VMKeyProtector -NewLocalKeyProtector -VMName $VM
    Enable-VMTPM -VMName $VM
}
Hyper-V switch management and pre-existing virtual switches
Please note that if you have already been using Hyper-V on the device where you intend to build our lab environment, you will want to consider either removing your existing Hyper-V external switch or making the necessary script adjustments for the existing virtual switch name in your configuration.
Now that we have created all of the necessary virtual machines, we will need to install the Windows Server 2022 operating system on all of our virtual machines. Let’s begin the configuration using the following steps:
- Install Windows Server 2022 on the VM:
- Open the Windows Start menu and search for
Hyper-V Manager, then select Open. You will be presented with a list of virtual machines that we have previously created via a script. - Connect to one of our four virtual machines by right-clicking and selecting Connect…, as displayed in the following screenshot:
- Open the Windows Start menu and search for
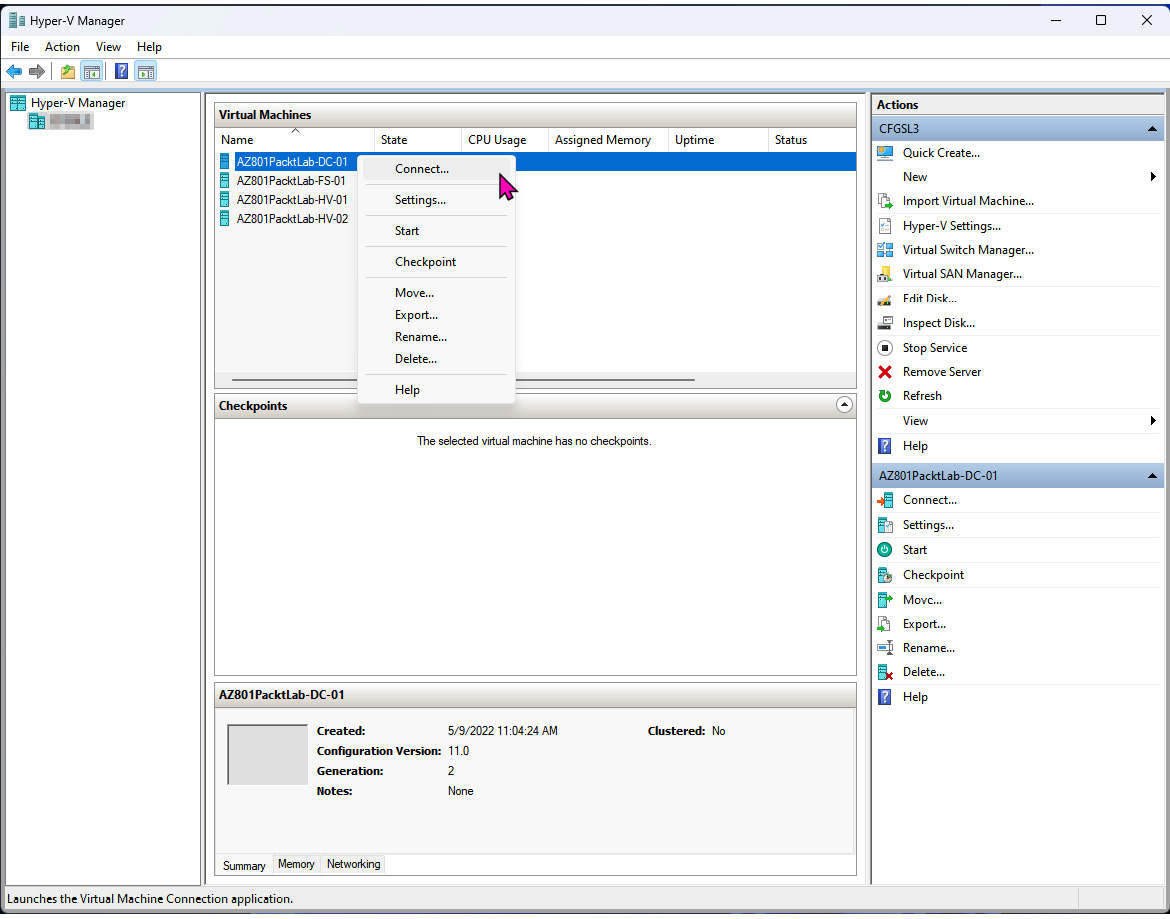
Figure 1.16 – Selecting a virtual machine to start in Hyper-V Manager
- From the Virtual Machine Connection window, we can either select the Start button in the center of the screen or select the green Start button in the taskbar at the top of the screen:
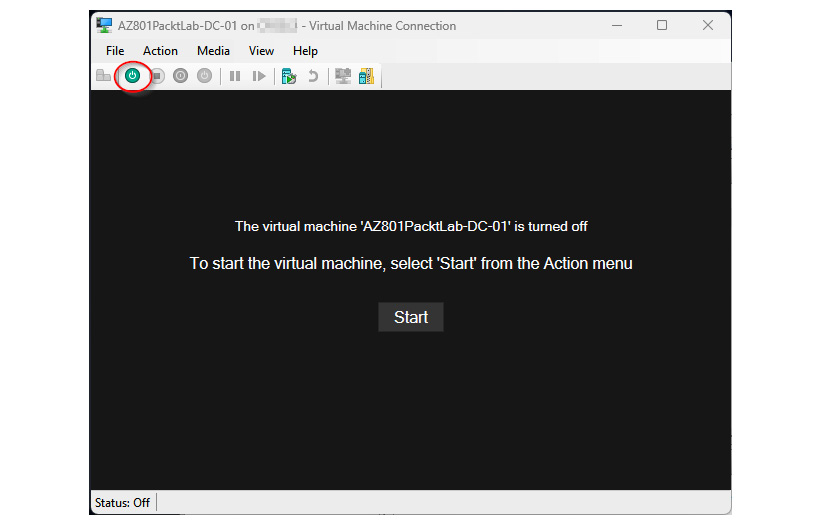
Figure 1.17 – Starting a virtual machine inside of the Virtual Machine Connection console
- Ensure that you press a key inside Virtual Machine Connection to begin the operating system’s installation quickly after the virtual machine boots. If you do not receive a Microsoft Server Operating System Setup screen, you will need to reset the VM and attempt to boot into the DVD again to begin the installation.
- In Microsoft Server Operating System Setup, select Next to continue:
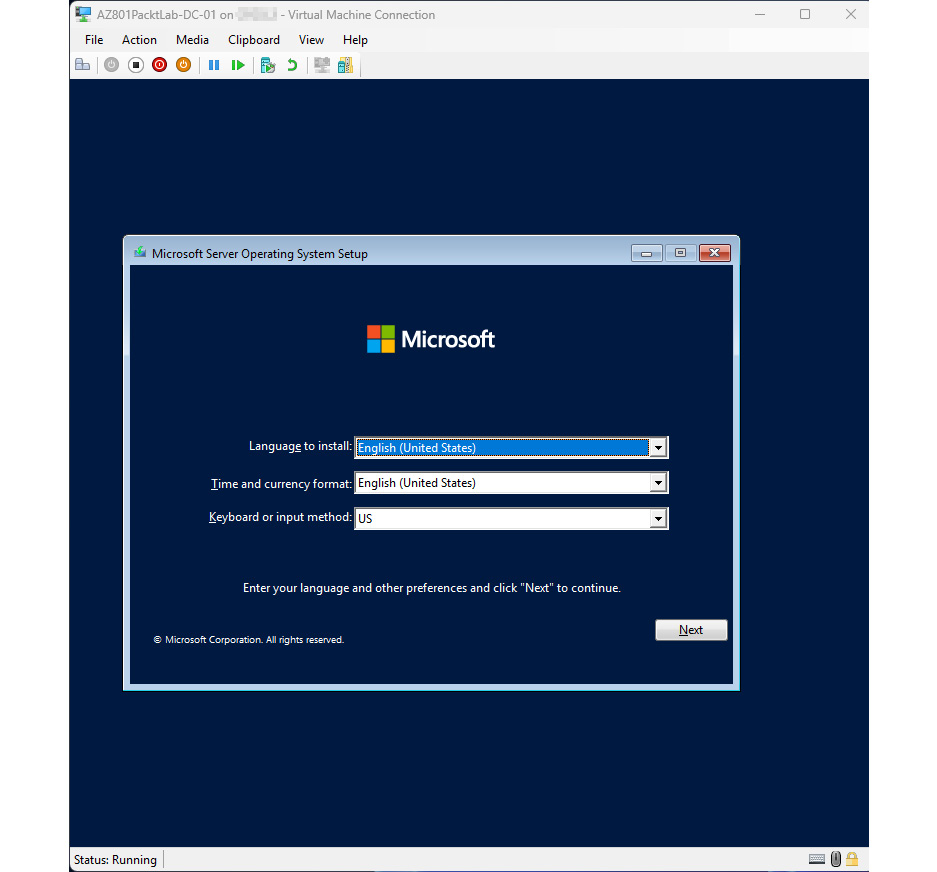
Figure 1.18 – Starting the Microsoft Server 2022 operating system setup
- On the following page, select Install Now:
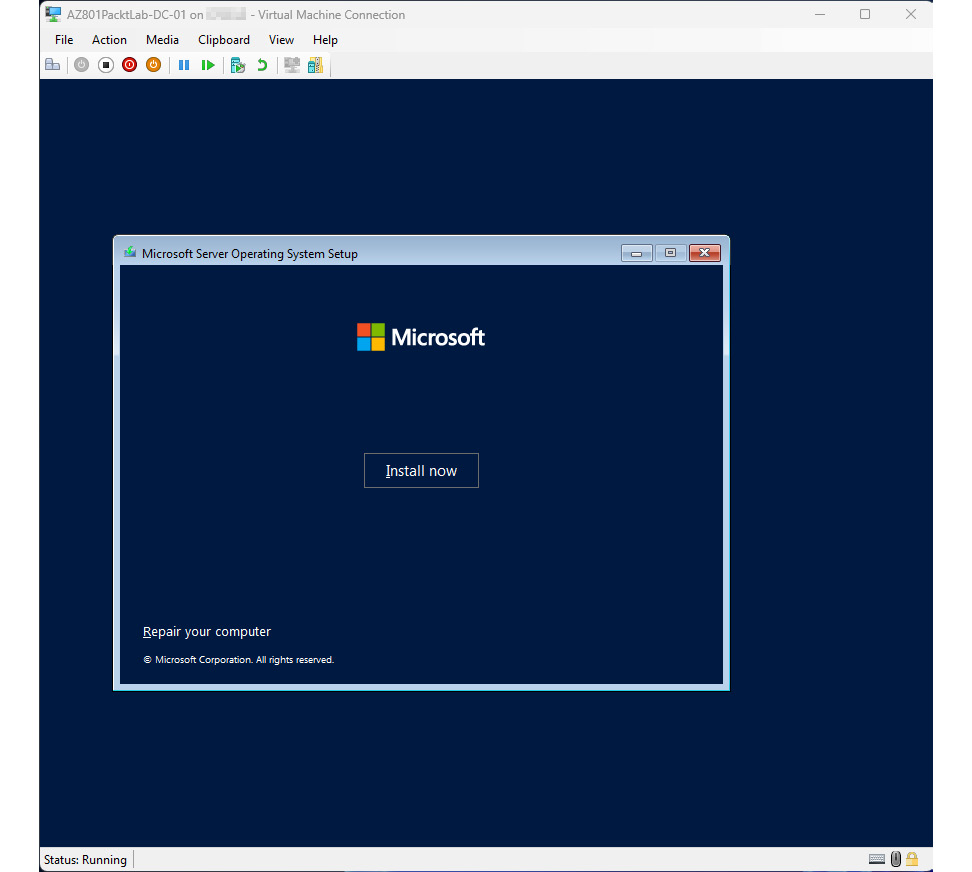
Figure 1.19 – Continuing the Windows Server 2022 operating system installation
- In Activate Microsoft Server Operating System Setup, select I don’t have a product key to continue our installation as shown in the following screenshot. Please note that these evaluation virtual machines will have 180 days before they are no longer licensed under the evaluation period:
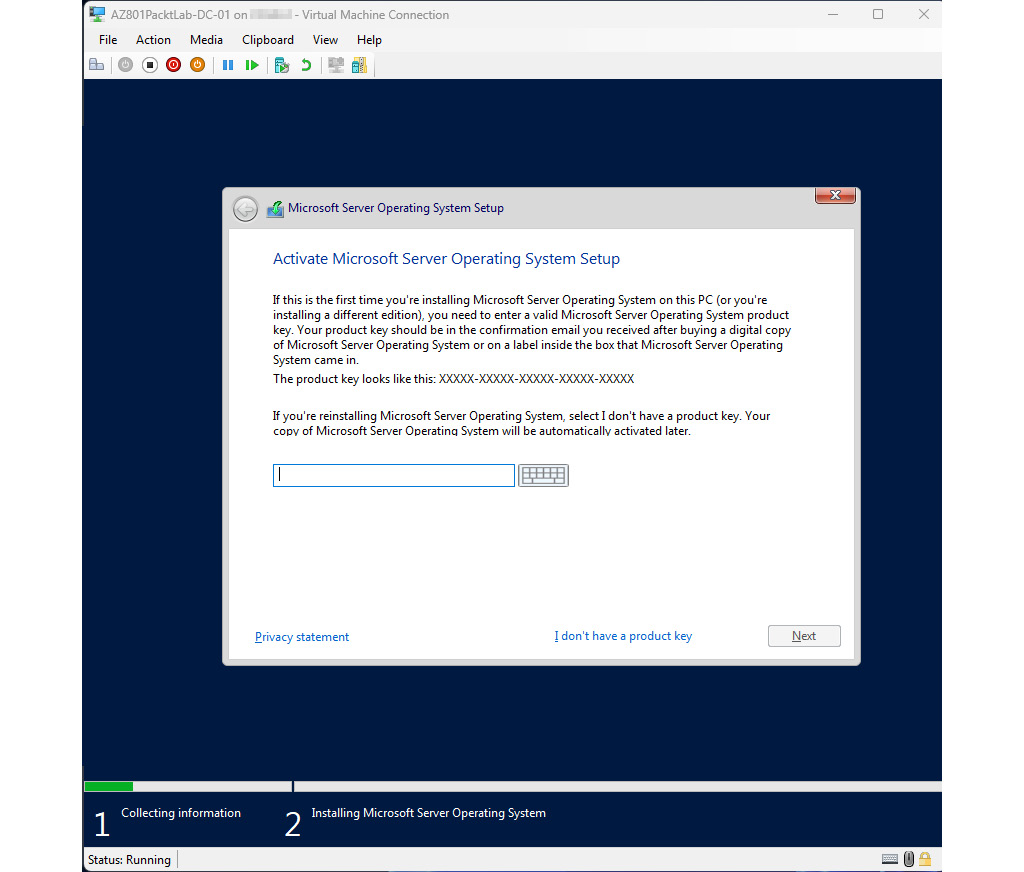
Figure 1.20 – Selecting to use an evaluation version in the Windows Server 2022 installation
- On the Select the operating system you want to install screen, change your selection to Windows Server 2022 Datacenter (Desktop Experience), and select Next to continue:
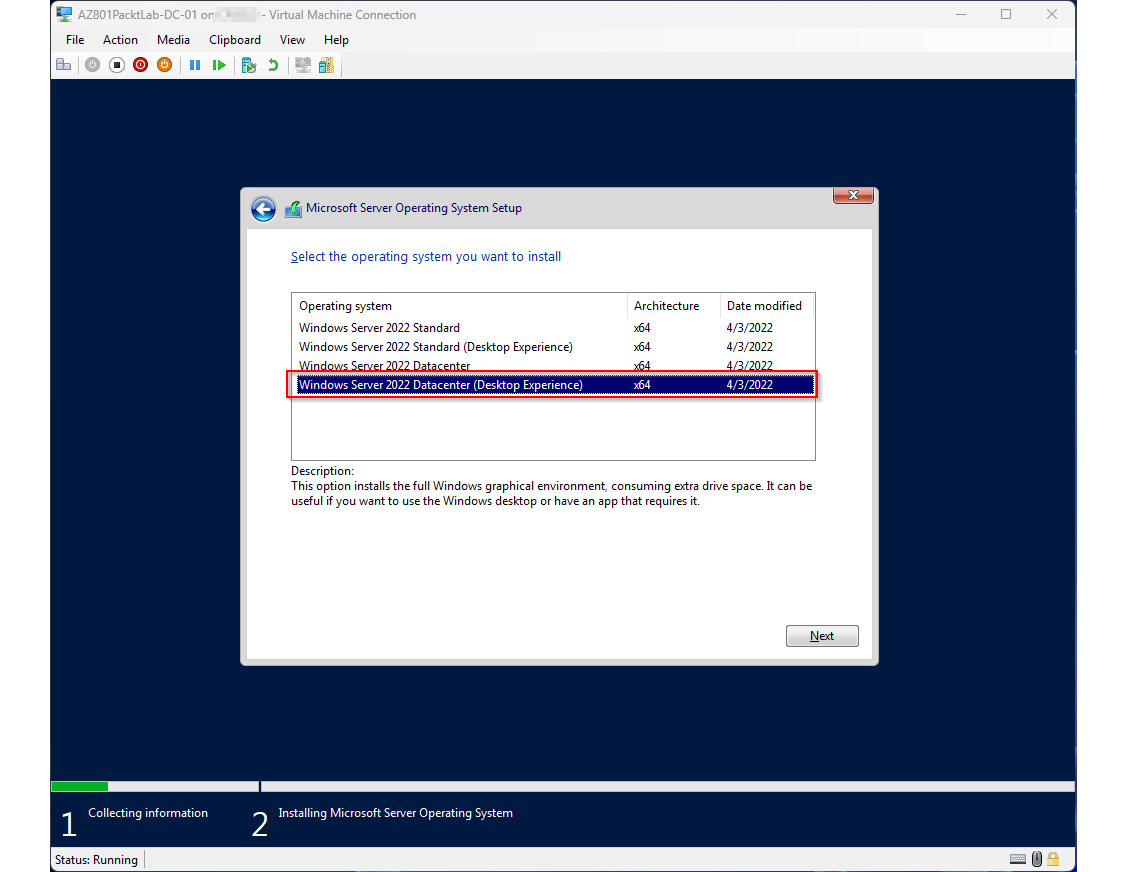
Figure 1.21 – Selecting to install the Windows Server 2022 Datacenter (Desktop Experience)
- On the Applicable notices and license terms page, select I accept… and then select Next to continue:
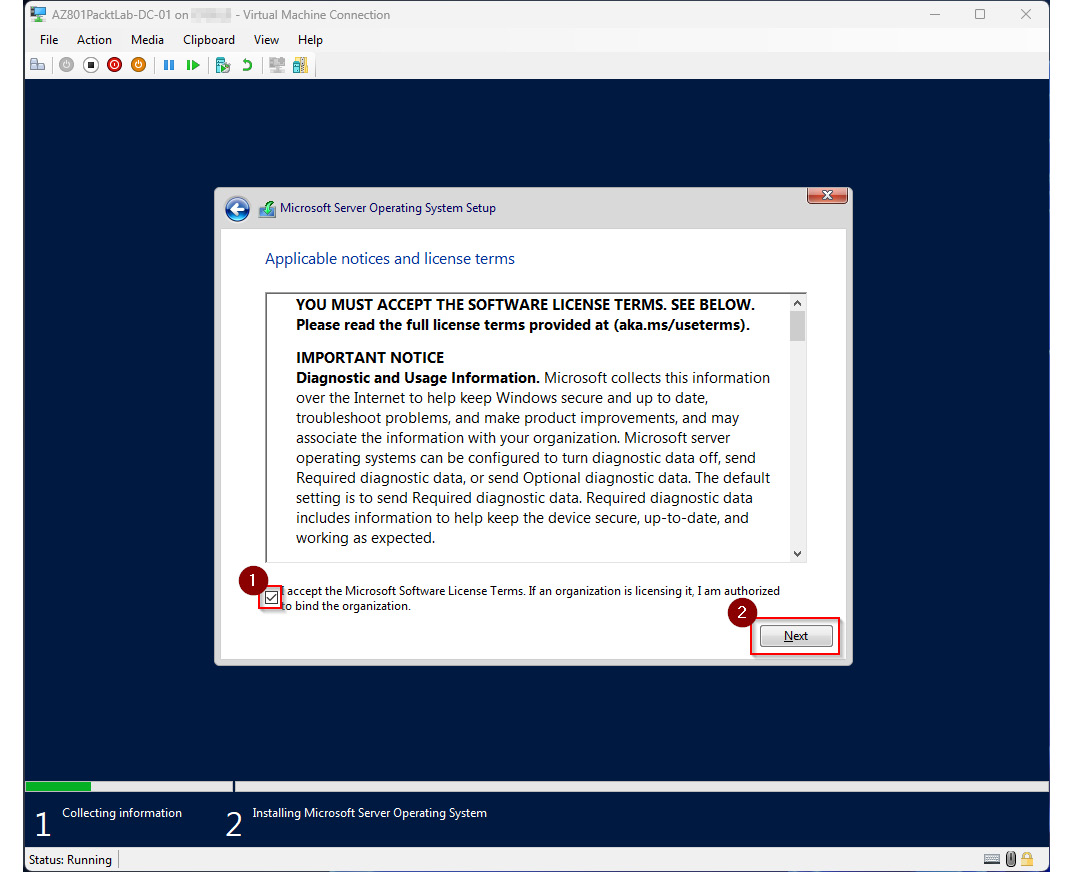
Figure 1.22 – Accepting the Microsoft Software license terms
- On the Which type of installation do you want? page, select Custom: Install Microsoft Server Operating System only (advanced) as shown in the following screenshot:
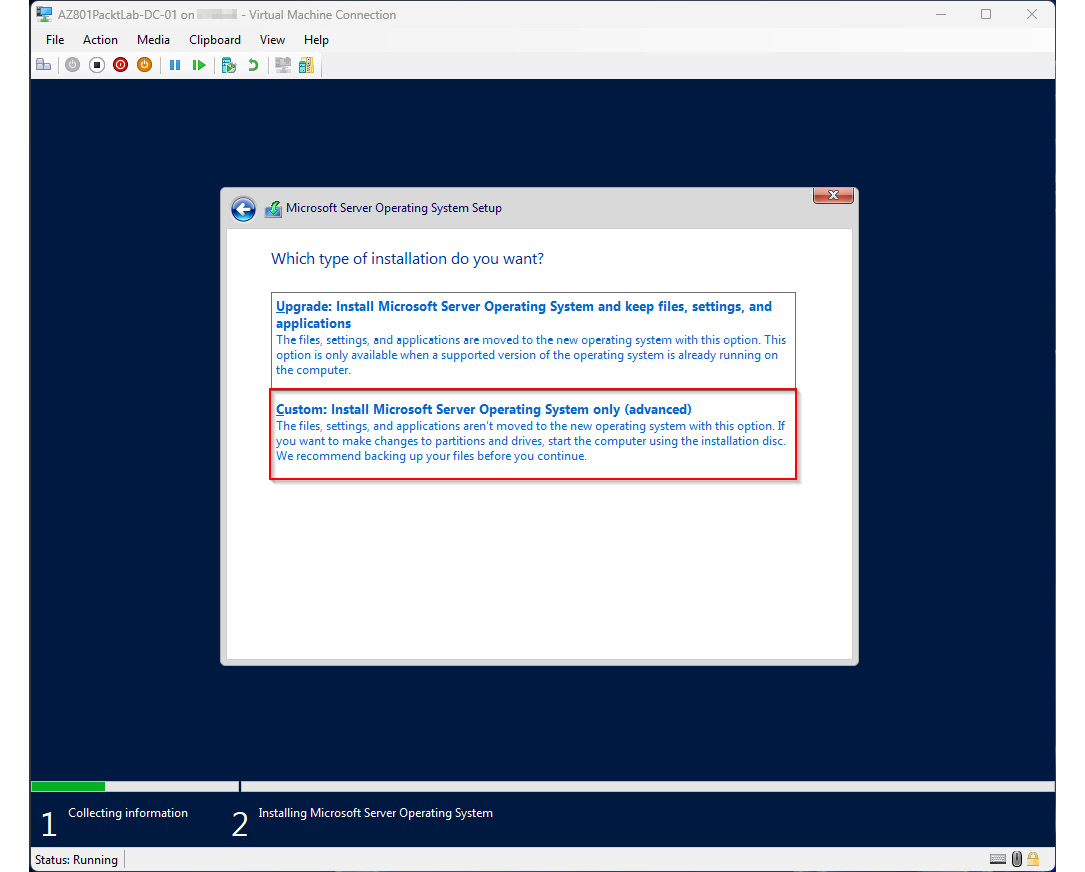
Figure 1.23 – Selecting Custom: Install Microsoft Server Operating System only (advanced)
- Select Next on the Where do you want to install the operating system? page:
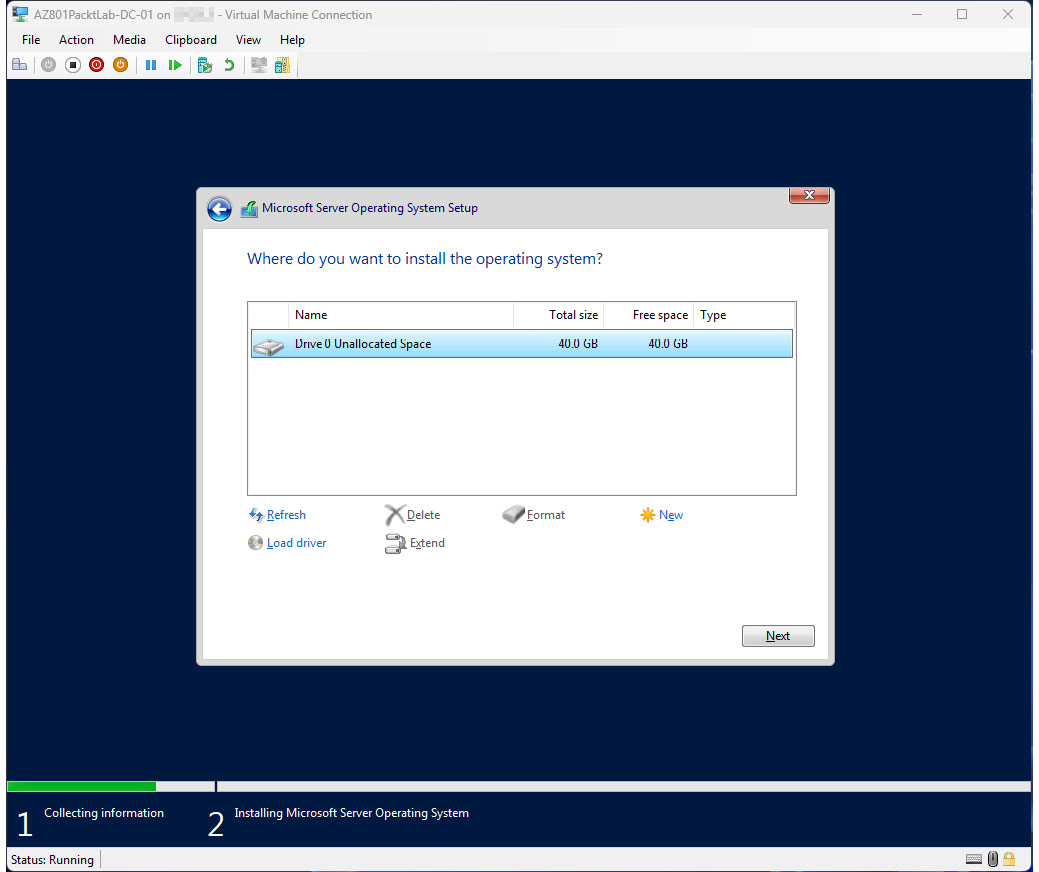
Figure 1.24 – Installing the operating system on the available disk
- Monitor the Status page to confirm that the installation succeeds:
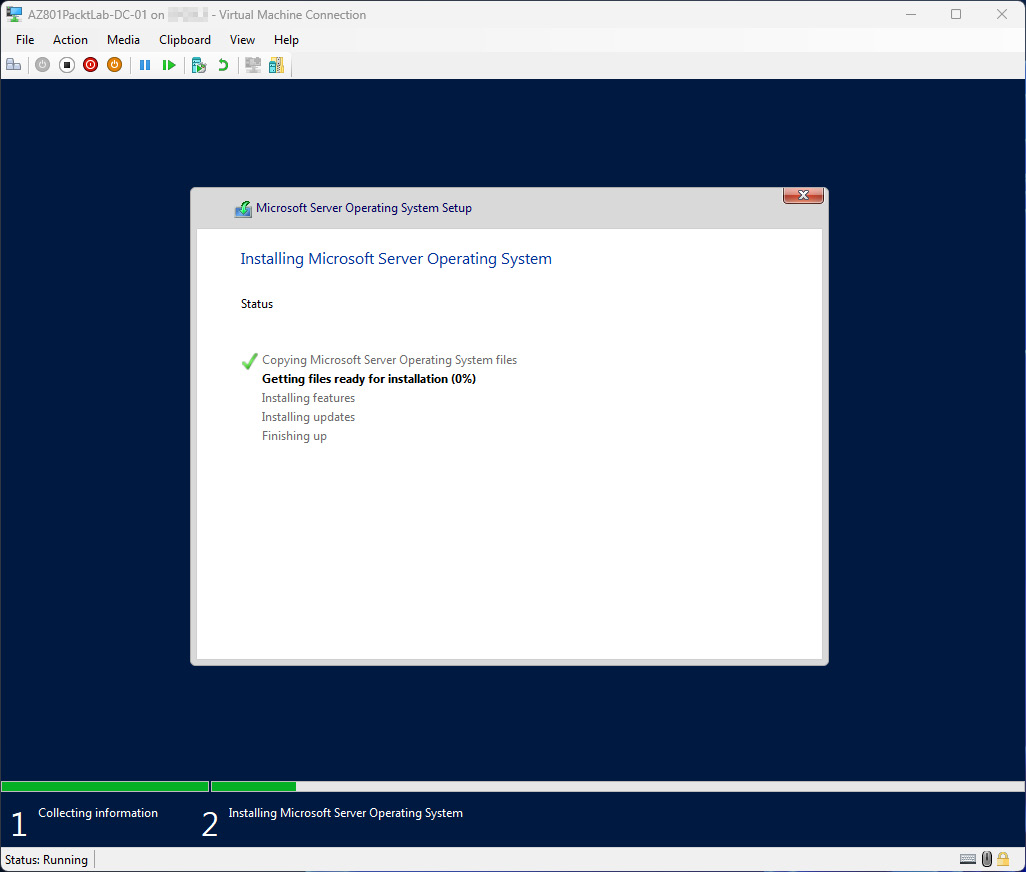
Figure 1.25 – Installing Microsoft Server Operating System
- After the virtual machine reboots a few times, you will return to the Customize settings screen and be prompted for an administrator passcode. We recommend you use
Packtaz801guiderocksas a passcode for all your lab virtual machines. You may also create your own passcode for these lab machines; just be sure to record the passcode in a password keeper for later use in the lab exercises:
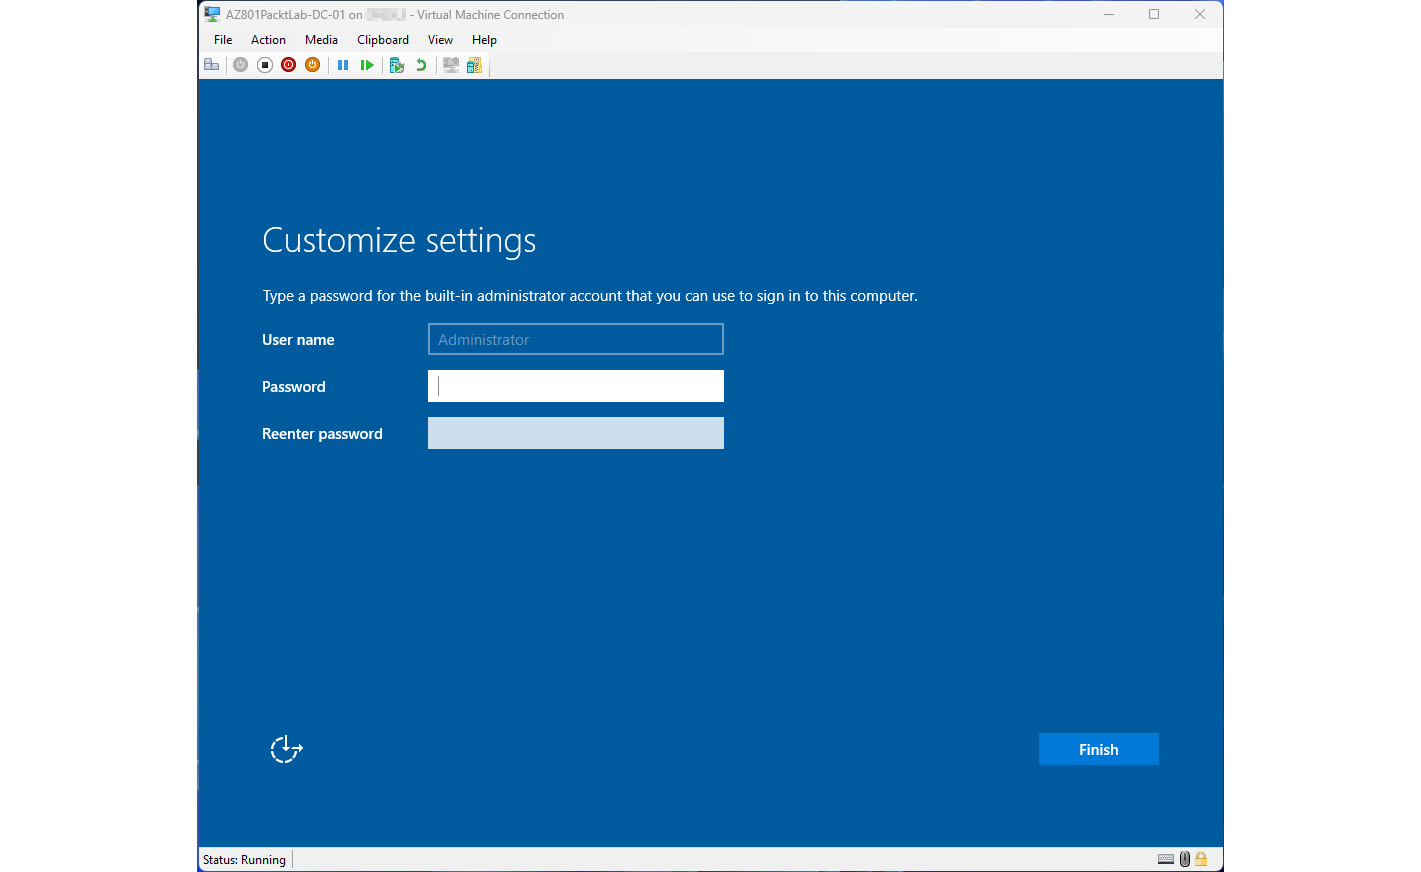
Figure 1.26 – Setting a new password for the administrator account
- When prompted to adjust the display configuration, choose an appropriate resolution for your virtual machine, and then select Connect, as shown in the following screenshot:
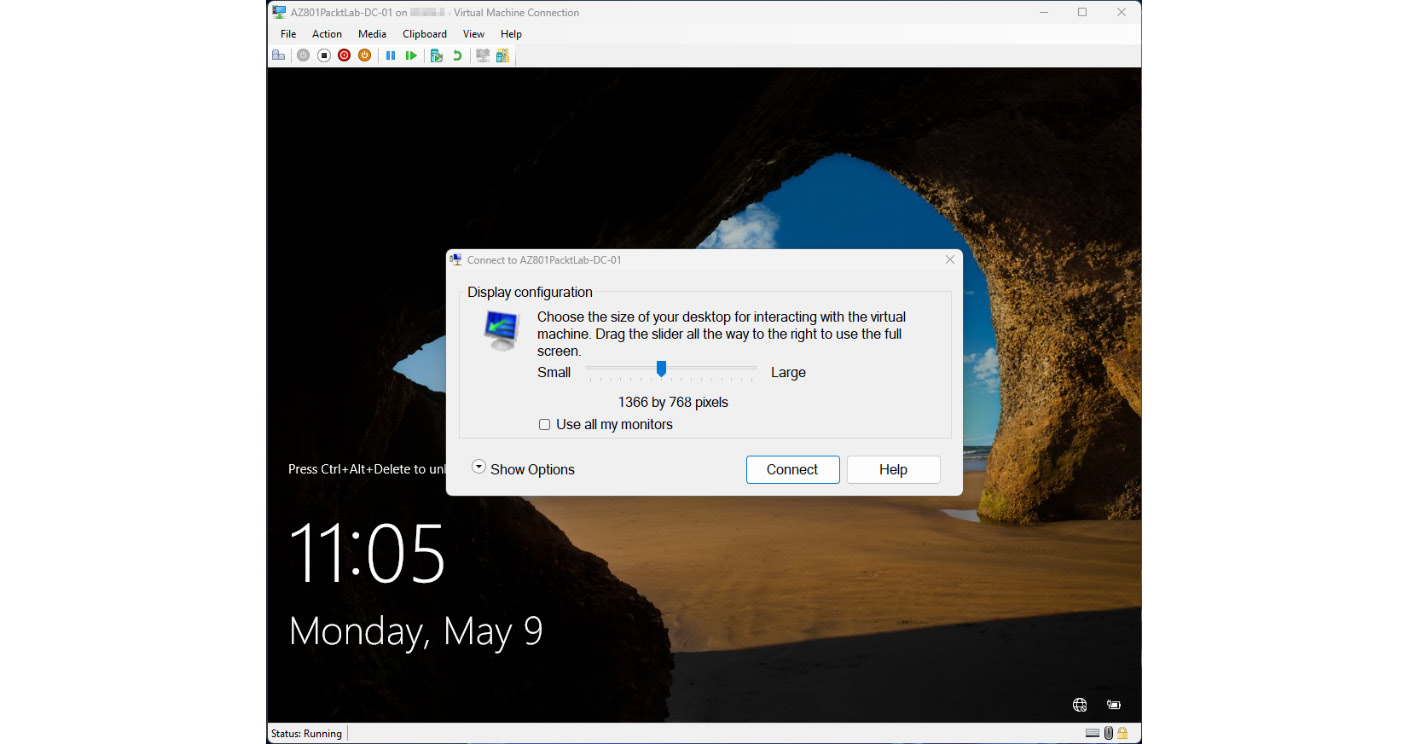
Figure 1.27 – Adjusting the display configuration of the virtual machine
- Power down the virtual machine.
- Repeat the preceding steps for each of the four virtual machines within Hyper-V Manager to complete the lab setup.
This concludes the initial Hyper-V lab setup for use throughout the rest of the book and will position you for success throughout all the lab exercises. There will be some additional steps needed throughout the following chapters in this book, and these steps will be detailed in the technical requirements at the beginning of each chapter.


