(For more resources related to this topic, see here.)
Basic light sources
You use lights to give a scene brightness, ambience, and depth. Without light, everything looks flat and dull. Use additional light sources to even-out lighting and to set up interior scenes. In Unity, lights are components of GameObjects. The different kinds of light sources are as follows:
- Directional lights: These lights are commonly used to mimic the sun. Their position is irrelevant, as only orientation matters. Every architectural scene should at least have one main Directional light. When you only need to lighten up an interior room, they are more tricky to use, as they tend to brighten up the whole scene, but they help getting some light through the windows, inside the project. We'll see a few use cases in the next few sections.
- Point lights: These lights are easy to use, as they emit light in any direction. Try to minimize their Range, so they don't spill light in other places. In most scenes, you'll need several of them to balance out dark spots and corners and to even-out the overall lighting.
- Spot lights: These lights only emit light into a cone and are good to simulate interior light fixtures. They cast a distinct bright circular light spot so use them to highlight something.
- Area lights: These are the most advanced lights, as they allow a light source to be given an actual rectangular size. This results in smoother lights and shadows, but their effect is only visible when baking and they require a pro-license. They are good to simulate light panels or the effect of light coming in through a window. In the free version, you can simulate them using multiple Spot or Directional Lights.
Shadows
Most current games support some form of shadows. They can be pre-calculated or rendered in real-time. Pre-calculation implies that the effect of shadows and lighting is calculated in advance and rendered onto an additional material layer. It only makes sense for objects that don't move in the scene. Real-time shadows are rendered using the GPU, but can be computationally expensive and should only be used for dynamic lighting. You might be familiar with real-time shadows from applications such as SketchUp and recent versions of ArchiCAD or Revit.
Ideally, both techniques are combined. The overall lighting of the scene (for example, buildings, street, interiors, and so on) is pre-calculated and baked in texture maps. Additional real-time shadows are used on the moving characters. Unity can blend both types of shadows to simulate dynamic lighting in large scenes. Some of these techniques, however, are only supported in the pro-version.
Real-time shadows
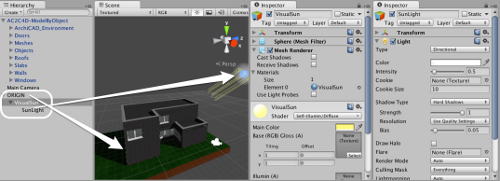
Imagine we want to create a sun or shadow study of a building. This is best appreciated in real-time and by looking from the outside. We will use the same model as we did in the previous article, but load it in a separate scene. We want to have a light object acting as a sun, a spherical object to act as a visual clue where the sun is positioned and link them together to control the rotations in an easy way. The steps to be followed to achieve this are as follows:
- Add a Directional light, name it SunLight and choose the Shadow Type. Hard shadows are more sharply defined and are the best choice in this example, whereas Soft shadows look smoother and are better suited for a subtle, mood lighting.
- Add an empty GameObject by navigating to GameObject | Create Empty that is positioned in the center of the scene and name it ORIGIN.
- Create a Sphere GameObject by navigating to GameObject | Create Other | Sphere, name it VisualSun.
- Make it a child of the ORIGIN by dragging the VisualSun name in the Hierarchy Tab onto the ORIGIN name.
- Give it a bright, yellow material, using a Self-Illumin/Diffuse Shader. Deactivate Cast Shadows and Receive Shadows on the Mesh Renderer component.

- After you have placed the VisualSun as a child of the origin object, reset the position of the Sphere to be 0 for X, Y and Z. It now sits in the same place as its parent. Even if you move the parent, its local position stays at X=0, Y=0 and Z=0, which makes it convenient for a placement relative to its parent object. Alter the Z-position to define an offset from the origin, for example 20 units. The negative Z will facilitate the SunLight orientation in the next step.
- The SunLight can be dragged onto the VisualSun and its local position reset to zero as well. When all rotations are also zero, it emits light down the Z-axis and thus straight to the origin.
- If you want to have a nice glow effect, you can add a Halo by navigating to Components | Effects | Halo and then to SunLight and setting a suitable Size.
We now have a hierarchic structure of the origin, the visible sphere and the Directional light, that is accentuated by the halo. We can adjust this assembly by rotating the origin around. Rotating around the Y-axis defines the orientation of the sun, whereas a rotation around the X-axis defines the azimuth. With these two rotations, we can position the sun wherever we want.
Lightmapping
Real-time lighting is computationally very expensive. If you don't have the latest hardware, it might not even be supported. Or you might avoid it for a mobile app, where hardware resources are limited. It is possible to pre-calculate the lighting of a scene and bake it onto the geometry as textures. This process is called Lightmapping, for more information on it visit: http://docs.unity3d.com/Documentation/Manual/Lightmapping.html
While actual calculations are rather complex, the process in Unity is made easy, thanks to the integrated Beast Lightmapping. There are a few things you need to set up properly. These are given as follows:
- First, ensure that any object that needs to be baked is set to Static. Each GameObject has a static-toggle, right next to the Name property. Activate this for all models and light objects that will not move in the Scene.
- Secondly, ensure that all geometry has a second set of texture coordinates, called UV2 coordinates in Unity. Default GameObjects have those set up, but for imported models, they usually need to be added. Luckily for us, this is automated when Generate Lightmap UVs is activated on the model import settings given earlier in Quick Walk Around Your Design, in the section entitled, Controlling the import settings.
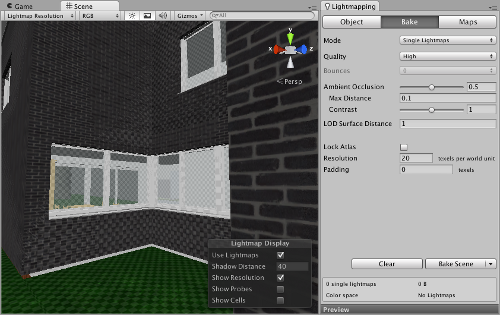
- If all lights and meshes are static and UV2 coordinates are calculated, you are ready to go. Open the Lightmapping dialog by navigating to Window | Lightmapping and dock it somewhere conveniently.
There are several settings, but we start with a basic setup that consists of the following steps:
Unlock access to the largest independent learning library in Tech for FREE!
Get unlimited access to 7500+ expert-authored eBooks and video courses covering every tech area you can think of.
Renews at ₹800/month. Cancel anytime
- Usually a Single Lightmap suffices. Dual Lightmaps can look better, but require the deferred rendering method that is only supported in Unity Pro.
- Choose the Quality High modus. Quality Low gives jagged edges and is only used for quick testing.
- Activate Ambient Occlusion as a quick additional rendering step that darkens corners and occluded areas, such as where objects touch. This adds a real sense of depth and is highly recommended. Set both sliders somewhere in the middle and leave the distance at 0.1, to control how far the system will look to detect occlusions.
- Start with a fairly low Resolution, such as 5 or 10 texels per world unit. This defines how detailed the calculated Lightmap texture is, when compared to the geometry. Look at the Scene view, to get a checkered overlay visible, when adjusting Lightmapping settings. For final results, increase this to 40 or 50, to give more detail to the shadows, at the cost of longer rendering times.

There are additional settings for which Unity Pro is required, such as Sky Light and Bounced Lighting. They both add to the realism of the lighting, so they are actually highly recommended for architectural visualization, if you have the pro-version.
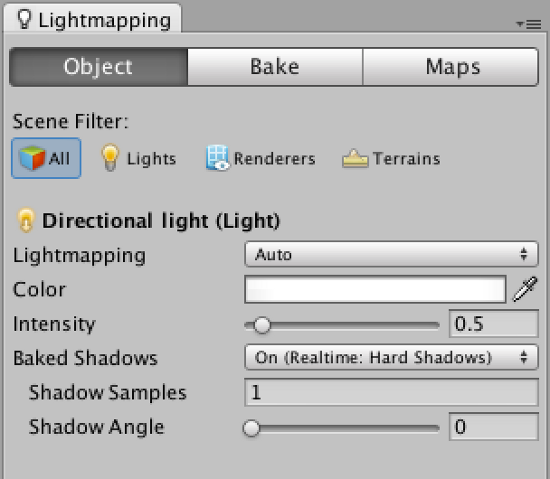
On the Object sub-tab, you can also tweak the shadow calculation settings for individual lights. By increasing the radius, you get a smoother shadow edge, at the cost of longer rendering times. If you increase the radius, you should also increase the amount of samples, which helps reduce the noise that gets added with sampling. This is shown in the following screenshot:

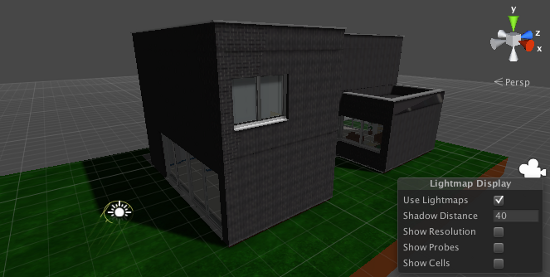
Now you can go on and click Bake Scene. It can take quite some time for large models and fine resolutions. Check the blue time indicator on the right side of the status bar (but you can continue working in Unity). After the calculations are finished, the model is reloaded with the new texture and baked shadows are visible in Scene and Game views, as shown in the following screenshot:

Beware that to bake a Scene, it needs to be saved and given a name, as Unity places the calculated Lightmap textures in a subfolder with the same name as the Scene.
Summary
In this article we learned about the use of different light sources and shadow. To avoid the heavy burden of real-time shadows, we discussed the use Lightmapping technique to bake lights and shadows on the model, from within Unity
Resources for Article:
Further resources on this subject:
 United States
 Great Britain
 India
India
 Germany
 France
 Canada
 Russia
 Spain
Spain
 Brazil
 Australia
 Singapore
 Hungary
 Ukraine
 Luxembourg
 Estonia
 Lithuania
 South Korea
 Turkey
 Switzerland
 Colombia
 Taiwan
 Chile
Chile
 Norway
 Ecuador
 Indonesia
 New Zealand
 Cyprus
 Denmark
 Finland
 Poland
 Malta
Malta
 Czechia
 Austria
 Sweden
 Italy
Italy
 Egypt
Egypt
 Belgium
 Portugal
 Slovenia
 Ireland
 Romania
 Greece
 Argentina
 Netherlands
 Bulgaria
 Latvia
 South Africa
 Malaysia
 Japan
Japan
 Slovakia
 Philippines
 Mexico
 Thailand

