Linux on Azure
In Chapter 1, Linux: History and future in the cloud, we mentioned that Microsoft came up with the motto "Microsoft ♡ Linux." On Azure, Linux mainly refers to the different Linux distributions that are supported on Azure. Microsoft Azure supports common Linux server distros including RHEL, CentOS, Ubuntu, Debian, SLES, openSUSE, Oracle Linux, and Flatcar Container Linux. You can find the up-to-date list and much more about Linux on Azure at this landing page: https://azure.com/linux.
If the operating system that you are looking for is not on the list or you need to have a customized or pre-configured image, feel free to visit Azure Marketplace where you can browse through hundreds of images that may suit your requirements.
If the Azure Marketplace images do not meet your organization's standards or requirements, you can create and upload your own images to Azure:
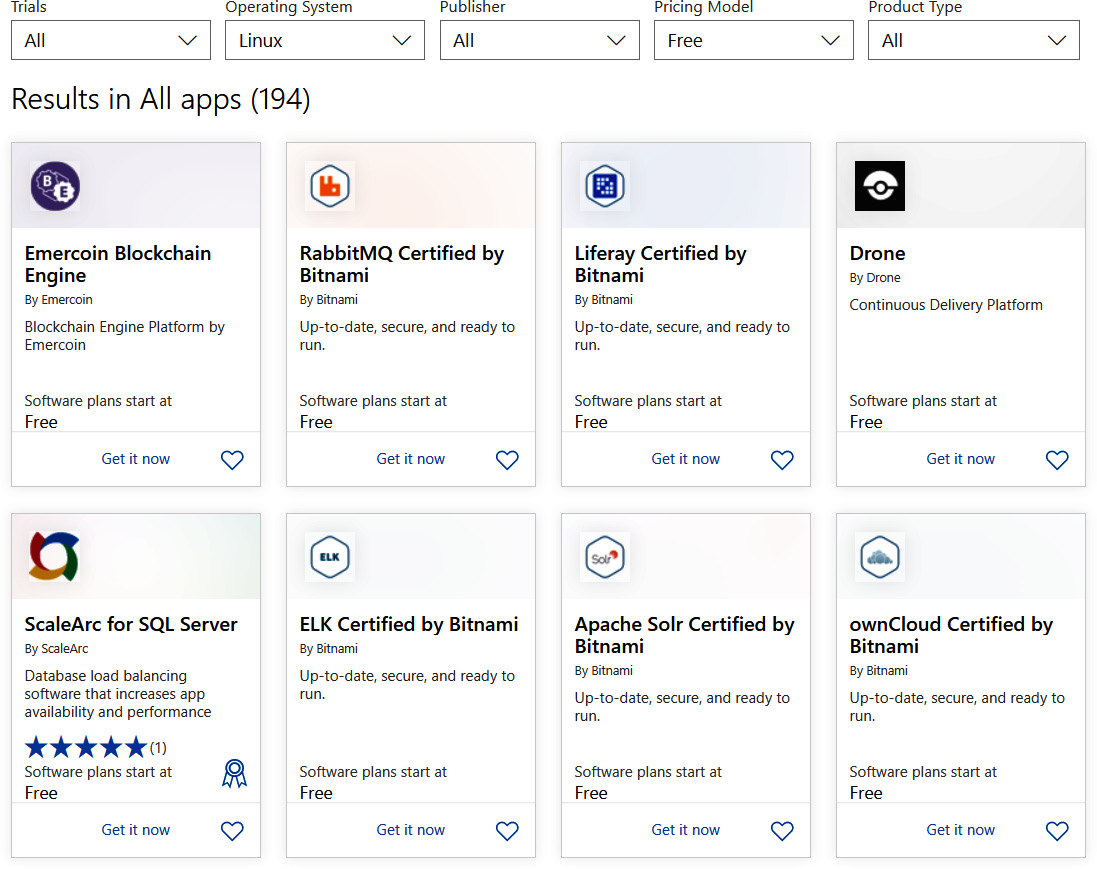
Figure 2.2: Azure Marketplace
Figure 2.2 is a view of Azure Marketplace, showing some of the different types of pre-configured images that are available.
Benefits of Linux on Azure
Deploying in the cloud is no different from what you are used to on-premises; you will be able to work with the Linux OS in the cloud in the same way as with an on-premises server. You can use the commands and tools that you are already acquainted with and add more packages as required.
You can use out-of-the-box features such as cloud-init, Azure Automation Runbooks, and Azure Custom Script Extension for Azure Resource Manager templates to automate configuration management during the deployment phase itself. By using these tools, administrators will be able to save time that would have been spent on lengthy and repetitive configuration management tasks.
As the environment is already set up and ready to log into, you do not have to go through the lengthy installation process that you used to do in the case of on-premises hypervisors while creating VMs. The credentials will be supplied during the Azure VM creation and, once the VM is deployed, you can log in and start using the VM.
Since all deployments are integrated with Azure Monitor, you can monitor all the metrics associated with the VM, such as CPU usage, disk write, disk read, network out, network in, and so on. Azure exposes the Metrics API, so you can further utilize the developed dashboards to monitor the metrics of your mission-critical workloads. Along with the metrics, Azure provides an agent that can be installed on your Linux VMs known as the OMS agent. Using this agent, you can ingest syslogs, auth logs, and custom logs such as Apache logs to an Azure Log Analytics workspace. Once the data is ingested, you can use the Kusto Query Language (KQL) to analyze the logs.
From a security standpoint, you can improve the security posture of your infrastructure using Azure Security Center. Azure Security Center can detect threats and provide policy insights and recommendations for your deployments.
Additionally, we can now make use of Azure Active Directory Login for Linux VMs. This eradicates the management overhead and security risk of managing local user accounts on each Linux machine; users can sign in to Linux VMs with their corporate credentials.
From this non-exhaustive list of advantages, we see that Linux on Azure offers the best of both worlds; you get all the customization features of Linux and at the same time all the features and benefits provided by Microsoft Azure.
Linux on Azure is very generic; the "on Azure" suffix can apply separately to each distro. For example, you should take "Red Hat on Azure" to mean all the Red Hat products that are supported on Azure. You might think RHEL is the only offering from Red Hat that is available on Azure, but you can also find other products such as Azure Red Hat OpenShift, Red Hat JBoss Enterprise Application Platform, Red Hat Gluster Storage, Red Hat OpenShift Container Platform, Red Hat CloudForms, and Red Hat Ansible Automation. You can see that all the major product lines of Red Hat are available on Azure; this is a clear example of how large organizations promote their products to Microsoft Azure. You will see similar approaches from other vendors, as in "SUSE on Azure" and "Ubuntu on Azure," which stand for the products supported by the respective vendors in Azure.
Note
Check out the product lines available on Azure for the following vendors:
- Red Hat product lines available on Azure: https://Azure.com/RedHat
- SUSE product lines available on Azure: https://Azure.com/SUSE
- Ubuntu on Azure: https://Azure.com/Ubuntu
Microsoft recommends using endorsed Linux distributions in Azure to host your production workloads. The rationale for this is that all endorsed images are maintained by the most well-known Linux vendors in the world, such as Red Hat, Canonical, SUSE, and so on; basically, endorsed images are images published by these vendors. The complete Linux support matrix can be reviewed at https://docs.microsoft.com/troubleshoot/azure/cloud-services/support-linux-open-source-technology#linux-support-matrix.
You can also bring your own images to Azure if you do not want to use an endorsed image. You may even customize Azure images using the Azure Image Builder tool, which is based on Hashicorp Packer: https://docs.microsoft.com/azure/virtual-machines/image-builder-overview.
One key point to note here is that Microsoft provides support to endorsed distributions only. Having said that, let's take a look at how the technical support for Linux on Azure is arranged.
Linux support scope
Microsoft provides support for the endorsed Linux distributions on Azure, and if there is a need to engage the vendor, they will be engaged on your behalf depending on the scenario. For example, if there is an issue with the image of Ubuntu 18.04 LTS and Microsoft cannot fix it, they will engage Canonical (the publisher of Ubuntu) to check the scenario. Here are some of the key points that you should keep in mind when engaging Microsoft Support.
Microsoft's technical support team can help you mainly in Linux troubleshooting scenarios—for instance, if you are unable to connect to a Linux VM with SSH, or unable to install a package. The Linux vendor may have to be engaged for issues related to the Linux image itself. For this Microsoft has joint support and engineering agreements with Linux vendors such as Red Hat, SUSE, and Canonical.
Always get your Linux administrator involved while working with Microsoft Support. In most troubleshooting scenarios, you might need superuser (often referred to as sudo) permissions, which only the admins will have.
Linux offers more room for customization than any other operating system available. Some organizations use custom Linux kernels or modules that cannot be supported by Microsoft Support. Although kernel-related issues are resolved by collaborating with the Linux vendor, in this scenario, even the vendor may not be able to help as they can typically only support the official kernel versions published by themselves.
Azure Advisor and Azure Security Center provide different security-, cost-, high availability-, and performance-related recommendations for our workloads. Following these recommendations is one of the best practices to run your workloads effectively on Azure. However, for performance tuning and optimization, customers may need to contact the vendor for resolution.
As mentioned earlier, Microsoft Support helps you to troubleshoot issues. This applies to the free Azure support, which is officially called "Basic" and is included for all Azure customers. If you need help to design, create architecture, or deploy applications on Azure, you have the option to purchase additional support, which ranges from development support to business-critical enterprise support plans. The paid plans include various levels of design and architecture support, and you can read more about them here: https://azure.microsoft.com/support/plans/.
Another option to get help with Azure design, architecture, and other technical questions is to engage with Microsoft's sales and partner teams, namely the Customer Success Unit (CSU) and One Commercial Partner (OCP). These teams are able to assist named commercial customers and partners. It is good to remember that these organizations are not replacements for Microsoft Support but are part of Microsoft's Global Sales and Marketing organization. To get in touch with the technical staff of the CSU and OCP teams, you should contact your named Microsoft account manager.
A third and very popular option is to talk with the large network of Microsoft partners. They are able to provide a broad range of advisory, consulting, implementation, and operational assistance for Azure in general as well as Linux on Azure. Many of these partners are also partnered with some of the Linux vendors mentioned in this chapter. The easiest way to locate Microsoft partners is to use the Microsoft solution provider search tool: https://www.microsoft.com/solution-providers/home.
Note
Along with the endorsed Linux distribution support, Microsoft also provides production support for certain OSS technologies such as PHP, Java, Python, Node.js, MySQL, Apache, Tomcat, and WordPress. This list is subject to change and the technical support available may be very limited.
Now that we are familiar with the scope of Azure Technical Support, let's look at how pricing works on Azure.
Licensing on Azure
In Azure, there are three licensing models: pay-as-you-go (PAYG), Azure Hybrid Benefit, and prepay. We will look at how these models vary and what the benefits are, starting with the PAYG model.
The pay-as-you-go model
As the name implies, in the PAYG model, customers are charged for the license as they use resources. For example, if you run a VM for 12 hours, you will see charges for:
- 12 hours of compute (which includes vCPU, RAM, and so on).
- 12 hours of Linux "license" or "subscription" use (if you are using distros such as RHEL or SLES that require a paid subscription).
- The cost of a public IP address (if needed).
- The cost of egress network traffic.
- The cost of storage.
Usually, in the Azure Pricing Calculator (https://azure.microsoft.com/pricing/calculator/), when you select a Linux VM that is running RHEL or SLES, you will be able to see the license cost. If you are using Ubuntu/CentOS, there will be no license cost. In Figure 2.3, you can see that for an RHEL VM there are compute and license costs under PAYG. The calculation is for 730 hours of consumption:
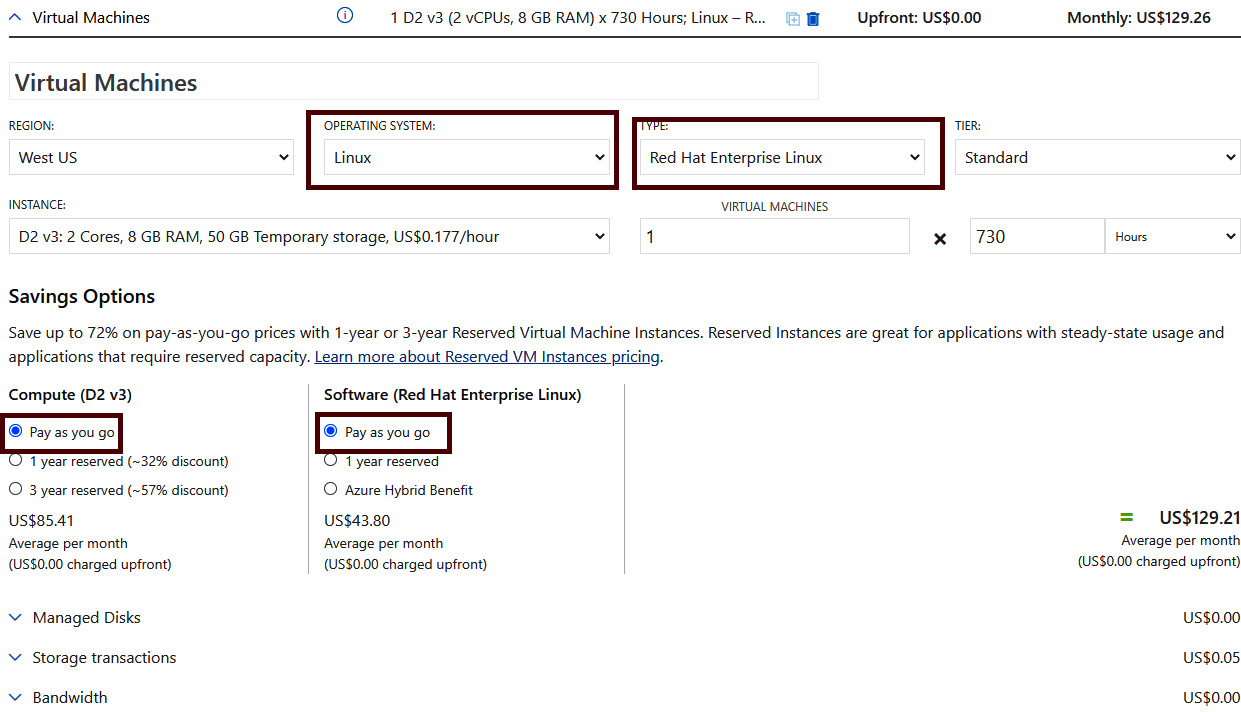
Figure 2.3: Licensing cost for RHEL from the Azure Pricing Calculator
On the other hand, if we pick Ubuntu/CentOS, the license cost will not be there, as shown in Figure 2.4:
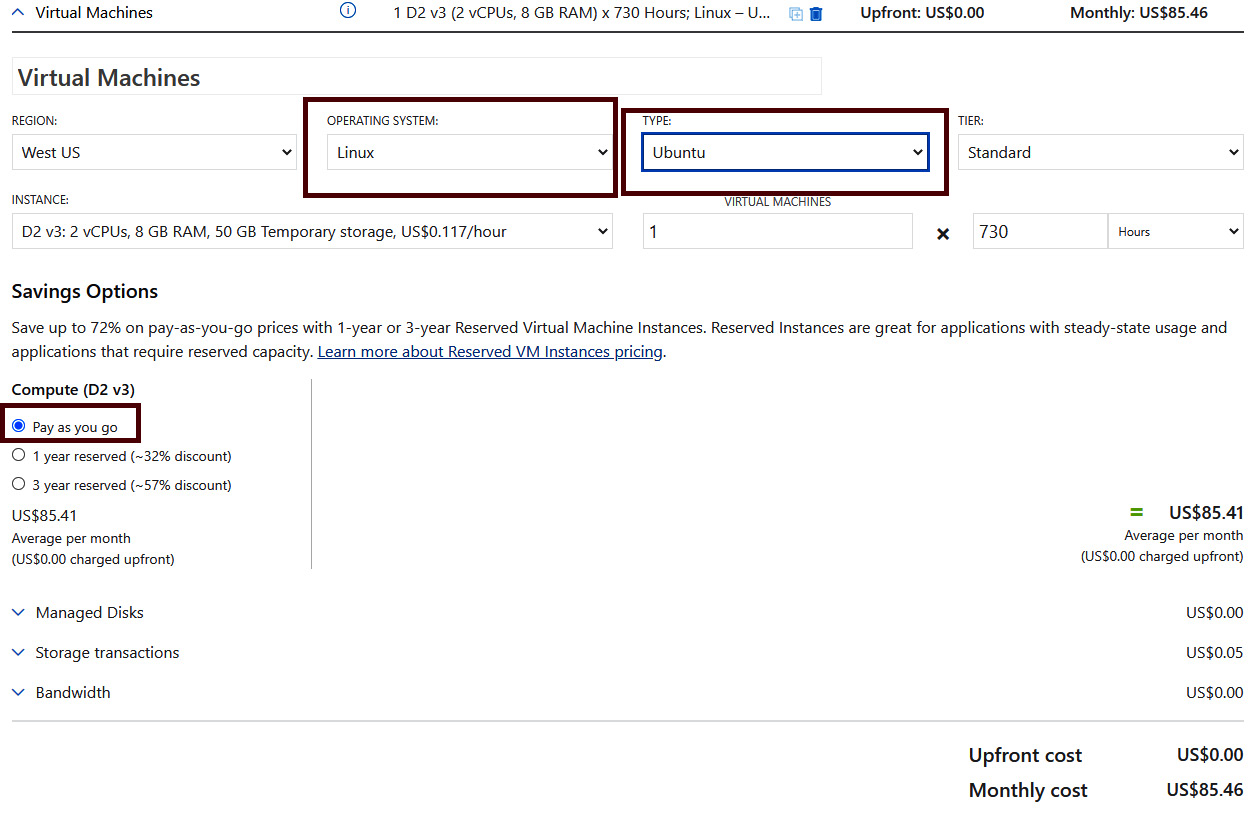
Figure 2.4: Licensing cost does not apply to Ubuntu
To summarize, in PAYG, customers pay based on how long a VM runs. When the VM is deallocated, the compute cores are not utilized, which means no charges are incurred for compute cores or the license. This model is ideal for VMs that are deployed for testing and will be running for a short period of time, but if you have VMs running 24/7/365, this might not be the ideal model, as the license cost will keep on accumulating based on hours used. In these cases, it is better to go with the Azure Hybrid Benefit or prepay plans for potential savings.
Azure Hybrid Benefit
If you revisit the screenshot of the pricing calculator in Figure 2.3, you can see another option under Software (Red Hat Enterprise Linux), one that reads Azure Hybrid Benefit. Previously, Azure Hybrid Benefit was referred to as a licensing benefit available for Windows Server and SQL VMs by which customers can bring their own Windows Server and SQL licenses to Azure. Using this method, the licensing cost is nullified, and customers can utilize the licenses that they had already purchased from their software assurance or volume licensing. In November 2020, Azure Hybrid Benefit was made generally available for Linux.
Using Azure Hybrid Benefit, you can migrate your existing RHEL and SLES servers to Azure with bring-your-own-subscription (BYOS) billing. Normally, in the case of the PAYG model, you pay for both infrastructure (compute + storage + network) costs and software (license) costs. Since you are bringing your own subscription here, though, the software cost is nullified, and you pay only for the infrastructure, which drastically reduces the cost of hosting in Azure. You can convert your existing VMs under the PAYG model to BYOS billing without any downtime, which also means that the redeployment of these services is not required at all. When your BYOS expires, you can convert these VMs back to the PAYG model as required.
All RHEL and SLES PAYG images on Azure Marketplace are eligible for Azure Hybrid Benefit. However, if you are choosing a custom image or any RHEL/SLES BYOS images from Azure Marketplace, those are not eligible for the benefit.
Red Hat customers can follow the instructions below to get started with Azure Hybrid Benefit. Before we start, there are some prerequisites:
- You should have active or unused RHEL subscriptions that are eligible for Azure usage.
- You should have enabled one or more active or unused subscriptions for Azure usage with the Red Hat Cloud Access program. Red Hat Cloud Access is a program offered by Red Hat. Using this, you can run eligible Red Hat product subscriptions on Red Hat certified cloud providers such as Microsoft Azure, Amazon Web Services, and Google Cloud.
If you meet the prerequisites, the next step is to start using Azure Hybrid Benefit. Here are the steps you need to follow:
- Choose one of the active or unused RHEL subscriptions and enable it for use in Azure. This is done from the Red Hat Cloud Access customer interface. Red Hat customers will be able to access this by logging in to https://www.redhat.com/technologies/cloud-computing/cloud-access. Only the subscriptions we enroll here are eligible to use Azure Hybrid Benefit.
- Linking the subscription was the primary step; we can specify that the VMs use the RHEL subscription during the creation stage, or we can convert existing VMs.
- During the creation of the VM, you can opt to use the existing RHEL subscription as shown in Figure 2.5:

Figure 2.5: Enabling Azure Hybrid Benefit during VM creation
- We can also convert existing VMs to Azure Hybrid Benefit without the need to redeploy. This can be achieved from the Configuration pane of the VM as shown in Figure 2.6:
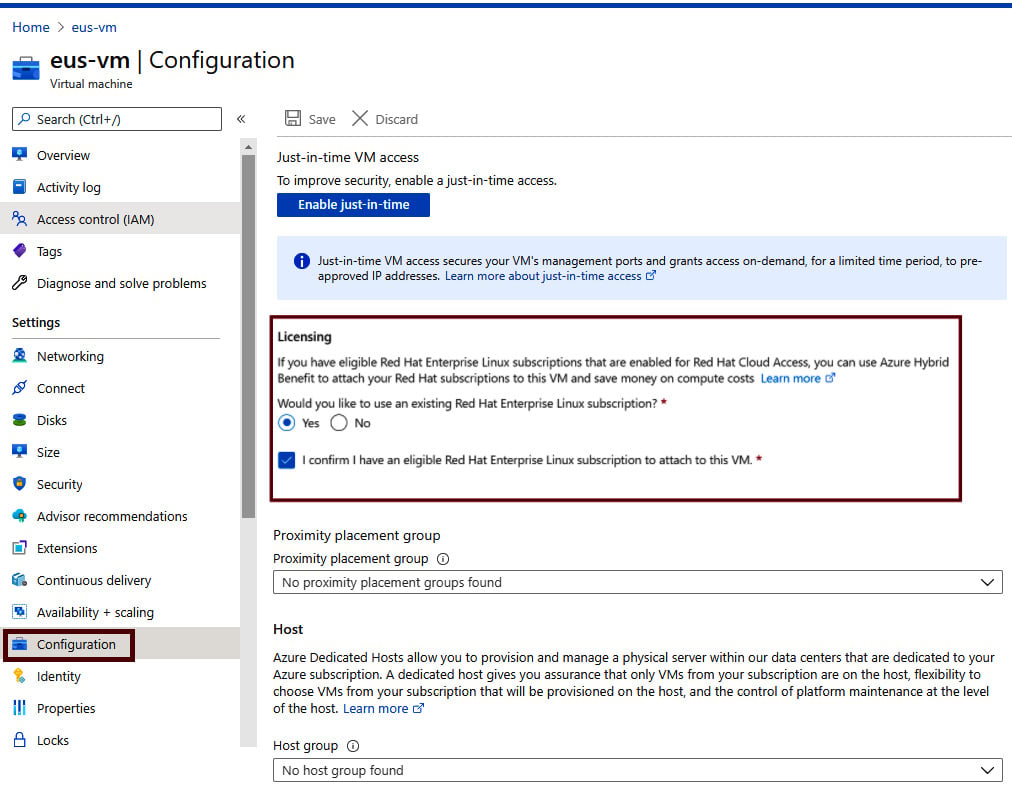
Figure 2.6: Converting existing VMs to Azure Hybrid Benefit
Once this process is complete, in your Azure usage, you will see that the cost for the VM has dropped significantly. The process of attaching the RHEL subscription to Azure VMs can be done from the CLI and ARM templates as well if you would like to do this programmatically.
As mentioned earlier, customers have the freedom to switch back to a PAYG model whenever their RHEL subscriptions expire. Conversion back to the PAYG model is also done via the Configuration pane of the VM.
For SUSE customers, the process of attaching is pretty much the same; however, registration for using SUSE subscriptions is done via the SUSE Public Cloud program.
This model is ideal for customers who have active or unused RHEL or SUSE subscriptions that they purchased from the respective vendors and who would like to utilize these in the cloud for potential savings over the PAYG model.
In this model, we were using the subscription that we purchased from Red Hat or SUSE and attaching it to use with our Azure subscription. However, in the prepay model, which we are going to cover next, we will be purchasing Red Hat or SUSE software plans directly from Microsoft.
Prepay for Azure software plans
The final option under Software (Red Hat Enterprise Linux) in the Savings Options section of the Azure Pricing Calculator is 1 year reserved. Figure 2.7 demonstrates the 1-year software plan being selected for Red Hat:
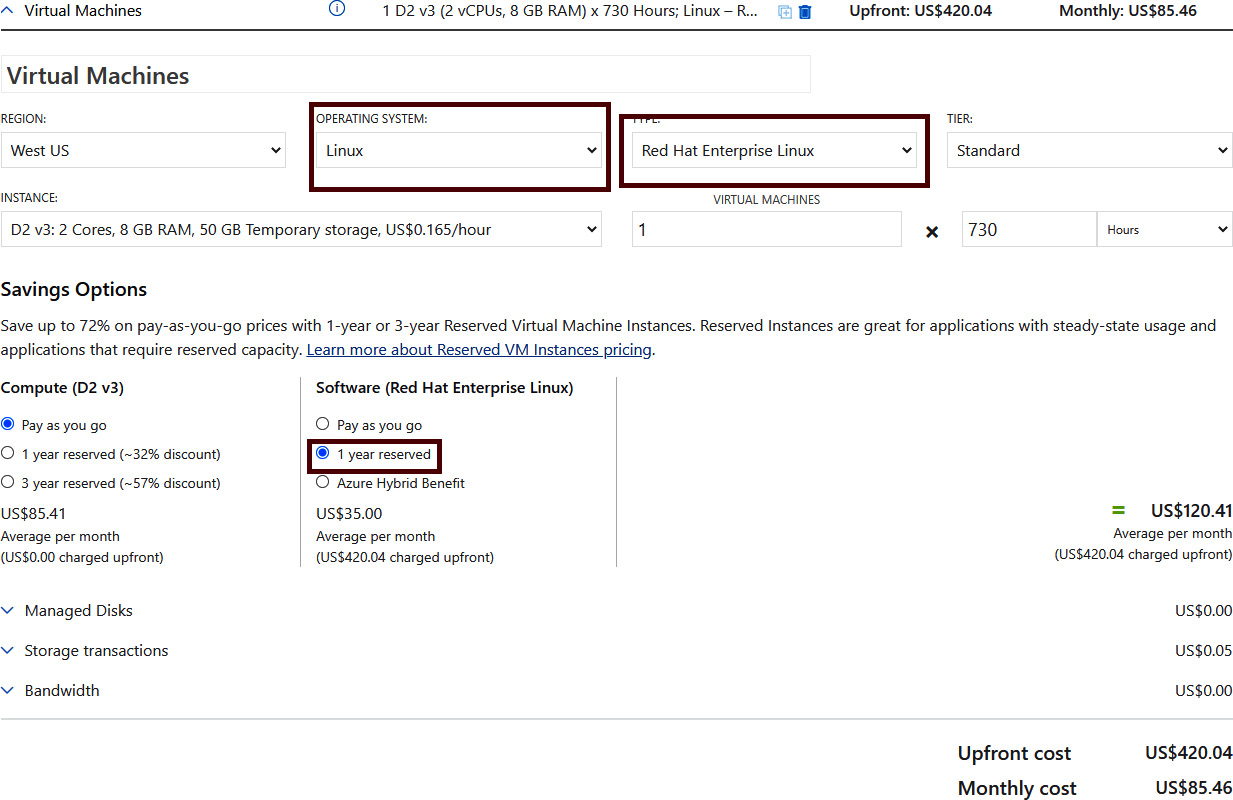
Figure 2.7: Calculating a software plan cost from the Azure Pricing Calculator
In this model, customers can buy software plans directly from Microsoft for a term of 1 year and they can also renew if required by term-end. One catch here is that the plan amount should be paid upfront. In Figure 2.7, you can see that this has been mentioned in the cost; the moment a customer purchases a software plan from Azure, that charge will be added to the next invoice as an upfront cost for the next year.
Another key point to keep in mind here is that cancellation or exchange of these plans is not allowed. This means you should be buying the right plan for your workload. For example, if your product is SLES Priority for 2-4 vCPUs, you should purchase SLES Priority for 2-4 vCPUs. If you were to purchase SLES for HPC 1-2 vCPUs instead of SLES Priority for 2-4 vCPUs by mistake, then you would not get the benefit and you would not be able to return or exchange this plan. A piece of advice here is to understand your workload and buy accordingly.
The software plan can be purchased from the Reservations pane in Azure, the very same place where we purchase reserved instances for Azure VMs, databases, and so on. The benefit will be applied automatically to the matching workload and no mapping is required.
For instance, if you have three SLES Priority instances, each with 4 vCPUs, then the right plan for you is SLES Priority for 2-4 vCPUs. Depending on the quantity you purchase, the discount is applied automatically to the instances. Assume that we purchased two SLES Priority for 2-4 vCPU plans; then, two out of three VMs will get the benefit and the remaining one will remain in the PAYG model. If you need the third one's cost also covered by the plan, then you need to buy another plan of the same kind. This new plan will automatically attach to the remaining VM.
Like Azure reserved instances, the software plans are a "use it or lose it" benefit. This means that if you deallocate all your VMs and the plan is not able to find a suitable VM to attach to, the benefit will be in vain. You cannot carry forward the unused hours.
Note
You can avoid losing the benefit in the case of a migration by opening a billing support case on the Azure portal.
You should always do proper planning for your workloads before buying software plans to ensure that the most cost-effective plan is selected. Reiterating some of the considerations that we should be keeping in mind:
- The plan is ideal for 24/7/365 workloads; other servers need a billing support change request. If the plan is not able to discover the appropriate SKU, the utilization of the plan will be zero and you will lose a benefit.
- No return or exchange is possible. Buy the right plan based on the product and vCores your VM has; buying the wrong plan or the wrong number of CPUs will result in a loss of money.
- For SUSE plans, only certain SLES versions are supported. Make sure you check the version you are running using the
cat/etc/os-releasecommand and match with the documentation available here: https://docs.microsoft.com/azure/cost-management-billing/reservations/understand-suse-reservation-charges#discount-applies-to-different-vm-sizes-for-suse-plans. - The plan's costs are upfront and will appear on your next invoice.
In the next section, we will conclude the licensing part of the chapter with a helpful comparison of these licensing models and their benefits.
Savings comparison of licensing models
In the previous section, we saw the different types of licensing models that are available for your Linux workloads in Azure (refer to Chapter 1, Linux: History and future in the cloud). Here, we are going to make a comparison from the perspective of a customer and look at the savings percentage for each model.
For demonstration purposes, we will be using the cost of an RHEL D2v3 VM running in East US for 730 hours in US dollars. At the time of writing, the cost of the software is $43.80 and $35.00 per month for the PAYG and prepay software plan models respectively. We are not taking into account the Azure Hybrid Benefit monthly charge as this subscription is bought from the respective model. If you are already partnered with Red Hat or SUSE, you could get some discounts on these subscriptions. Now let's do the math; Table 2.1 shows the cost per month for each model:

Table 2.1: Azure licensing model comparison
If we plot these values on a graph and calculate the savings percentage for a year, we will get a graph like the one shown in Figure 2.8:
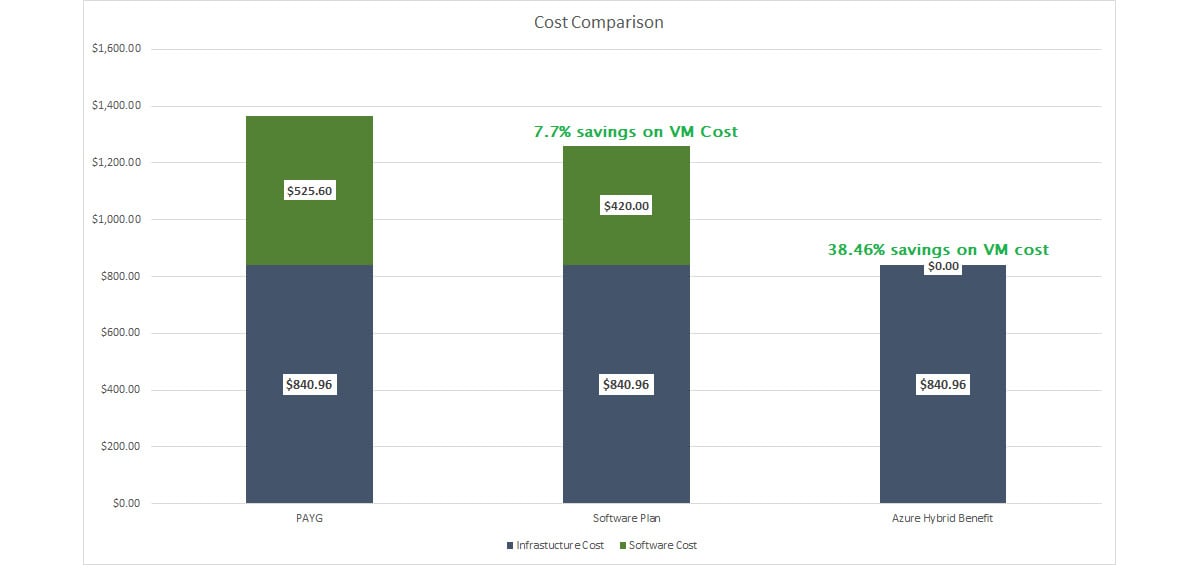
Figure 2.8: Calculating savings for licensing models
The value may look small, but this is only for a single VM; in an enterprise environment where there will be thousands of VMs, the potential savings are very high.
Each model has its own use case scenarios:
- PAYG is ideal for testing or development where you are not planning to keep the VM running 24/7.
- Azure Hybrid Benefit is appropriate if you have license subscriptions from Red Hat or SUSE and would like to use them in the cloud.
- Prepay software plans are perfect for customers who do not have RHEL or SUSE subscriptions and would like to get some discounts on the software cost. However, this is a long-term commitment with Microsoft.
Using Azure Reserved Instances, customers can also get a discount on the compute cost. In short, if you combine Azure Hybrid Benefit or a prepay software plan with Azure Reserved Instances, the overall savings percentage will be boosted to 50-70%. You can read more about Azure Reserved Instances for VMs here: https://docs.microsoft.com/azure/cost-management-billing/reservations/save-compute-costs-reservations. As this is not a licensing model, but more of a cost optimization technique, we will not cover this topic in this chapter. However, when we discuss assessment and migration in Chapter 3, Assessment and migration planning, we will discuss how to optimize cloud costs.
Now that we are familiar with the licensing models, let's see how we can use the Azure command-line interface (CLI) to find the versions of available distros.
Available distros
In the introduction of the Linux on Azure section, we saw that Microsoft Azure supports common Linux distros such as Red Hat, Ubuntu, SUSE, CentOS, Debian, Oracle Linux, and CoreOS. We also saw how we can make use of Azure Marketplace to find the appropriate image as per our organization's requirements. Table 2.2 displays the endorsed distros and the vendors/publishers who are providing these images:
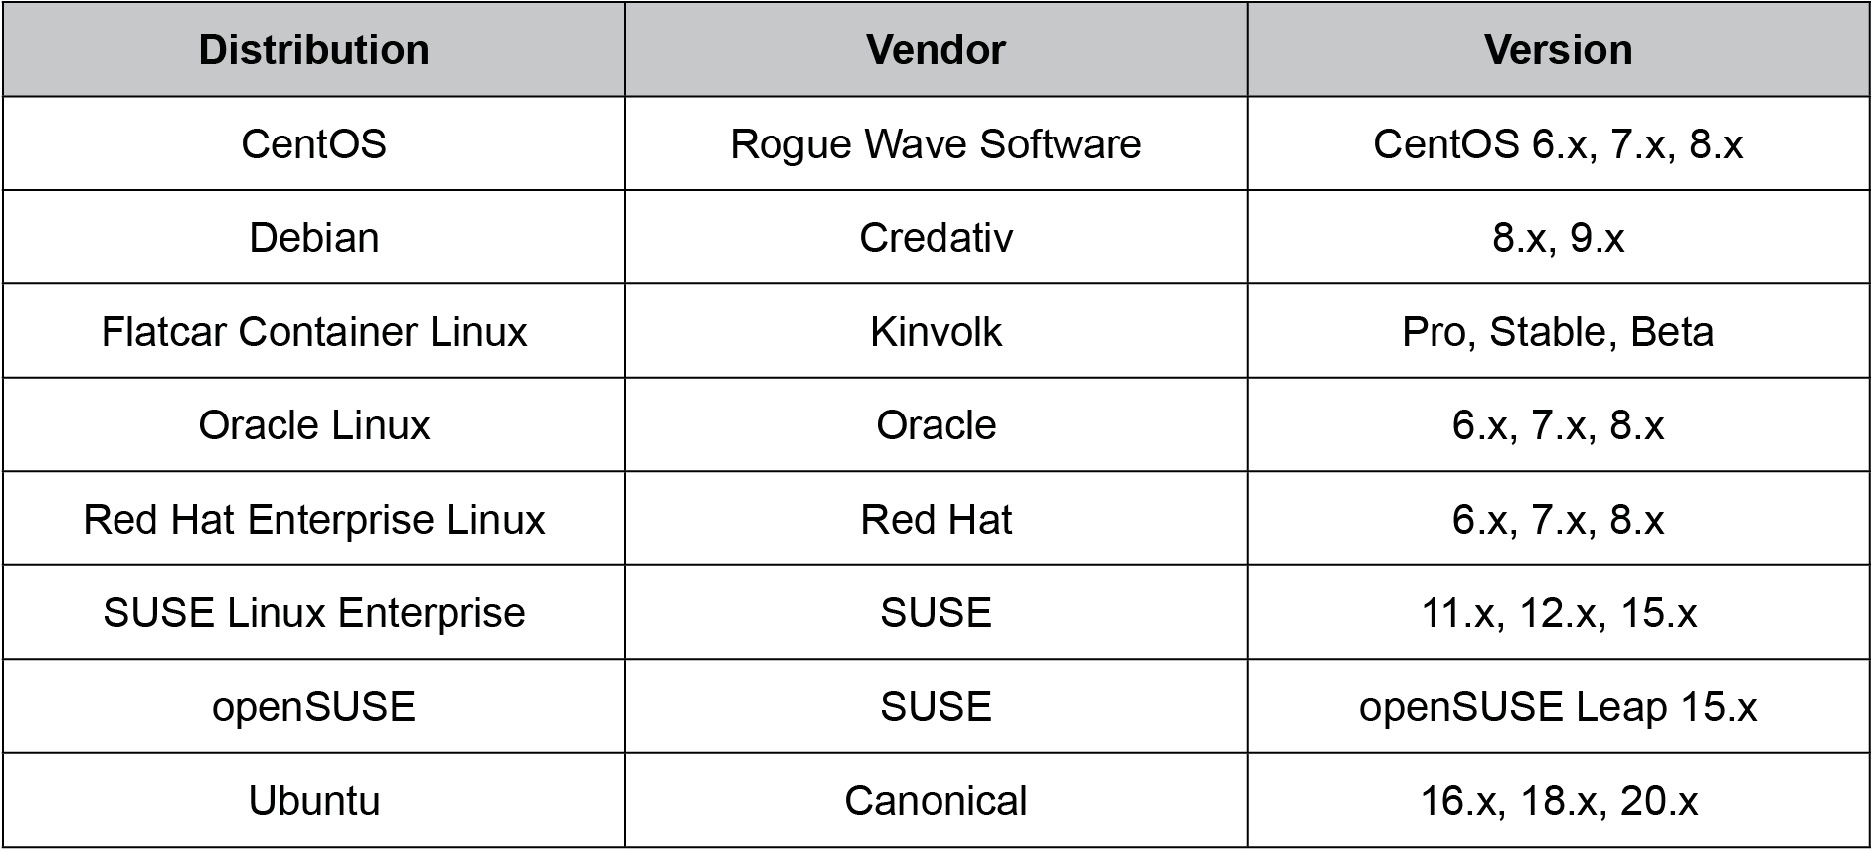
Table 2.2: Endorsed Linux distributions on Azure
Though generic version numbers are given in the preceding table, it is very easy to find the image name and version from a publisher using the Azure CLI. In order to use the Azure CLI, we need to install it on our workstation. The Azure CLI can be installed on Linux, Mac, or Windows systems. If you are using the Cloud Shell in the Azure portal, by default the Azure CLI is installed for you.
Assuming that we are using a local computer (an Ubuntu computer, for example), we need to install the Azure CLI. You can find the specific installation steps depending on your operating system here: https://docs.microsoft.com/cli/azure/install-azure-cli. For simplicity of demonstration, we will install the Azure CLI on an Ubuntu instance:
- Microsoft has developed a script to run the installation in a single shot, which makes it convenient for beginners to ramp up quickly. If you prefer to perform this step by step, the Microsoft documentation has instructions for that as well. For Ubuntu, the installation can be done using the following command:
curl -sL https://aka.ms/InstallAzureCLIDeb | sudo bash
The output is shown in Figure 2.9:

Figure 2.9: Azure CLI installation on Ubuntu
- The next step is to log in to our account from the Azure CLI in order to connect our Azure account to the Azure CLI. This can be accomplished by running the
az logincommand. The console will prompt you to open a browser window and provide a code to complete the authentication process, as shown in Figure 2.10:
Figure 2.10: Logging in to Azure using the Azure CLI
- In a browser window, you must enter the code shown in the terminal (as shown in Figure 2.10) and sign in using your credentials. Once signed in, the terminal will show all the subscriptions you have access to, as seen in Figure 2.11. If you do not want to authenticate using the code, you can log in using a service principal where you will be using the client ID and client secret as the username and password, respectively. Also, you can use Managed Identity if required:

Figure 2.11: Logged in to Azure
Now we will see how we can get information on the available VM images. The primary command used here is
az vm image. - To list the images (offline) for the VMs/VMSSs that are available on Azure Marketplace, you can use
az vm image list. The response will be in JSON and we can format it to a table by appending the-o tableparameter to the command. This will list offline cached images as shown in Figure 2.12:
Figure 2.12: Listing the VM images available
To update the list and display all images, you can append the
–allparameter to the command and call the command again.The preceding command may take a minute or two to refresh the list of all available images. Usually, when we query the image list, it is recommended to use the publisher or SKU or offer parameters, so that the search is limited to a set of images and the results can be retrieved very easily.
In the next steps, we will be seeing how we can find the publisher, offer, or SKU for an image and use it in our
az vm image listto narrow down the search. - In order to find the list of all publishers, we can use the
az vm image list-publisherscommand. Location is a required parameter here, as some publishers publish only to a specific region, so it's recommended to check that the publisher has published to the region you are planning to deploy to. The following is the output:
Figure 2.13: Listing publishers in a region
- For example, the publisher for Ubuntu is Canonical. If we want to list all the offers provided by this publisher, we can use the following command:
az vm image list-offers -p Canonical -l eastus -o table
Here the location is a required parameter, as offers may vary depending upon location. The output will be similar to the one shown in Figure 2.14:

Figure 2.14: Listing images from the Canonical publisher in East US
- Let's pick an offer; for instance,
UbuntuServer. Now we need to list the SKUs to find the available SKUs for the image. We need to pass the publisher, offer, and location to theaz vm image list-skuscommand in order to list the SKUs. The aforementioned parameters are mandatory for this command, so the final command will be as follows:az vm image list-skus -l eastus -p Canonical -f UbuntuServer -o table
The output is as shown in Figure 2.15:

Figure 2.15: Listing SKUs available for the Canonical UbuntuServer offer in East US
- Now we know the publisher, offer, and SKU. Let's use these values in the
az vm image listcommand to see the available versions of an image. Here we will be usingCanonicalas the publisher (-p),UbuntuServeras the offer (-f), and19_04-gen2as the SKU (-s). Combine these and call the following command:az vm image list -p Canonical -f UbuntuServer -s 19_04-gen2 --all -o table
This will list the image version available for the specified publisher, offer, and SKU combination. The following is the sample output:

Figure 2.16: Listing versions of an image for a specific publisher, offer, and SKU combination
- We can use
urnfrom the output in theaz vm image showcommand to get the details of the VM image as shown in Figure 2.17:
Figure 2.17: Finding VM image details
- The same
urncan be used in ouraz vm createcommand to create a VM with that particular image version. A quick illustration has been given in Figure 2.18:
Figure 2.18: Creating a VM using URN
Before we conclude, please check Table 2.3, which lists all the commands we used in the preceding steps for quick reference:
|
Command |
Purpose |
Required Parameters |
Documentation |
|
az vm image list |
Lists VM/VMSS images (offline/cached). |
NA |
https://docs.microsoft.com/cli/azure/vm/image?view=azure-cli-latest |
|
az vm image list --all |
Lists all images from Azure Marketplace. This usually takes time due to the large dataset. It’s recommended that you filter using publisher, offer, and SKU for a quicker response. |
NA |
|
|
az vm image list-publishers |
Lists publishers available. |
Location ( |
|
|
az vm image list-offers |
Lists VM image offers available. |
Location ( |
|
|
az vm image list-skus |
Lists available SKUs for an offer from a publisher. |
Location ( |
|
|
az vm image show |
Shows details for a given URN. |
Location ( |
|
|
az vm create |
Creates a VM. |
Name ( |
https://docs.microsoft.com/cli/azure/vm?view=azure-cli-latest#az_vm_create |
Table 2.3: Commands used for the hands-on exercise
In this hands-on exercise, we queried the image list to find the available images and created a VM using that. We learned how to narrow down the search using parameters such as publisher, offers, and SKU.
Although we used the Azure CLI to accomplish this task, if you are using PSCore or PowerShell, you can make use of the Azure Powershell module to perform the same operations. The documentation for this is available here: https://docs.microsoft.com/powershell/module/az.compute/get-azvmimage?view=azps-5.2.0.
With that, we have reached the end of this chapter, and we will now summarize the topics we have discussed so far.


