Explore Arduino IDE
Now we have downloaded and installed the Arduino IDE on our system, let's explore the IDE.
In Windows, just open the installed Arduino software. On Ubuntu/Linux, type the following line in the terminal and hit Enter :
sudo Arduino

On the mac, just open the Arduino.app file.
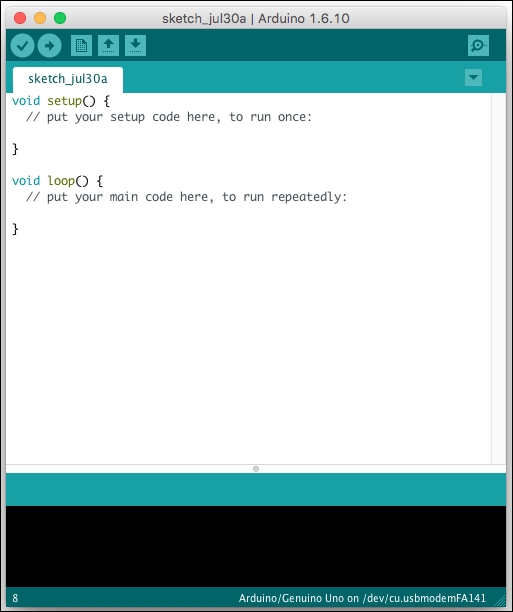
No matter which operating system you use, you will see almost the following screen on every platform:

At the top of the screen you will find all the menus for the Arduino Uno. Before learning anything, let's configure our Arduino Uno with the Arduino IDE. We have already connected our Arduino to our PC via an A-B cable. Now, from the menu, go to Tools | Board and select Arduino Uno. Then go to port and select the port on which the Arduino is connected:

If you find difficulty in selecting the port, please have a look at Chapter 10, Few Error Handlings.
If everything looks good, then we are now ready to write code for Arduino and upload it to the board.
Let's explore all the menus and their functions. In the File menu you will see the following options:

New: This option enables you to create a new Arduino file.Open: This option opens an existing Arduino file.Open Recent: This shows the recent Arduino files.Sketchbook: This shows the stored files.Examples: This shows the common Arduino Programs and other library file-related examples.Close: This option closes the Arduino tab.Save: This option saves the Arduino code you want to save inside a folder and adds an.inoextension to the file.Save as: This allows you to save the file as other formats (for example a text file).Page Setup: This option helps to set up the print screen of the code.Printoptions let you print the code.Preference: This shows the following screen, where you can customize the look of your Arduino IDE, for example the location of your sketchbooks, size of fonts, type of fonts, display line numbers and so on. I would suggest checking the Display.
Line numbers option for the debugging suitability:

Quitoption helps to exit the Arduino IDE at any time- The
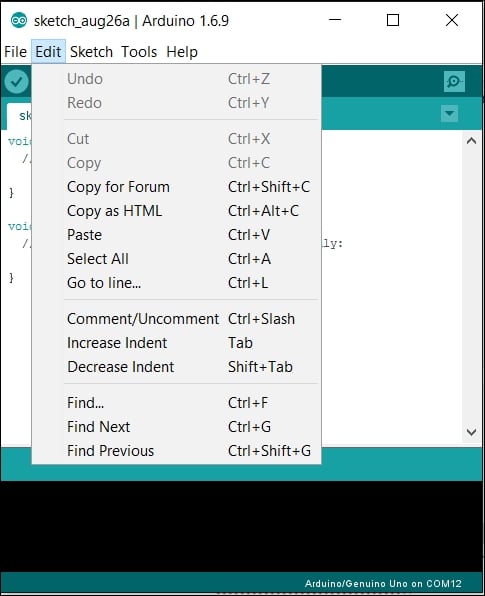
Editoption shows the following screen:

In the Edit menu, you will see the following options:
Undo: This option allows you to undo any error in the code or go back to the previous step of the code.Redo: This option allows you to go forward if you have selected undo before.Cut: This option cuts the line of code.Copy: This option copies the selected text.Copy for Forum: This formats code for the Arduino forum.*Copy as HTML: This copies code as an HTML document. This option is used to publish the Arduino code to the web. It's an option that allows you to export the code in a web format (using HTML, CSS etc). Just click this option after writing the code, and your code will be copied as the web format. You can then use it in an HTML file.Paste: This option allows you to paste the copied text.Select All: This selects all the code.Go to line: This allows you to go to the desired line.Comment/Uncomment: This allows you to comment or uncomment any text on the code.IncreaseIndent: This moves code to the right using spaces (organizes code for better readability).DecreaseIndent: This moves code to the left, removing spaces.Find: This helps to find any text in the text editor.FindNext: This helps you to find the next keyword when searching in the text editor.FindPrevious: This helps you to find the previous keyword that was searched for in the text editor:

In the Sketch menu you will see the following options:
Verify/Compile: This option compiles the code we write in the text editor into machine code for the Arduino microcontroller. In doing so, it also verifies the code to find any programming errors.Upload: This option helps to upload the code we write in the text editor to the Arduino board.Upload Using programmer: In the Arduino Uno, we use an ATmega328 microcontroller. By default, when we purchase it, it comes preinstalled with a tiny program known as a bootloader, and using this we can upload code to the board directly. If there was no bootloader, we would need an external programmer to upload code to the Arduino. So, if we need to change the removable microcontroller for a new one, it might not contain the bootloader pre-installed. For this reason, we use this option. We connect the Arduino with a fresh microcontroller and another old Arduino with a pre-installed bootloader. Then we upload to the new one using the old one as a programmer.Export compiled binary: We sometimes need .hex files for microcontrollers. This option allows us to convert the Arduino code into hex format.
Note
Hex file is a file format that conveys binary data into ASCII text format.
Show Sketch Folder: This folder shows the directory of the sketch files we save.Include Library: There are a number of libraries for Arduino, about which we will learn more in Chapter 8, Working with Arduino Libraries. Using this option, we can add libraries to our code. All we need to do is just select a library and the Arduino application will automatically add the library to the code.Add File...By using this option, we can add files (any file) to our sketch folder:

In the Tools menu, you will see the following options:
Auto Format: We sometime do not maintain clean code. The code might not be understood by others if we do so. This option auto formats the whole code and makes it readable.Archive Sketch: To make a zip folder that includes all the sketch files inside our sketch folder, we use this option.Fix Encoding and Reload: This fixes the character encoding of the text file and reloads it.Serial Monitor: This is one of the most useful options of the Arduino application. With this option we can monitor the data input/output on the Arduino. We will discuss this option later.Serial Plotter: With this option we can also monitor the serial, but visually. We can create graphs using this option. You will be given examples of the serial plotter later.Board: Using this option you can select your Arduino board, which is connected to your PC.Port: With this option, we can select the port to which our Arduino is connected.Get Board Info: This option shows the Arduino board information, which is connected to the PC.*Programmer: This option selects the programmer if we want to burn our microcontroller or burn a bootloader on another Arduino. By default, AVRISP mkll is selected.Burn Bootloader: This option helps to burn the bootloader on another Arduino.


