Projected texture – spot light
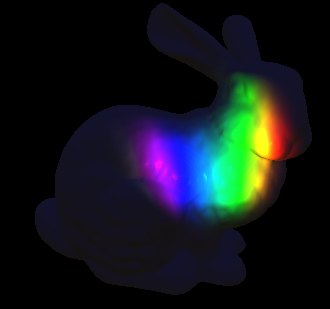
Similar to point lights with projected textures, spot lights can use a 2D texture instead of a constant color value. The following screenshot shows a spot light projecting a rainbow pattern on the bunny:

Getting ready
Due to the cone shape of the spot light, there is no point in using a cube map texture. Most spot light sources use a cone opening angle of 90 degrees or less, which is equivalent to a single cube map face. This makes using the cube map a waste of memory in this case. Instead, we will be using a 2D texture.
Projecting a 2D texture is a little more complicated compared to the point light. In addition to the transformation from world space to light space, we will need a projection matrix. For performance reasons, those two matrices should be combined to a single matrix by multiplying them in the following order:
FinalMatrix = ToLightSpaceMatrix * LightProjectionMatrix
Generating this final matrix is similar to how the matrices used for rendering the scene get generated. If you have a system that handles the conversion of camera information into matrices, you may benefit from defining a camera for the spot light, so you can easily get the appropriate matrices.
How to do it...
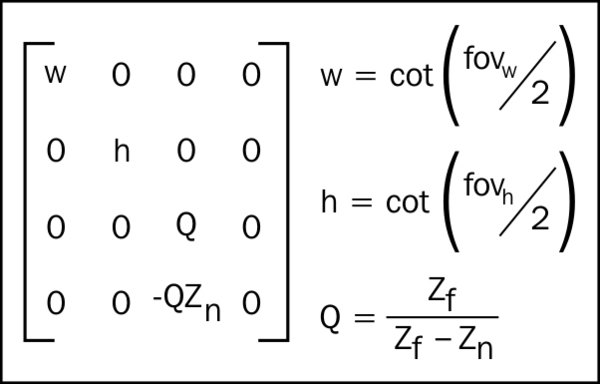
Spot light projection matrix can be calculated in the same way the projection matrix is calculated for the scene's camera. If you are unfamiliar with how this matrix is calculated, just use the following formulas:

In our case, both w and h are equal to the cotangent of the outer cone angle. Zfar is just the range of the light source. Znear was not used in the previous implementation and it should be set to a relatively small value (when we go over shadow mapping, this value's meaning will become clear). For now just use the lights range times 0.0001 as Znear's value.
The combined matrix should be stored to the vertex shader constant:
float4x4 LightViewProjection;
Getting the texture coordinate from the combined matrix is handled by the following code:
float2 GetProjPos(float4 WorldPosition)
{
   float3 ProjTexXYW = mul(WorldPosition, LightViewProjection).xyw;
   ProjTexXYW.xy /= ProjTexXYW.z; // Perspective correction
   Float2 UV = (ProjTexXYW.xy + 1.0.xx) * float2(0.5, -0.5); // Convert to normalized space
   return UV;
}
This function takes the world position as four components (w should be set to 1) as parameter and returns the projected texture UV sampling coordinates. This function should be called in the vertex shader.
The texture coordinates should be than passed to the pixel shader, so they can be used for sampling the texture. In order to sample the texture, the following shader resource view should be defined in the pixel shader:
Texture2D ProjLightTex : register( t0 );
Sampling the texture is done in the pixel shader with the following code:
float3 GetLightColor(float2 UV)
{
   return SpotIntensity * ProjLightTex.Sample(LinearSampler, UV);
}
This function takes the UV coordinates as parameter and returns the light's color intensity for the pixel. Similar to point lights with projected textures, the color sampled from the texture is then multiplied by the intensity to get the color intensity value used in the lighting code.
The only thing left to do is to use the light color intensity and light the mesh. This is handled by the following code:
float3 CalcSpot(float3 LightColor, float3 position, Material material)
{
   float3 ToLight = SpotLightPos - position;
   float3 ToEye = EyePosition.xyz - position;
   float DistToLight = length(ToLight);

   // Phong diffuse
   ToLight /= DistToLight; // Normalize
   float NDotL = saturate(dot(ToLight, material.normal));
   float3 finalColor = LightColor * NDotL;

   // Blinn specular
   ToEye = normalize(ToEye);
   float3 HalfWay = normalize(ToEye + ToLight);
   float NDotH = saturate(dot(HalfWay, material.normal));
   finalColor += LightColor * pow(NDotH, material.specExp) * material.specIntensity;

   // Cone attenuation
   float cosAng = dot(SpotLightDir, ToLight);
   float conAtt = saturate((cosAng - SpotCosOuterCone) / SpotCosInnerCone);
   conAtt *= conAtt;

   // Attenuation
   float DistToLightNorm = 1.0 - saturate(DistToLight / SpotLightRange);
   float Attn = DistToLightNorm * DistToLightNorm;
   finalColor *= material.diffuseColor * Attn * conAtt;

   return finalColor;
}
Similar to the point light implementation with projected texture support, you will notice that the only difference compared to the basic spot light code is the light color getting passed as an argument.
How it works…
Converting the world space position to texture coordinates is very similar to the way world positions get converted to the screen's clip space by the GPU. After multiplying the world position with the combined matrix, the position gets converted to projected space that can be then converted to clip space (X and Y values that are inside the lights influence will have the value -1 to 1). We then normalize the clip space values (X and Y range becomes 0 to 1), which are the UV range we need texture sampling for.
All values passed to the vertex shader are linearly interpolated, so the values passed from the vertex shader to the pixel shader will be interpolated correctly for each pixel based on the UV values calculated for the three vertices, which make the triangle the pixel was rasterized from.


