Search icon CANCEL
Subscription
0
Cart icon
Your Cart (0 item)
Close icon
You have no products in your basket yet
Save more on your purchases! discount-offer-chevron-icon
Savings automatically calculated. No voucher code required.
Arrow left icon
Explore Products
Best Sellers
New Releases
Books
Videos
Audiobooks
Learning Hub
Newsletter Hub
Free Learning
Arrow right icon
timer SALE ENDS IN
0 Days
:
00 Hours
:
00 Minutes
:
00 Seconds
Arrow up icon
GO TO TOP
Godot Engine Game Development Projects

You're reading from   Godot Engine Game Development Projects Build five cross-platform 2D and 3D games with Godot 3.0

Arrow left icon
Product type Paperback
Published in Jun 2018
Publisher Packt
ISBN-13 9781788831505
Length 298 pages
Edition 1st Edition
Languages
Tools
Arrow right icon
Author (1):
Arrow left icon
Chris Bradfield Chris Bradfield
Author Profile Icon Chris Bradfield
Chris Bradfield
Arrow right icon
View More author details
Toc

Creating the level

In this section, you'll create the map where all the action will take place. As the name implies, you'll probably want to make a maze-like level with lots of twists and turns.

Here is a sample level:
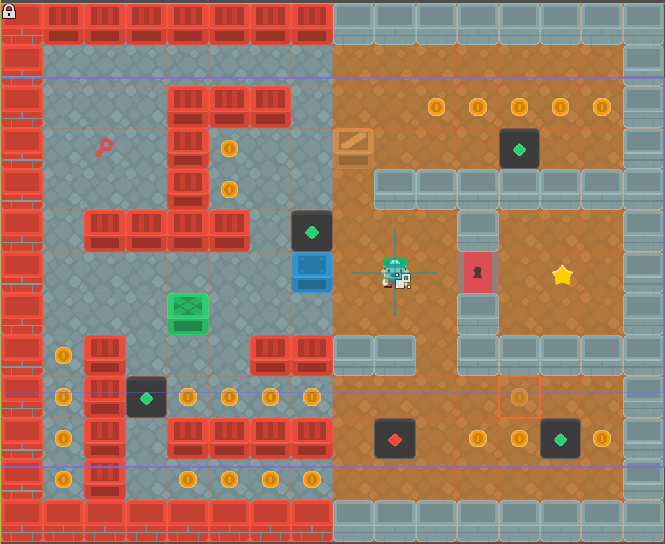
The player's goal is to reach the star. Locked doors can only be opened by picking up the key. The green dots mark the spawn locations of enemies, while the red dot marks the player's start location. The coins are extra items that can be picked up along the way for bonus points. Note that the entire level is larger than the display window. The Camera will scroll the map as the player moves around it.

You'll use the TileMap node to create the map. There are several benefits to using a TileMap for your level design. First, they make it possible to draw the level's layout by painting the tiles onto a grid, which is much faster than placing individual Sprite nodes one by one. Secondly, they allow for much larger levels because they are optimized for drawing large numbers of tiles efficiently by batching them together and only drawing the chunks of the map that are visible at a given time. Finally, you can add collision shapes to individual tiles and the entire map will act as a single collider, simplifying your collision code.

Once you've completed this section, you'll be able to create as many of these maps as you wish. You can put them in order to give a progression from level to level.

Items

First, create a new scene for the collectable objects that the player can pick up. These items will be spawned by the map when the game is run. Here is the scene tree:

Leave the Sprite Texture blank. Since you're using this object for multiple items, the texture can be set in the item's script when it's created.

Set the Pickup Collision Layer to items and its Mask to player. You don't want the enemies collecting the coins before you get there (although that might make for a fun variation on the game where you race to get as many coins as you can before the bad guys gobble them up).

Give the CollisionShape2D node a rectangle shape and set its extents to (32, 32) (strictly speaking, you can use any shape, as the player will move all the way onto the tile and completely overlap the item anyway).

Here is the script for the Pickup:

extends Area2D

var textures = {'coin': 'res://assets/coin.png',
'key_red': 'res://assets/keyRed.png',
'star': 'res://assets/star.png'}
var type

func _ready():
$Tween.interpolate_property($Sprite, 'scale', Vector2(1, 1),
Vector2(3, 3), 0.5, Tween.TRANS_QUAD, Tween.EASE_IN_OUT)
$Tween.interpolate_property($Sprite, 'modulate',
Color(1, 1, 1, 1), Color(1, 1, 1, 0), 0.5,
Tween.TRANS_QUAD, Tween.EASE_IN_OUT)

func init(_type, pos):
$Sprite.texture = load(textures[_type])
type = _type
position = pos

func pickup():
$CollisionShape2D.disabled = true
$Tween.start()

The type variable will be set when the item is created and used to determine what texture the object should use. Using _type as the variable name in the function argument lets you use the name without conflicting with type, which is already in use.

Some programming languages use the notion of private functions or variables, meaning they are only used locally. The _ naming convention in GDScript is used to visually designate variables or functions that should be regarded as private. Note that they aren't actually any different from any other name; it is merely a visual indication for the programmer.

The pickup effect using Tween is similar to the one you used for the coins in Coin Dash—animating the scale and opacity of Sprite. Connect the tween_completed signal of Tween so that the item can be deleted when the effect has finished:

func _on_Tween_tween_completed( object, key ):
queue_free()

TileSets

In order to draw a map using a TileMap, it must have a TileSet assigned to it. The TileSet contains all of the individual tile textures, along with any collision shapes they may have.

Depending on how many tiles you have, it can be time-consuming to create a TileSet, especially the first time. For that reason, there is a pre-generated TileSet included in the assets folder titled tileset.tres. Feel free to use that instead, but please don't skip the following section. It contains useful information to help you understand how the TileSet works.

Creating a TileSet

A TileSet in Godot is a type of Resource. Examples of other resources include Textures, Animations, and Fonts. They are containers that hold a certain type of data, and are typically saved as .tres files.

By default, Godot saves files in text-based formats, indicated by the t in .tscn or .tres, for example. Text-based files are preferred over binary formats because they are human-readable. They are also more friendly for Version Control Systems (VCS), which allow you to track file changes over the course of building your project.

To make a TileSet, you create a scene with a set of Sprite nodes containing the textures from your art assets. You can then add collisions and other properties to those Sprite tiles. Once you've created all the tiles, you export the scene as a TileSet resource, which can then be loaded by the TileMap node.

Here is a screenshot of the TileSetMaker.tscn scene, containing the tiles you'll be using to build this game's levels:

Start by adding a Sprite node and setting its texture to res://assets/sokoban_tilesheet.png. To select a single tile, set the Region/Enabled property to On and click Texture Region at the bottom of the editor window to open the panel. Set Snap Mode to Grid Snap and the Step to 64px in both x and y. Now, when you click and drag in the texture, it will only allow you to select 64 x 64 sections of the texture:

Give the Sprite an appropriate name (crate_brown or wall_red, for example)—this name will appear as the tile's name in the TileSet. Add a StaticBody2D as a child, and then add a CollisionPolygon2D to that. It is important that the collision polygon be sized properly so that it aligns with the tiles placed next to it. The easiest way to do this is to turn on grid snapping in the editor window.

Click the Use Snap button (it looks like a magnet) and then open the snap menu by clicking on the three dots next to it:

Choose Configure Snap... and set the Grid Step to 64 by 64:

Now, with the CollisionPolygon2D selected, you can click in the four corners of the tile one by one to create a closed square (it will appear as a reddish orange):

This tile is now complete. You can duplicate it (Ctrl + D) and make another, and you only need to change the texture region. Note that collision bodies are only needed on the wall tiles. The ground and item tiles should not have them.

When you've created all your tiles, click Scene | Convert To | TileSet and save it with an appropriate name, such as tileset.tres. If you come back and edit the scene again, you'll need to redo the conversion. Pay special attention to the Merge With Existing option. If this is set to On, the current scene's tiles will be merged with the ones already in the tileset file. Sometimes, this can result in changes to the tile indices and change your map in unwanted ways. Take a look at the following screenshot:

tres stands for text resource and is the most common format Godot stores its resource files in. Compare this with tscn, which is the text scene storage format.

Your TileSet resource is ready to use!

TileMaps

Now, let's make a new scene for the game level. The level will be a self-contained scene, and will include the map and the player, and will handle spawning any items and enemies in the level. For the root, use a Node2D and name it Level1 (later, you can duplicate this node setup to create more levels).

You can open the Level1.tscn file from the assets folder to see the completed level scene from this section, although you're encouraged to create your own levels.

When using TileMap, you will often want more than one tile object to appear in a given location. You might want to place a tree, for example, but also have a ground tile appear below it. This can be done by using TileMap as many times as you like to create layers of data. For your level, you'll make three layers to display the ground, which the player can walk on; the walls, which are obstacles; and the collectible items, which are markers for spawning items like coins, keys, and enemies.

Add a TileMap and name it Ground. Drag the tileset.tres into the Tile Set property and you'll see the tiles appear, ready to be used, on the right-hand side of the editor window:

It's very easy to accidentally click and drag in the editor window and move your whole tile map. To prevent this, make sure you select the Ground node and click the Lock button: .

Duplicate this TileMap twice and name the new TileMap nodes Walls and Items. Remember that Godot draws objects in the order listed in the node tree, from top to bottom, so Ground should be at the top, with Walls and Items underneath it.

As you're drawing your level, be careful to note which layer you're drawing on! You should only place the item markers on the Items layer, for example, because that's where the code is going to look for objects to create. Don't place any other objects there, though, because the layer itself will be invisible during gameplay.

Finally, add an instance of the Player scene. Make sure the Player node is below the three TileMap nodes, so it will be drawn on top. The final scene tree should look like this:

Level script

Now that the level is complete, attach a script to create the level behavior. This script will first scan the Items map to spawn any enemies and collectibles. It will also serve to monitor for events that occur during gameplay, such as picking up a key or running into an enemy:

extends Node2D

export (PackedScene) var Enemy
export (PackedScene) var Pickup

onready var items = $Items
var doors = []

The first two variables contain references to the scenes that will need to be instanced from the Items map. Since that particular map node will be referenced frequently, you can cache the $Items lookup in a variable to save some time. Finally, an array called doors will contain the door location(s) found on the map.

Save the script and drag the Enemy.tscn and Pickup.tscn files into their respective properties in the Inspector.

Now, add the following code for _ready():

func _ready():
randomize()
$Items.hide()
set_camera_limits()
var door_id = $Walls.tile_set.find_tile_by_name('door_red')
for cell in $Walls.get_used_cells_by_id(door_id):
doors.append(cell)
spawn_items()
$Player.connect('dead', self, 'game_over')
$Player.connect('grabbed_key', self, '_on_Player_grabbed_key')
$Player.connect('win', self, '_on_Player_win')

The function starts by ensuring that the Items tilemap is hidden. You don't want the player to see those tiles; they exist so the script can detect where to spawn items.

Next, the camera limits must be set, ensuring that it can't scroll past the edges of the map. You'll create a function to handle that (see the following code).

When the player finds a key, the door(s) need to be opened, so the next part searches the Walls map for any door_red tiles and stores them in an array. Note that you must first find the tile's id from the TileSet, because the cells of the TileMap only contain ID numbers that refer to the tile set.

More on the spawn_items() function follows.

Finally, the Player signals are all connected to functions that will process their results.

Here's how to set the camera limits to match the size of the map:

func set_camera_limits():
var map_size = $Ground.get_used_rect()
var cell_size = $Ground.cell_size
$Player/Camera2D.limit_left = map_size.position.x * cell_size.x
$Player/Camera2D.limit_top = map_size.position.y * cell_size.y
$Player/Camera2D.limit_right = map_size.end.x * cell_size.x
$Player/Camera2D.limit_bottom = map_size.end.y * cell_size.y

get_used_rect() returns a Vector2 containing the size of the Ground layer in cells. Multiplying this by the cell_size gives the total map size in pixels, which is used to set the four limit values on the Camera node. Setting these limits ensures you won't see any dead space outside the map when you move near the edge.

Now, add the spawn_items() function:

func spawn_items():
for cell in items.get_used_cells():
var id = items.get_cellv(cell)
var type = items.tile_set.tile_get_name(id)
var pos = items.map_to_world(cell) + items.cell_size/2
match type:
'slime_spawn':
var s = Enemy.instance()
s.position = pos
s.tile_size = items.cell_size
add_child(s)
'player_spawn':
$Player.position = pos
$Player.tile_size = items.cell_size
'coin', 'key_red', 'star':
var p = Pickup.instance()
p.init(type, pos)
add_child(p)

This function looks for the tiles in the Items layer, returned by get_used_cells(). Each cell has an id that maps to a name in the TileSet (the names that were assigned to each tile when the TileSet was made). If you made your own tile set, make sure you use the names that match your tiles in this function. The names used in the preceding code match the tile set that was included in the asset download.

map_to_world() converts the tile map position to pixel coordinates. This gives you the upper-left corner of the tile, so then you must add one half-size tile to find the center of the tile. Then, depending on what tile was found, the matching item object is instanced.

Finally, add the three functions for the player signals:

func game_over():
pass

func _on_Player_win():
pass
func _on_Player_grabbed_key():
for cell in doors:
$Walls.set_cellv(cell, -1)

The player signals dead and win should end the game and go to a Game Over screen (which you haven't created yet). Since you can't write the code for those functions yet, use pass for the time being. The key pickup signal should remove any door tiles (by setting their tile index to -1, which means an empty tile).

Adding more levels

If you want to make another level, you just need to duplicate this scene tree and attach the same script to it. The easiest way to do this is to use Scene | Save As and save the level as Level2.tscn. Then, you can use some of the existing tiles or draw a whole new level layout.

Feel free to do this with as many levels as you like, making sure to save them all in the levels folder. In the next section, you'll see how to link them together so that each level will lead to the next. Don't worry if you number them incorrectly; you'll be able to put them in whatever order you like.

lock icon The rest of the chapter is locked
Register for a free Packt account to unlock a world of extra content!
A free Packt account unlocks extra newsletters, articles, discounted offers, and much more. Start advancing your knowledge today.
Unlock this book and the full library FREE for 7 days
Get unlimited access to 7000+ expert-authored eBooks and videos courses covering every tech area you can think of
Renews at $19.99/month. Cancel anytime
Banner background image