Chapter 4. Re-topology of the High Resolution Sculpted Character's Mesh
In this chapter, we will cover the following recipes:
- Using the Grease Pencil tool to plan the edge-loops flow
- Using the Snap tool to re-topologize the mesh
- Using the Shrinkwrap modifier to re-topologize the mesh
- Using the LoopTools add-on to re-topologize the mesh
- Concluding the re-topologized mesh
Introduction
The re-topology of a mesh, as the name itself explains, is simply the reconstruction of that mesh with a different topology; usually, the re-topology is used to obtain a low resolution mesh from a high resolution one.
In our case, this is obviously needed because we are later going to rig and animate our Gidiosaurus, and these tasks would be almost impossible with a mesh as dense as the high resolution sculpted one; we not only need to reconstruct the shape of the mesh with a lower number of vertices, but also with the edge-loops properly placed and flowing for the best render and deformation of the character's features.
In Blender, we have several tools to accomplish this task, both hardcoded into the software or as add-ons to be enabled, and in this chapter, we are going to see them.
Using the Grease Pencil tool to plan the edge-loops flow
It would be perfectly possible to start immediately to re-topologize the high resolution mesh, at least for an expert modeler; by the way, it's usually a good practice to have a guide to be followed in the process, to solve a priori any issue (or at least most of them) that we would come across.
So, let's start this chapter by planning what the right topology can be for a low resolution mesh of our Gidiosaurus character; we are going to use the Grease Pencil tool to draw the paths of the edge-loops and polygons flow, straight onto the sculpted mesh.
Getting ready
First, let's prepare the screen:
- Open the
Gidiosaurus_modeling_02.blendfile. - Go to the UV/Image Editor window to the left and Shift + left-click on the X icon on the toolbar to get rid of the template image (to be more technically precise, to unlink the template image data block; the Shift key is to set the users to 0 and definitely eliminate the image from the file).
- Put the mouse pointer on the border between the two windows and right-click; in the little Area Options pop-up panel, left-click on the Join Area item and then slightly move the mouse pointer to the left and left-click again, to join the two windows and obtain a single big 3D viewport window:

Joining the two windows into one
- Click on the 11th scene layer button to show only the sculpted Gidiosaurus mesh and parts such as the teeth, eyes, and so on.
- Go to the Outliner and click on the icons showing an eye image placed to the right side of the Eyeballs, Fangs, and Talons items to hide them.
- Press the N key to make the Properties 3D view sidepanel appear to the right of the 3D window and scroll it to find the Grease Pencil subpanel (already enabled by default); go to the Tool Shelf panel to the left of the 3D window and click on the Grease Pencil tab:

The Grease Pencil panels and the screen layout in current state
- Check to enable the Continuous Drawing item just below the four buttons at the top of the Grease Pencil tab on the Tool Shelf.
- Go to the Grease Pencil subpanel under the Properties 3D view sidepanel to the right and click on the New button; then, click on the + icon button to the left side to add a new Grease Pencil layer, which is by default labeled GP_Layer; set the Stroke color to RGB 1.000, 0.000, 0.350 and Thickness of the strokes to 4 pixels.
- Double-click on the GP_Layer name to rename it as Head.
- Go to the Tool Shelf and, under Stroke Placement, click on the Surface button:

Starting to use the Grease Pencil tool
- Save the file as
Gidiosaurus_retopology.blend.
How to do it…
We are now going to start to draw on the character's head:
- Press Shift + B and draw a box around the head of the Gidiosaurus to zoom to it; then, press the 5 key on the numpad to go into Ortho view.
- Click on the Draw, Line or Poly buttons at the top of the Grease Pencil tab in the Tool Shelf; alternatively, keep the D key pressed (along with left-click) to start to draw the first stroke on the mesh (Ctrl + D + left-click and Ctrl + D + right-click, respectively for Line and Poly).
Because we enabled the Continuous Drawing item in the Tool Shelf, we can continue to draw without the need to reactivate the drawing mode at each stroke. To quit the sketching session (for example, to change the brush), we can press the Esc or the Enter keys, so confirming the sketching session itself at the same time; otherwise, without the Continuous Drawing item enabled, the sketching is confirmed right after each stroke.
- Start to draw (one half side of the mesh is enough) the strokes; try to make the strokes follow the main, basic, and more remarkable features of the sculpted mesh such as the main skin folders going from the snout to the eye sockets and the bags under the eyes, nostril, mouth rim, and so on.
- Don't worry too much about the quality or the precision of the strokes; also, don't be afraid to erase (D + right-click or the Erase button) and/or correct the strokes, if necessary. The Grease Pencil, in this case, is just a tool to sketch directly on the mesh the guidelines we will later follow for the re-topology stage:

Drawing the head's main features topology
In the case of our Gidiosaurus, the topology for a correct deformation is similar to the topology we would use for a human face, but a lot simpler: we just need edge-loops around the eyes and in the eyebrows area, to give them mobility for expressiveness; a few edge-loops around the mouth that, however, in our case, remains quite rigid; and edge-loops following the folders on the top of the snout, which can also be important for the growl expression.
- Once the strokes for the main features have been posed, try to join them into a web of edges, as balanced and efficient as possible:

Connecting the strokes
- At a certain point, when and if the overlapping of the strokes starts to become confusing, you can uncheck the X Ray item, which is located to the right side of the Thickness slot in the Grease Pencil layer subpanel, to disable the visibility of the strokes behind the mesh surface.
- Forget about the edge-loops of stiff parts such as the cranium; it's enough to plan the position and the flow of the deforming ones. In the screenshot at the bottom right, I have highlighted (in Gimp) the main facial edge-loops for the Gidiosaurus with different colors:

The X Ray button and the highlighted main edge-loops
- When you think you are done with the head, click on the + icon button to add a new layer and rename it as Neck. Set the values the same you did for the Head layer, just change the color of the strokes; I set mine to RGB 0.106, 0.435, 0.993, but whatever color you choose, be sure that it stands out in the viewport against the mesh color.
- In the case of the neck, the important thing is to find the correct joining with the head's edge-loops under the lower jaw, as you can see in the bottom-right screenshot:

The Neck layer
- Continue to stroke on the neck by drawing parallel horizontal loops along its length and use the vertical strokes to outline the neck's muscles (don't look for a sternocleidomastoid muscle here; the Gidiosaurus, anatomy, although similar in some ways, is not human at all!).
- Remember that because our character is wearing an armor, it is not necessary to re-topologize the whole body, but only the exposed parts; so we can stop the planning just a little beyond the plates outside edges. To verify the correct extension of the strokes, just be sure to have the X Ray item enabled in the Grease Pencil layers and also the 13th scene layer enabled to show the armor:

Verifying the extension of the strokes under the armor
- Click again on the + icon button in the Grease Pencil subpanel under the Properties 3D view sidepanel and rename the new layer as Arm. Set the values the same as you did for the Head and Neck layers, but change the color once more (R 0.000, G 1.000, B 0.476); this time, we have to plan the joining of the cylindrical shape of the arm with the shoulder and the collar bones areas:

Sketching the guidelines on the arm
- As before, also in this case, it is not necessary to go beyond the boundaries of the armor chest plate, but including also the muscles of the chest and back in the topology planning can give a more natural result:

The completed guidelines for the shoulder and the arm joining
- When you are done, save the file.
At this point, we can stop with the Grease Pencil sketching of the topology; the remaining parts of the exposed body are a lot simpler and will be quickly resolved in the successive recipe of this chapter.
There's more…
We can load any already existing Grease Pencil layer data blocks even into an empty scene, by clicking on the little arrows on the left-hand side of the Gpencil slot (Freehand annotation sketchbook) at the top of the Grease Pencil subpanel on the Properties 3D view sidepanel, and indifferently for Scene or Object. Actually, the Grease Pencil tool can be used as a sketchbook tool, to write quick notes and/or corrections inside the Node Editor window or the UV/Image Editor window, and even as an animation tool, by drawing inside an empty scene or on the surface of other objects to be used as templates.
In the following screenshot, you can see the sketching sessions previously made on the Gidiosaurus object's surface, showing a solo and keeping the volumes of the character in the 3D space:
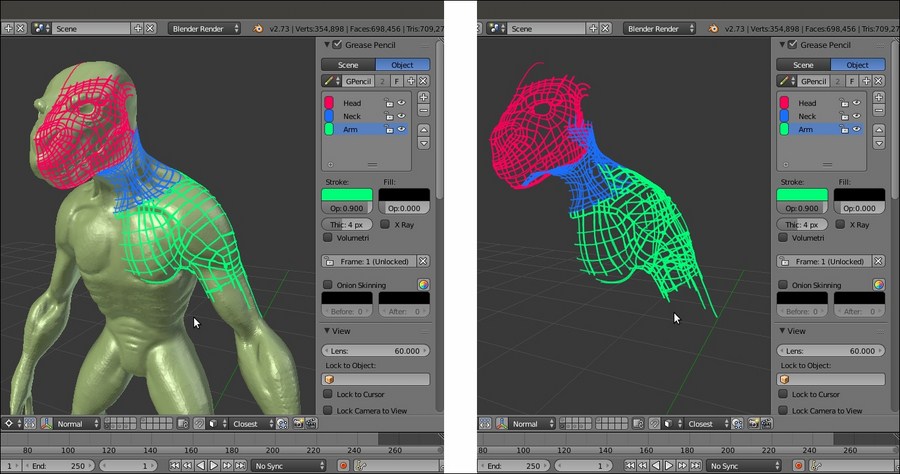
The Grease Pencil layers in the 3D space
Getting ready
First, let's prepare the screen:
- Open the
Gidiosaurus_modeling_02.blendfile. - Go to the UV/Image Editor window to the left and Shift + left-click on the X icon on the toolbar to get rid of the template image (to be more technically precise, to unlink the template image data block; the Shift key is to set the users to 0 and definitely eliminate the image from the file).
- Put the mouse pointer on the border between the two windows and right-click; in the little Area Options pop-up panel, left-click on the Join Area item and then slightly move the mouse pointer to the left and left-click again, to join the two windows and obtain a single big 3D viewport window:

Joining the two windows into one
- Click on the 11th scene layer button to show only the sculpted Gidiosaurus mesh and parts such as the teeth, eyes, and so on.
- Go to the Outliner and click on the icons showing an eye image placed to the right side of the Eyeballs, Fangs, and Talons items to hide them.
- Press the N key to make the Properties 3D view sidepanel appear to the right of the 3D window and scroll it to find the Grease Pencil subpanel (already enabled by default); go to the Tool Shelf panel to the left of the 3D window and click on the Grease Pencil tab:

The Grease Pencil panels and the screen layout in current state
- Check to enable the Continuous Drawing item just below the four buttons at the top of the Grease Pencil tab on the Tool Shelf.
- Go to the Grease Pencil subpanel under the Properties 3D view sidepanel to the right and click on the New button; then, click on the + icon button to the left side to add a new Grease Pencil layer, which is by default labeled GP_Layer; set the Stroke color to RGB 1.000, 0.000, 0.350 and Thickness of the strokes to 4 pixels.
- Double-click on the GP_Layer name to rename it as Head.
- Go to the Tool Shelf and, under Stroke Placement, click on the Surface button:

Starting to use the Grease Pencil tool
- Save the file as
Gidiosaurus_retopology.blend.
How to do it…
We are now going to start to draw on the character's head:
- Press Shift + B and draw a box around the head of the Gidiosaurus to zoom to it; then, press the 5 key on the numpad to go into Ortho view.
- Click on the Draw, Line or Poly buttons at the top of the Grease Pencil tab in the Tool Shelf; alternatively, keep the D key pressed (along with left-click) to start to draw the first stroke on the mesh (Ctrl + D + left-click and Ctrl + D + right-click, respectively for Line and Poly).
Because we enabled the Continuous Drawing item in the Tool Shelf, we can continue to draw without the need to reactivate the drawing mode at each stroke. To quit the sketching session (for example, to change the brush), we can press the Esc or the Enter keys, so confirming the sketching session itself at the same time; otherwise, without the Continuous Drawing item enabled, the sketching is confirmed right after each stroke.
- Start to draw (one half side of the mesh is enough) the strokes; try to make the strokes follow the main, basic, and more remarkable features of the sculpted mesh such as the main skin folders going from the snout to the eye sockets and the bags under the eyes, nostril, mouth rim, and so on.
- Don't worry too much about the quality or the precision of the strokes; also, don't be afraid to erase (D + right-click or the Erase button) and/or correct the strokes, if necessary. The Grease Pencil, in this case, is just a tool to sketch directly on the mesh the guidelines we will later follow for the re-topology stage:

Drawing the head's main features topology
In the case of our Gidiosaurus, the topology for a correct deformation is similar to the topology we would use for a human face, but a lot simpler: we just need edge-loops around the eyes and in the eyebrows area, to give them mobility for expressiveness; a few edge-loops around the mouth that, however, in our case, remains quite rigid; and edge-loops following the folders on the top of the snout, which can also be important for the growl expression.
- Once the strokes for the main features have been posed, try to join them into a web of edges, as balanced and efficient as possible:

Connecting the strokes
- At a certain point, when and if the overlapping of the strokes starts to become confusing, you can uncheck the X Ray item, which is located to the right side of the Thickness slot in the Grease Pencil layer subpanel, to disable the visibility of the strokes behind the mesh surface.
- Forget about the edge-loops of stiff parts such as the cranium; it's enough to plan the position and the flow of the deforming ones. In the screenshot at the bottom right, I have highlighted (in Gimp) the main facial edge-loops for the Gidiosaurus with different colors:

The X Ray button and the highlighted main edge-loops
- When you think you are done with the head, click on the + icon button to add a new layer and rename it as Neck. Set the values the same you did for the Head layer, just change the color of the strokes; I set mine to RGB 0.106, 0.435, 0.993, but whatever color you choose, be sure that it stands out in the viewport against the mesh color.
- In the case of the neck, the important thing is to find the correct joining with the head's edge-loops under the lower jaw, as you can see in the bottom-right screenshot:

The Neck layer
- Continue to stroke on the neck by drawing parallel horizontal loops along its length and use the vertical strokes to outline the neck's muscles (don't look for a sternocleidomastoid muscle here; the Gidiosaurus, anatomy, although similar in some ways, is not human at all!).
- Remember that because our character is wearing an armor, it is not necessary to re-topologize the whole body, but only the exposed parts; so we can stop the planning just a little beyond the plates outside edges. To verify the correct extension of the strokes, just be sure to have the X Ray item enabled in the Grease Pencil layers and also the 13th scene layer enabled to show the armor:

Verifying the extension of the strokes under the armor
- Click again on the + icon button in the Grease Pencil subpanel under the Properties 3D view sidepanel and rename the new layer as Arm. Set the values the same as you did for the Head and Neck layers, but change the color once more (R 0.000, G 1.000, B 0.476); this time, we have to plan the joining of the cylindrical shape of the arm with the shoulder and the collar bones areas:

Sketching the guidelines on the arm
- As before, also in this case, it is not necessary to go beyond the boundaries of the armor chest plate, but including also the muscles of the chest and back in the topology planning can give a more natural result:

The completed guidelines for the shoulder and the arm joining
- When you are done, save the file.
At this point, we can stop with the Grease Pencil sketching of the topology; the remaining parts of the exposed body are a lot simpler and will be quickly resolved in the successive recipe of this chapter.
There's more…
We can load any already existing Grease Pencil layer data blocks even into an empty scene, by clicking on the little arrows on the left-hand side of the Gpencil slot (Freehand annotation sketchbook) at the top of the Grease Pencil subpanel on the Properties 3D view sidepanel, and indifferently for Scene or Object. Actually, the Grease Pencil tool can be used as a sketchbook tool, to write quick notes and/or corrections inside the Node Editor window or the UV/Image Editor window, and even as an animation tool, by drawing inside an empty scene or on the surface of other objects to be used as templates.
In the following screenshot, you can see the sketching sessions previously made on the Gidiosaurus object's surface, showing a solo and keeping the volumes of the character in the 3D space:

The Grease Pencil layers in the 3D space
How to do it…
We are now going to start to draw on the character's head:
- Press Shift + B and draw a box around the head of the Gidiosaurus to zoom to it; then, press the 5 key on the numpad to go into Ortho view.
- Click on the Draw, Line or Poly buttons at the top of the Grease Pencil tab in the Tool Shelf; alternatively, keep the D key pressed (along with left-click) to start to draw the first stroke on the mesh (Ctrl + D + left-click and Ctrl + D + right-click, respectively for Line and Poly).
Because we enabled the Continuous Drawing item in the Tool Shelf, we can continue to draw without the need to reactivate the drawing mode at each stroke. To quit the sketching session (for example, to change the brush), we can press the Esc or the Enter keys, so confirming the sketching session itself at the same time; otherwise, without the Continuous Drawing item enabled, the sketching is confirmed right after each stroke.
- Start to draw (one half side of the mesh is enough) the strokes; try to make the strokes follow the main, basic, and more remarkable features of the sculpted mesh such as the main skin folders going from the snout to the eye sockets and the bags under the eyes, nostril, mouth rim, and so on.
- Don't worry too much about the quality or the precision of the strokes; also, don't be afraid to erase (D + right-click or the Erase button) and/or correct the strokes, if necessary. The Grease Pencil, in this case, is just a tool to sketch directly on the mesh the guidelines we will later follow for the re-topology stage:

Drawing the head's main features topology
In the case of our Gidiosaurus, the topology for a correct deformation is similar to the topology we would use for a human face, but a lot simpler: we just need edge-loops around the eyes and in the eyebrows area, to give them mobility for expressiveness; a few edge-loops around the mouth that, however, in our case, remains quite rigid; and edge-loops following the folders on the top of the snout, which can also be important for the growl expression.
- Once the strokes for the main features have been posed, try to join them into a web of edges, as balanced and efficient as possible:

Connecting the strokes
- At a certain point, when and if the overlapping of the strokes starts to become confusing, you can uncheck the X Ray item, which is located to the right side of the Thickness slot in the Grease Pencil layer subpanel, to disable the visibility of the strokes behind the mesh surface.
- Forget about the edge-loops of stiff parts such as the cranium; it's enough to plan the position and the flow of the deforming ones. In the screenshot at the bottom right, I have highlighted (in Gimp) the main facial edge-loops for the Gidiosaurus with different colors:

The X Ray button and the highlighted main edge-loops
- When you think you are done with the head, click on the + icon button to add a new layer and rename it as Neck. Set the values the same you did for the Head layer, just change the color of the strokes; I set mine to RGB 0.106, 0.435, 0.993, but whatever color you choose, be sure that it stands out in the viewport against the mesh color.
- In the case of the neck, the important thing is to find the correct joining with the head's edge-loops under the lower jaw, as you can see in the bottom-right screenshot:

The Neck layer
- Continue to stroke on the neck by drawing parallel horizontal loops along its length and use the vertical strokes to outline the neck's muscles (don't look for a sternocleidomastoid muscle here; the Gidiosaurus, anatomy, although similar in some ways, is not human at all!).
- Remember that because our character is wearing an armor, it is not necessary to re-topologize the whole body, but only the exposed parts; so we can stop the planning just a little beyond the plates outside edges. To verify the correct extension of the strokes, just be sure to have the X Ray item enabled in the Grease Pencil layers and also the 13th scene layer enabled to show the armor:

Verifying the extension of the strokes under the armor
- Click again on the + icon button in the Grease Pencil subpanel under the Properties 3D view sidepanel and rename the new layer as Arm. Set the values the same as you did for the Head and Neck layers, but change the color once more (R 0.000, G 1.000, B 0.476); this time, we have to plan the joining of the cylindrical shape of the arm with the shoulder and the collar bones areas:

Sketching the guidelines on the arm
- As before, also in this case, it is not necessary to go beyond the boundaries of the armor chest plate, but including also the muscles of the chest and back in the topology planning can give a more natural result:

The completed guidelines for the shoulder and the arm joining
- When you are done, save the file.
At this point, we can stop with the Grease Pencil sketching of the topology; the remaining parts of the exposed body are a lot simpler and will be quickly resolved in the successive recipe of this chapter.
There's more…
We can load any already existing Grease Pencil layer data blocks even into an empty scene, by clicking on the little arrows on the left-hand side of the Gpencil slot (Freehand annotation sketchbook) at the top of the Grease Pencil subpanel on the Properties 3D view sidepanel, and indifferently for Scene or Object. Actually, the Grease Pencil tool can be used as a sketchbook tool, to write quick notes and/or corrections inside the Node Editor window or the UV/Image Editor window, and even as an animation tool, by drawing inside an empty scene or on the surface of other objects to be used as templates.
In the following screenshot, you can see the sketching sessions previously made on the Gidiosaurus object's surface, showing a solo and keeping the volumes of the character in the 3D space:

The Grease Pencil layers in the 3D space
There's more…
We can load any already existing Grease Pencil layer data blocks even into an empty scene, by clicking on the little arrows on the left-hand side of the Gpencil slot (Freehand annotation sketchbook) at the top of the Grease Pencil subpanel on the Properties 3D view sidepanel, and indifferently for Scene or Object. Actually, the Grease Pencil tool can be used as a sketchbook tool, to write quick notes and/or corrections inside the Node Editor window or the UV/Image Editor window, and even as an animation tool, by drawing inside an empty scene or on the surface of other objects to be used as templates.
In the following screenshot, you can see the sketching sessions previously made on the Gidiosaurus object's surface, showing a solo and keeping the volumes of the character in the 3D space:

The Grease Pencil layers in the 3D space
Using the Snap tool to re-topologize the mesh
In this recipe, we'll use the Snap tool to start to re-topologize the sculpted high resolution mesh.
Getting ready
First, let's prepare both, the mesh to be traced, which is the high resolution mesh, and the tool itself:
- Go to the Outliner and click on the Restrict viewport selection icon, which is the arrow one, to the side of the Gidiosaurus item to make it not selectable.
- Be sure that the 3D Cursor is at the center of the scene (Shift + C) and add a Plane primitive.
- Click on the Snap during transform button, the little icon with the magnet, on the 3D view toolbar, or else press Shift + Tab to activate the tool.
- Click on the Snap Element button (Type of element to snap to) on the close right to select the Face item, or else press Shift + Ctrl + Tab to make the Snap Element pop-up menu appear in order to select the item from:

The Snap Element menu
How to do it…
Now, we are going to start the re-topology:
- With the Plane object selected, press Tab to go into Edit Mode; with all the vertices already selected by default, by pressing Shift + right-click, deselect just one vertex (anyone of them, it doesn't matter which one).
- Press X to delete the other three vertices that are still selected.
- Select the single remaining vertex and move it onto the head of the sculpted mesh, close to the left eye socket; as the Snap tool is enabled, the vertex stays on the mesh surface.
- Press the period (.) key on the numpad to zoom the 3D view centered on the selected vertex:

Starting the re-topology process
- Go to the Object Data window and check the X-Ray item under the Display subpanel in the main Properties panel to the right of the screen.
- Start to extrude the vertex, building an edge-loop around the eye socket and following the Grease Pencil guideline, both by pressing the E key or Ctrl + left-click to add vertices; if needed, press G to move them at the right location (that is, at the intersections of the guidelines).
- When you have almost completed the edge-loop around the eye socket, select the last and the first vertices and press the F key to close it.
- Select the bottom row of vertices of the edge-loop and extrude them; adjust the position of each vertex on the ground of the strokes guideline:

The first re-topology around the eye socket
- Do the same with the upper row of vertices and then select the free vertices on the right-hand side of the edge-loops and press Alt + M to merge them at the center (At Center):

Building the eye edge-loop
- While still in Edit Mode, select all the vertices and press Ctrl + N to recalculate the normals.
- Keep on extruding the edge-loops to build the faces around the eye socket. Select the inner edge-loop and extrude it; then, scale it inside and adjust the vertices position as usual.
- Cut a new edge-loop in the middle of the eye socket by pressing Ctrl + R and then select each vertex; press G and, immediately after, click with the left button of the mouse. This way the newly added vertex stays in place, but is snapped to the underlying surface (sadly, it doesn't work automatically as you cut or add vertices; they must be moved in some way to make the Snap tool work).

Adding geometry and snapping the vertices to the surface
- Keep on adding geometry to the mesh, extruding or Ctrl + left-clicking, and switch between edges and vertices selection mode to make the workflow faster. Press 5 on the numpad to go into Ortho view when necessary. Following the strokes guideline, build faces going towards the median line of the object.
- As you are arrived to the median line of the object, go to the Object Modifiers window under the Properties panel and assign a Mirror modifier.
- Click on the Adjust edit cage to modifier result icon (the last one in the row to the side of the modifier's name), to activate the modifier during the editing, and check the Clipping item.
- Adjust the vertices you just added to the median line of the mesh to stay on the y axis and recalculate the normals.
- Go to the Outliner and rename the Plane item as Gidiosaurus_lowres.

Going towards the median line
- Build the remainder of the faces the same way, extruding edges or vertices, moving them to react to the Snap tool, and adding cuts and edge-loops where needed to keep all quads. N-gons faces can be split into quads by dividing an edge to add a vertex in the middle, selecting the new vertex and its opposite one and pressing the J key to connect them (see the two screenshots at the bottom row):

Building the eyebrows and dividing N-gons into two quad faces
- Assign a Subdivision Surface modifier to the low resolution mesh and set Subdivisions to 2. Check the Optimal Display item; if you want, click on the Adjust edit cage to modifier result icon, which is the last one in the row to the side of the modifier's name. To work with an already smoothed mesh (in the end, the mesh will be subdivided in any case) is a usual workflow; by the way, it depends on your preferences. If you prefer to work without the modifier, occasionally go out of Edit Mode to verify how the geometry behaves under the Subdivision Surface modifier.

The created geometry in the Subdivision Surface visualization mode
- Around the eyebrows, it is important to have continuous edge-loops to allow for better mesh deformation; often, it is enough to merge (Alt + M) two vertices to obtain the right flow. Note that this creates a pole (check out the screenshot at the top right) that can later be eliminated by a cut and then merges the two tris faces into a quad (Alt + J; the two screenshots at the bottom):

Closing two edge-loops
- We have almost completed the Gidiosaurus' face. Select the vertices of the lower jaw and press the H key to hide them; select the upper mouth rim and extrude it and then adjust the vertices' position.
- Deselect the vertices, press Alt + H to unhide the mandible, and press Shift + H to hide the unselected vertices (in this case, the upper face). Select the mouth rim of the mandible and extrude and then tweak the position of the vertices.
- Connect the upper and the lower jaws by connecting the last vertices, as shown in the bottom-left of screenshot and then build a face. Tweak the vertices' position:

Connecting the jaw to the upper mouth
We can stop using the Snap tool at this point and continue with the re-topologizing by using different tools; we'll see this in the upcoming recipes.
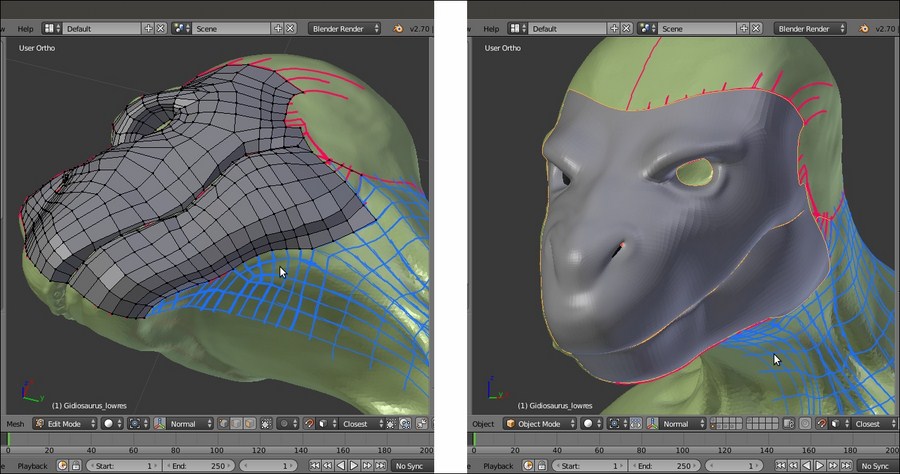
The re-topologized face of the character
How it works…
The main requirement for a re-topology tool is the ability to trace the shape and volume of the high resolution mesh as easily as possible. In this recipe, we used the Blender Snap tool that, once set to Face, guarantees that every added vertex lies on the faces of any directly underlying object; this way, it is quite simple to concentrate on the flow of the polygons, while their vertices stay anchored to the mesh's surface.
To remark that the strokes are there only as a generic indication, note that in certain areas we are doubling the number of faces sketched with the Grease Pencil tool as well as to try to keep the density of the mesh as even as possible.
Getting ready
First, let's prepare both, the mesh to be traced, which is the high resolution mesh, and the tool itself:
- Go to the Outliner and click on the Restrict viewport selection icon, which is the arrow one, to the side of the Gidiosaurus item to make it not selectable.
- Be sure that the 3D Cursor is at the center of the scene (Shift + C) and add a Plane primitive.
- Click on the Snap during transform button, the little icon with the magnet, on the 3D view toolbar, or else press Shift + Tab to activate the tool.
- Click on the Snap Element button (Type of element to snap to) on the close right to select the Face item, or else press Shift + Ctrl + Tab to make the Snap Element pop-up menu appear in order to select the item from:

The Snap Element menu
How to do it…
Now, we are going to start the re-topology:
- With the Plane object selected, press Tab to go into Edit Mode; with all the vertices already selected by default, by pressing Shift + right-click, deselect just one vertex (anyone of them, it doesn't matter which one).
- Press X to delete the other three vertices that are still selected.
- Select the single remaining vertex and move it onto the head of the sculpted mesh, close to the left eye socket; as the Snap tool is enabled, the vertex stays on the mesh surface.
- Press the period (.) key on the numpad to zoom the 3D view centered on the selected vertex:

Starting the re-topology process
- Go to the Object Data window and check the X-Ray item under the Display subpanel in the main Properties panel to the right of the screen.
- Start to extrude the vertex, building an edge-loop around the eye socket and following the Grease Pencil guideline, both by pressing the E key or Ctrl + left-click to add vertices; if needed, press G to move them at the right location (that is, at the intersections of the guidelines).
- When you have almost completed the edge-loop around the eye socket, select the last and the first vertices and press the F key to close it.
- Select the bottom row of vertices of the edge-loop and extrude them; adjust the position of each vertex on the ground of the strokes guideline:

The first re-topology around the eye socket
- Do the same with the upper row of vertices and then select the free vertices on the right-hand side of the edge-loops and press Alt + M to merge them at the center (At Center):

Building the eye edge-loop
- While still in Edit Mode, select all the vertices and press Ctrl + N to recalculate the normals.
- Keep on extruding the edge-loops to build the faces around the eye socket. Select the inner edge-loop and extrude it; then, scale it inside and adjust the vertices position as usual.
- Cut a new edge-loop in the middle of the eye socket by pressing Ctrl + R and then select each vertex; press G and, immediately after, click with the left button of the mouse. This way the newly added vertex stays in place, but is snapped to the underlying surface (sadly, it doesn't work automatically as you cut or add vertices; they must be moved in some way to make the Snap tool work).

Adding geometry and snapping the vertices to the surface
- Keep on adding geometry to the mesh, extruding or Ctrl + left-clicking, and switch between edges and vertices selection mode to make the workflow faster. Press 5 on the numpad to go into Ortho view when necessary. Following the strokes guideline, build faces going towards the median line of the object.
- As you are arrived to the median line of the object, go to the Object Modifiers window under the Properties panel and assign a Mirror modifier.
- Click on the Adjust edit cage to modifier result icon (the last one in the row to the side of the modifier's name), to activate the modifier during the editing, and check the Clipping item.
- Adjust the vertices you just added to the median line of the mesh to stay on the y axis and recalculate the normals.
- Go to the Outliner and rename the Plane item as Gidiosaurus_lowres.

Going towards the median line
- Build the remainder of the faces the same way, extruding edges or vertices, moving them to react to the Snap tool, and adding cuts and edge-loops where needed to keep all quads. N-gons faces can be split into quads by dividing an edge to add a vertex in the middle, selecting the new vertex and its opposite one and pressing the J key to connect them (see the two screenshots at the bottom row):

Building the eyebrows and dividing N-gons into two quad faces
- Assign a Subdivision Surface modifier to the low resolution mesh and set Subdivisions to 2. Check the Optimal Display item; if you want, click on the Adjust edit cage to modifier result icon, which is the last one in the row to the side of the modifier's name. To work with an already smoothed mesh (in the end, the mesh will be subdivided in any case) is a usual workflow; by the way, it depends on your preferences. If you prefer to work without the modifier, occasionally go out of Edit Mode to verify how the geometry behaves under the Subdivision Surface modifier.

The created geometry in the Subdivision Surface visualization mode
- Around the eyebrows, it is important to have continuous edge-loops to allow for better mesh deformation; often, it is enough to merge (Alt + M) two vertices to obtain the right flow. Note that this creates a pole (check out the screenshot at the top right) that can later be eliminated by a cut and then merges the two tris faces into a quad (Alt + J; the two screenshots at the bottom):

Closing two edge-loops
- We have almost completed the Gidiosaurus' face. Select the vertices of the lower jaw and press the H key to hide them; select the upper mouth rim and extrude it and then adjust the vertices' position.
- Deselect the vertices, press Alt + H to unhide the mandible, and press Shift + H to hide the unselected vertices (in this case, the upper face). Select the mouth rim of the mandible and extrude and then tweak the position of the vertices.
- Connect the upper and the lower jaws by connecting the last vertices, as shown in the bottom-left of screenshot and then build a face. Tweak the vertices' position:

Connecting the jaw to the upper mouth
We can stop using the Snap tool at this point and continue with the re-topologizing by using different tools; we'll see this in the upcoming recipes.

The re-topologized face of the character
How it works…
The main requirement for a re-topology tool is the ability to trace the shape and volume of the high resolution mesh as easily as possible. In this recipe, we used the Blender Snap tool that, once set to Face, guarantees that every added vertex lies on the faces of any directly underlying object; this way, it is quite simple to concentrate on the flow of the polygons, while their vertices stay anchored to the mesh's surface.
To remark that the strokes are there only as a generic indication, note that in certain areas we are doubling the number of faces sketched with the Grease Pencil tool as well as to try to keep the density of the mesh as even as possible.
How to do it…
Now, we are going to start the re-topology:
- With the Plane object selected, press Tab to go into Edit Mode; with all the vertices already selected by default, by pressing Shift + right-click, deselect just one vertex (anyone of them, it doesn't matter which one).
- Press X to delete the other three vertices that are still selected.
- Select the single remaining vertex and move it onto the head of the sculpted mesh, close to the left eye socket; as the Snap tool is enabled, the vertex stays on the mesh surface.
- Press the period (.) key on the numpad to zoom the 3D view centered on the selected vertex:

Starting the re-topology process
- Go to the Object Data window and check the X-Ray item under the Display subpanel in the main Properties panel to the right of the screen.
- Start to extrude the vertex, building an edge-loop around the eye socket and following the Grease Pencil guideline, both by pressing the E key or Ctrl + left-click to add vertices; if needed, press G to move them at the right location (that is, at the intersections of the guidelines).
- When you have almost completed the edge-loop around the eye socket, select the last and the first vertices and press the F key to close it.
- Select the bottom row of vertices of the edge-loop and extrude them; adjust the position of each vertex on the ground of the strokes guideline:

The first re-topology around the eye socket
- Do the same with the upper row of vertices and then select the free vertices on the right-hand side of the edge-loops and press Alt + M to merge them at the center (At Center):

Building the eye edge-loop
- While still in Edit Mode, select all the vertices and press Ctrl + N to recalculate the normals.
- Keep on extruding the edge-loops to build the faces around the eye socket. Select the inner edge-loop and extrude it; then, scale it inside and adjust the vertices position as usual.
- Cut a new edge-loop in the middle of the eye socket by pressing Ctrl + R and then select each vertex; press G and, immediately after, click with the left button of the mouse. This way the newly added vertex stays in place, but is snapped to the underlying surface (sadly, it doesn't work automatically as you cut or add vertices; they must be moved in some way to make the Snap tool work).

Adding geometry and snapping the vertices to the surface
- Keep on adding geometry to the mesh, extruding or Ctrl + left-clicking, and switch between edges and vertices selection mode to make the workflow faster. Press 5 on the numpad to go into Ortho view when necessary. Following the strokes guideline, build faces going towards the median line of the object.
- As you are arrived to the median line of the object, go to the Object Modifiers window under the Properties panel and assign a Mirror modifier.
- Click on the Adjust edit cage to modifier result icon (the last one in the row to the side of the modifier's name), to activate the modifier during the editing, and check the Clipping item.
- Adjust the vertices you just added to the median line of the mesh to stay on the y axis and recalculate the normals.
- Go to the Outliner and rename the Plane item as Gidiosaurus_lowres.

Going towards the median line
- Build the remainder of the faces the same way, extruding edges or vertices, moving them to react to the Snap tool, and adding cuts and edge-loops where needed to keep all quads. N-gons faces can be split into quads by dividing an edge to add a vertex in the middle, selecting the new vertex and its opposite one and pressing the J key to connect them (see the two screenshots at the bottom row):

Building the eyebrows and dividing N-gons into two quad faces
- Assign a Subdivision Surface modifier to the low resolution mesh and set Subdivisions to 2. Check the Optimal Display item; if you want, click on the Adjust edit cage to modifier result icon, which is the last one in the row to the side of the modifier's name. To work with an already smoothed mesh (in the end, the mesh will be subdivided in any case) is a usual workflow; by the way, it depends on your preferences. If you prefer to work without the modifier, occasionally go out of Edit Mode to verify how the geometry behaves under the Subdivision Surface modifier.

The created geometry in the Subdivision Surface visualization mode
- Around the eyebrows, it is important to have continuous edge-loops to allow for better mesh deformation; often, it is enough to merge (Alt + M) two vertices to obtain the right flow. Note that this creates a pole (check out the screenshot at the top right) that can later be eliminated by a cut and then merges the two tris faces into a quad (Alt + J; the two screenshots at the bottom):

Closing two edge-loops
- We have almost completed the Gidiosaurus' face. Select the vertices of the lower jaw and press the H key to hide them; select the upper mouth rim and extrude it and then adjust the vertices' position.
- Deselect the vertices, press Alt + H to unhide the mandible, and press Shift + H to hide the unselected vertices (in this case, the upper face). Select the mouth rim of the mandible and extrude and then tweak the position of the vertices.
- Connect the upper and the lower jaws by connecting the last vertices, as shown in the bottom-left of screenshot and then build a face. Tweak the vertices' position:

Connecting the jaw to the upper mouth
We can stop using the Snap tool at this point and continue with the re-topologizing by using different tools; we'll see this in the upcoming recipes.

The re-topologized face of the character
How it works…
The main requirement for a re-topology tool is the ability to trace the shape and volume of the high resolution mesh as easily as possible. In this recipe, we used the Blender Snap tool that, once set to Face, guarantees that every added vertex lies on the faces of any directly underlying object; this way, it is quite simple to concentrate on the flow of the polygons, while their vertices stay anchored to the mesh's surface.
To remark that the strokes are there only as a generic indication, note that in certain areas we are doubling the number of faces sketched with the Grease Pencil tool as well as to try to keep the density of the mesh as even as possible.
Using the Shrinkwrap modifier to re-topologize the mesh
Sometimes, the Snap tool is not enough or can be quite difficult to use because of a particular shape of the high resolution mesh; in these cases, the Shrinkwrap modifier can be very handy.
Getting ready
Basically, the usage of this method is all in the preparation of the modifier:
- Assign the Shrinkwrap modifier to the Gidiosaurus_lowres mesh and, in the modifier stack, move it before the Subdivision Surface modifier.
- Click on the Target field to select the Gidiosaurus mesh item and leave the Mode option to Nearest Surface Point (this seems to be the more efficient mode for this task; by the way, you can experiment with the other two modes that can reveal themselves useful in other situations).
- Enable the Display modifier in Edit mode and Adjust edit cage to modifier result buttons (the penultimate one and the last one to the right, with the cube and four selected vertices image and with the upside-down triangle and three vertices image, respectively) and the Keep Above Surface item.
- In Edit Mode, if it's necessary to make the low resolution mesh more easily visible against the high resolution one, change the Offset value to 0.001.
- Having the X-Ray item still active, go to the Shading subpanel under the Properties 3D view sidepanel and check the Backface Culling item:

The Shrinkwrap modifier panel
How to do it…
In Edit Mode, select, extrude, and move the vertices as required! The Shrinkwrap modifier will take care of keeping the vertices adhering to the target mesh surface.
If you are having issues, such as vertices jumping everywhere as you try to move them, try to disable the Snap tool. This is not always the case, but sometimes the combination of both the tool and the modifier can give unexpected results; other times, it can be the opposite.
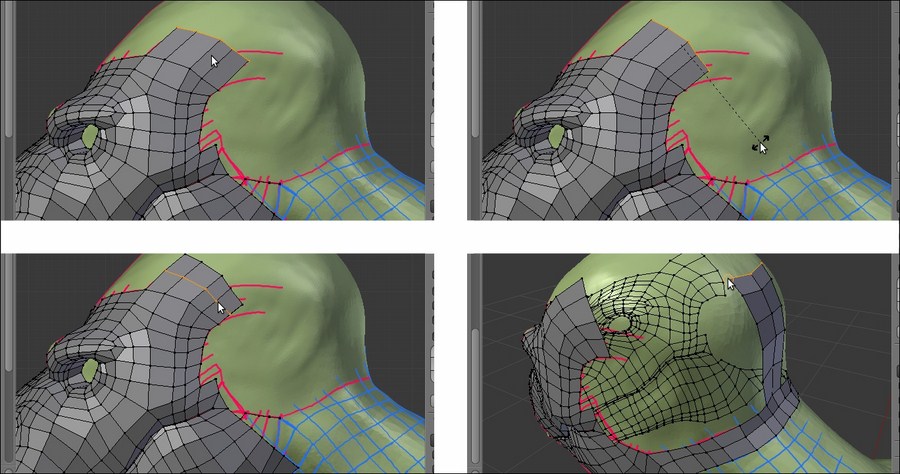
Extruding and cutting an edge-loop under the Shrinkwrap modifier
Remember that if you are using this method to re-topologize, at the end of the process, you must apply the Shrinkwrap modifier.
Also, save the file.
Getting ready
Basically, the usage of this method is all in the preparation of the modifier:
- Assign the Shrinkwrap modifier to the Gidiosaurus_lowres mesh and, in the modifier stack, move it before the Subdivision Surface modifier.
- Click on the Target field to select the Gidiosaurus mesh item and leave the Mode option to Nearest Surface Point (this seems to be the more efficient mode for this task; by the way, you can experiment with the other two modes that can reveal themselves useful in other situations).
- Enable the Display modifier in Edit mode and Adjust edit cage to modifier result buttons (the penultimate one and the last one to the right, with the cube and four selected vertices image and with the upside-down triangle and three vertices image, respectively) and the Keep Above Surface item.
- In Edit Mode, if it's necessary to make the low resolution mesh more easily visible against the high resolution one, change the Offset value to 0.001.
- Having the X-Ray item still active, go to the Shading subpanel under the Properties 3D view sidepanel and check the Backface Culling item:

The Shrinkwrap modifier panel
How to do it…
In Edit Mode, select, extrude, and move the vertices as required! The Shrinkwrap modifier will take care of keeping the vertices adhering to the target mesh surface.
If you are having issues, such as vertices jumping everywhere as you try to move them, try to disable the Snap tool. This is not always the case, but sometimes the combination of both the tool and the modifier can give unexpected results; other times, it can be the opposite.

Extruding and cutting an edge-loop under the Shrinkwrap modifier
Remember that if you are using this method to re-topologize, at the end of the process, you must apply the Shrinkwrap modifier.
Also, save the file.
How to do it…
In Edit Mode, select, extrude, and move the vertices as required! The Shrinkwrap modifier will take care of keeping the vertices adhering to the target mesh surface.
If you are having issues, such as vertices jumping everywhere as you try to move them, try to disable the Snap tool. This is not always the case, but sometimes the combination of both the tool and the modifier can give unexpected results; other times, it can be the opposite.

Extruding and cutting an edge-loop under the Shrinkwrap modifier
Remember that if you are using this method to re-topologize, at the end of the process, you must apply the Shrinkwrap modifier.
Also, save the file.
Using the LoopTools add-on to re-topologize the mesh
We have already seen the LoopTools add-on in Chapter 3, Polygonal Modeling of the Character's Accessories. This incredibly useful Python script can even be used for the re-topology!
Getting ready
If the LoopTools add-on isn't enabled yet, perform the following steps:
- Start Blender and call the Blender User Preferences panel (Ctrl + Alt + U); go to the Addons tab.
- Under the Categories item on the left-hand side of the panel, click on Mesh.
- Check the empty little box to the right of the Mesh: LoopTools add-on to enable it.
- Click on the Save User Settings button at the bottom-left of the panel to save your preferences and close the panel:

The User Preferences panel and the LoopTools add-on enabled
- Load the
Gidiosaurus_retopology.blendfile. - Click on the Snap during transform button on the 3D view toolbar (or else, press Shift + Tab) to enable the Snap tool again.
How to do it…
In the LoopTools add-on, there are at least three tools that can be used for the re-topology: Gstretch, Bridge, and Loft (the last two seem to have almost the same effect so, at least for our present goal, we can consider them to be interchangeable).
Let's first see the Gstretch tool:
- Go to the Grease Pencil subpanel under the Properties 3D view sidepanel to the right. Be sure that the Grease Pencil checkbox is checked and click on the + icon button to add a fourth layer after the Arm layer (actually, you can also delete the preexisting GPencil data block and start with a brand new one, or in any case disable the visibility of the other layers); leave the strokes color as it is by default—that is, pure black.
- In Edit Mode, press D and sketch one edge-loop stroke.
- Select the edges of the low resolution mesh and press E to extrude them and then right-click; click on the Gstretch button (or press W | Specials | LoopTools | Gstretch).
- In the last operator panel at the bottom of the Tool Shelf (or else, press F6 to make the pop-up window appear at the mouse cursor location), check the Delete strokes item.
- Press Ctrl + R to cut the required edge-loops in the new faces:

Using the Gstretch tool in conjunction with the Grease Pencil tool
Yes, it's that simple; it's enough to stroke the target position line and the new extruded vertices will be moved to that target position.
Also, now let's see the Bridge and the Loft tools:
- Select a group of edges and press Shift + D to duplicate them.
- Move them into a new position and adjust the vertices as required.
- Select both the new edges as the previous group.
- Go to the LoopTools panel and click on the Bridge button (or again, through the W key to call the Specials menu).

Using the Bridge tool
- If you need to add cuts, instead of the usual Ctrl + R shortcut, go to the last operator panel (F6) and change the value of the Segments slot to the number required.
It's not mandatory to duplicate new edges, it's enough to select the same number of vertices in the two edge-loops to be connected; here, after the Bridge tool operation, we have set the Segments value to 3:
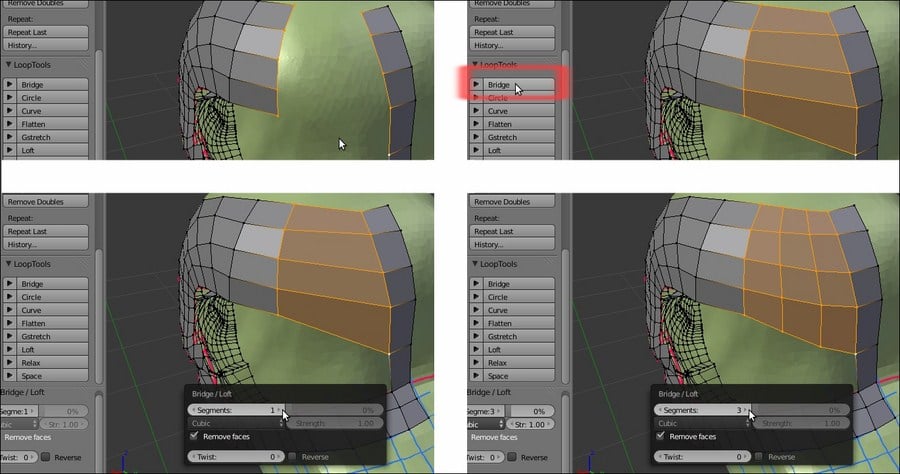
Adding cuts to the bridge operation
You can repeat the operation and the add-on will keep the last values you entered.
Repeat the steps, and this time click on the Loft button. The effect is almost the same, but if the new faces come out really messy, just click twice on the Reverse checkbox in the last operator panel; this should fix the issue.
You can then use all the other buttons to refine the added geometry; in the following screenshots, I tweaked the new geometry a little bit by selecting the horizontal edges and clicking on the Space, Flatten, and Relax buttons:
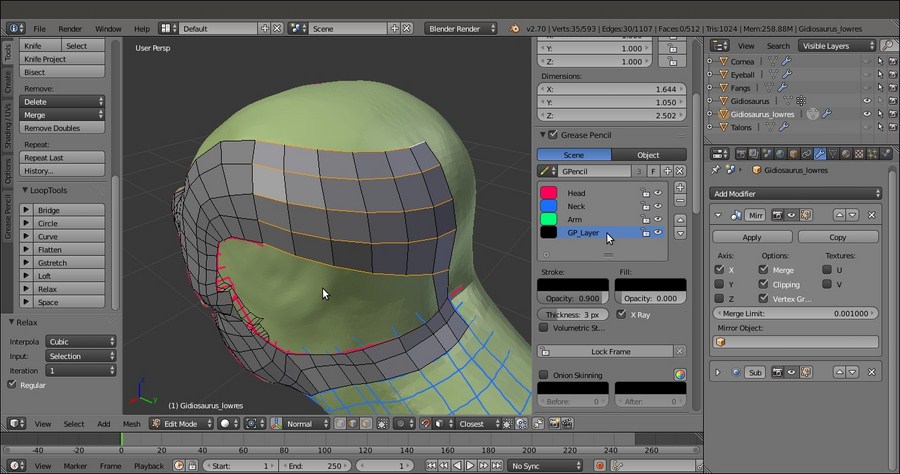
Completing the Gidiosaurus head
Using a mix of all the previous methods, in a short time, we have completed the head and the joining of the neck of our Gidiosaurus_lowres mesh; as you can see, particularly in the second screenshot at the bottom, the technique of following the main features and folders of the sculpted surface with the edge-loops can highlight the organic shapes even with a low resolution mesh:
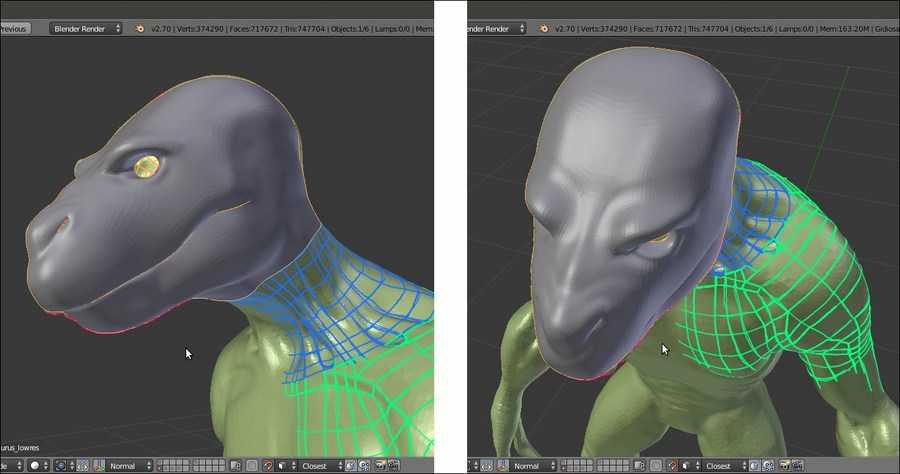
The completed head
Don't forget to save the file and quit Blender.
Getting ready
If the LoopTools add-on isn't enabled yet, perform the following steps:
- Start Blender and call the Blender User Preferences panel (Ctrl + Alt + U); go to the Addons tab.
- Under the Categories item on the left-hand side of the panel, click on Mesh.
- Check the empty little box to the right of the Mesh: LoopTools add-on to enable it.
- Click on the Save User Settings button at the bottom-left of the panel to save your preferences and close the panel:

The User Preferences panel and the LoopTools add-on enabled
- Load the
Gidiosaurus_retopology.blendfile. - Click on the Snap during transform button on the 3D view toolbar (or else, press Shift + Tab) to enable the Snap tool again.
How to do it…
In the LoopTools add-on, there are at least three tools that can be used for the re-topology: Gstretch, Bridge, and Loft (the last two seem to have almost the same effect so, at least for our present goal, we can consider them to be interchangeable).
Let's first see the Gstretch tool:
- Go to the Grease Pencil subpanel under the Properties 3D view sidepanel to the right. Be sure that the Grease Pencil checkbox is checked and click on the + icon button to add a fourth layer after the Arm layer (actually, you can also delete the preexisting GPencil data block and start with a brand new one, or in any case disable the visibility of the other layers); leave the strokes color as it is by default—that is, pure black.
- In Edit Mode, press D and sketch one edge-loop stroke.
- Select the edges of the low resolution mesh and press E to extrude them and then right-click; click on the Gstretch button (or press W | Specials | LoopTools | Gstretch).
- In the last operator panel at the bottom of the Tool Shelf (or else, press F6 to make the pop-up window appear at the mouse cursor location), check the Delete strokes item.
- Press Ctrl + R to cut the required edge-loops in the new faces:

Using the Gstretch tool in conjunction with the Grease Pencil tool
Yes, it's that simple; it's enough to stroke the target position line and the new extruded vertices will be moved to that target position.
Also, now let's see the Bridge and the Loft tools:
- Select a group of edges and press Shift + D to duplicate them.
- Move them into a new position and adjust the vertices as required.
- Select both the new edges as the previous group.
- Go to the LoopTools panel and click on the Bridge button (or again, through the W key to call the Specials menu).

Using the Bridge tool
- If you need to add cuts, instead of the usual Ctrl + R shortcut, go to the last operator panel (F6) and change the value of the Segments slot to the number required.
It's not mandatory to duplicate new edges, it's enough to select the same number of vertices in the two edge-loops to be connected; here, after the Bridge tool operation, we have set the Segments value to 3:

Adding cuts to the bridge operation
You can repeat the operation and the add-on will keep the last values you entered.
Repeat the steps, and this time click on the Loft button. The effect is almost the same, but if the new faces come out really messy, just click twice on the Reverse checkbox in the last operator panel; this should fix the issue.
You can then use all the other buttons to refine the added geometry; in the following screenshots, I tweaked the new geometry a little bit by selecting the horizontal edges and clicking on the Space, Flatten, and Relax buttons:

Completing the Gidiosaurus head
Using a mix of all the previous methods, in a short time, we have completed the head and the joining of the neck of our Gidiosaurus_lowres mesh; as you can see, particularly in the second screenshot at the bottom, the technique of following the main features and folders of the sculpted surface with the edge-loops can highlight the organic shapes even with a low resolution mesh:

The completed head
Don't forget to save the file and quit Blender.
How to do it…
In the LoopTools add-on, there are at least three tools that can be used for the re-topology: Gstretch, Bridge, and Loft (the last two seem to have almost the same effect so, at least for our present goal, we can consider them to be interchangeable).
Let's first see the Gstretch tool:
- Go to the Grease Pencil subpanel under the Properties 3D view sidepanel to the right. Be sure that the Grease Pencil checkbox is checked and click on the + icon button to add a fourth layer after the Arm layer (actually, you can also delete the preexisting GPencil data block and start with a brand new one, or in any case disable the visibility of the other layers); leave the strokes color as it is by default—that is, pure black.
- In Edit Mode, press D and sketch one edge-loop stroke.
- Select the edges of the low resolution mesh and press E to extrude them and then right-click; click on the Gstretch button (or press W | Specials | LoopTools | Gstretch).
- In the last operator panel at the bottom of the Tool Shelf (or else, press F6 to make the pop-up window appear at the mouse cursor location), check the Delete strokes item.
- Press Ctrl + R to cut the required edge-loops in the new faces:

Using the Gstretch tool in conjunction with the Grease Pencil tool
Yes, it's that simple; it's enough to stroke the target position line and the new extruded vertices will be moved to that target position.
Also, now let's see the Bridge and the Loft tools:
- Select a group of edges and press Shift + D to duplicate them.
- Move them into a new position and adjust the vertices as required.
- Select both the new edges as the previous group.
- Go to the LoopTools panel and click on the Bridge button (or again, through the W key to call the Specials menu).

Using the Bridge tool
- If you need to add cuts, instead of the usual Ctrl + R shortcut, go to the last operator panel (F6) and change the value of the Segments slot to the number required.
It's not mandatory to duplicate new edges, it's enough to select the same number of vertices in the two edge-loops to be connected; here, after the Bridge tool operation, we have set the Segments value to 3:

Adding cuts to the bridge operation
You can repeat the operation and the add-on will keep the last values you entered.
Repeat the steps, and this time click on the Loft button. The effect is almost the same, but if the new faces come out really messy, just click twice on the Reverse checkbox in the last operator panel; this should fix the issue.
You can then use all the other buttons to refine the added geometry; in the following screenshots, I tweaked the new geometry a little bit by selecting the horizontal edges and clicking on the Space, Flatten, and Relax buttons:

Completing the Gidiosaurus head
Using a mix of all the previous methods, in a short time, we have completed the head and the joining of the neck of our Gidiosaurus_lowres mesh; as you can see, particularly in the second screenshot at the bottom, the technique of following the main features and folders of the sculpted surface with the edge-loops can highlight the organic shapes even with a low resolution mesh:

The completed head
Don't forget to save the file and quit Blender.
Concluding the re-topologized mesh
The Shrinkwrap modifier method can be the way to quickly finish the rest of the re-topology of the Gidiosaurus sculpted mesh, by quickly re-topologizing the simpler cylindrical shapes and then completing the more difficult parts by hand.
Getting ready
If necessary, repeat the steps to set up the Shrinkwrap modifier technique:
- Assign the Shrinkwrap modifier to the Gidiosaurus_lowres mesh and in the modifier stack, move it before the Subdivision Surface modifier.
- Click on the Target field to select the Gidiosaurus mesh item and leave Mode to Nearest Surface Point.
- Enable the Display modifier in Edit mode and Adjust edit cage to modifier result buttons and the Keep Above Surface item.
- In Edit Mode, to make the low resolution mesh more easily visible against the high resolution one, change the Offset value to 0.001.
- Having the X-Ray item still active, go to the Shading subpanel under the Properties 3D view sidepanel and check the Backface Culling item.
- Then, to conclude the re-topology, we also need to enable the Copy Attributes Menu add-on; go to Blender User Preferences | Addons | 3D View | 3D View: Copy Attributes Menu.
How to do it…
Let's go on by building the geometry of the neck:
- While still in Edit Mode, just select the head's last edge loop on the neck and extrude it (E key) towards the shoulders.
- Press the Ctrl + R keys and add at least 7 or 8 widthwise edge-loops:

Extruding the neck
- Also, with the aid of the Snap tool, tweak the position of the bottom row of vertices, extrude them to add an edge-loop of faces, and tweak again. Go out of Edit Mode.

The re-topology of the neck
We can use the same technique as in steps 1, 2, and 3 to quickly re-topologize the left arm and leg of the character. Instead of extruding the new geometry from the Gidiosaurus_lowres mesh, in this case, it's better to add a new simple primitive: a Circle or also a Plane; whatever the primitive, when you add it, be sure that the 3D Cursor is at the character's origin pivot point.
As you can see in the following screenshot, at first we just created the geometry only for the main cylindrical sections of the limbs:
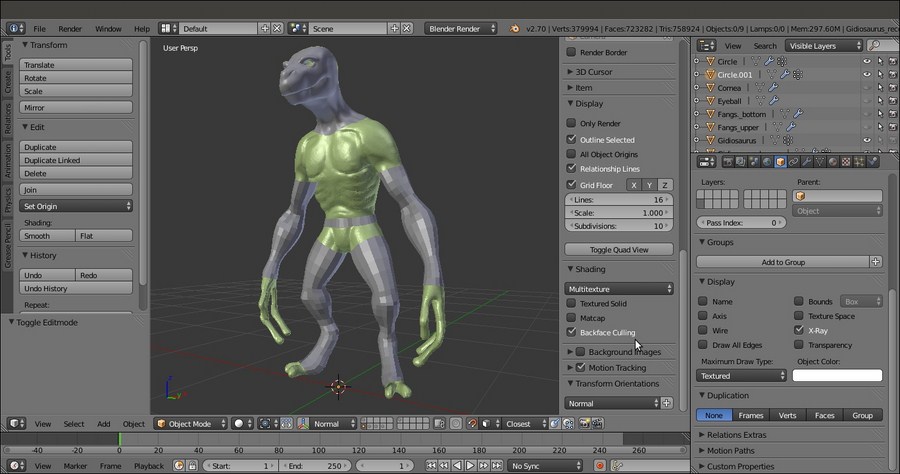
Arms and legs re-topologized
Do the same for the body: just a couple of edge-loops placed at the waist to extrude the geometry from; remember that the chest is covered with the armor breastplate, so only the exposed area needs to be re-topologized.
One Mirror and one Subdivision Surface modifier has been assigned to the three objects (head/neck, arm, and hips/leg). Also, because of the Mirror modifier, the vertices of the half side of the abdomen's edge-loops have been deleted.
There's more…
After the main parts have been re-topologized, we can start to tweak the position of the vertices on the arm and leg, to better fit the flow and shapes of the muscles and tendons in the sculpted mesh.
Thanks to the aid of the Shrinkwrap modifier, we can do it quite freely; however, before we start with the tweaking, we require a little bit of preparation for a better visibility of the working objects, to affect and modify the new geometry (visible as a wireframe) and have the underlying sculpted mesh visible at the same time.
To do this, we have two ways:
The first way is as follows:
- Go to the Shrinkwrap modifier panel and set the Offset value to 0.002.
- Go to the Object window and disable the X-Ray item; in the Maximum Draw Type slot, under the Display subpanel, select Wire:

The mesh visualized in wireframe mode
The second way is as follows:
- Go to the Shrinkwrap modifier and set the Offset value back to 0.000.
- If this is the case, go to the Object window and, under the Display subpanel, enable the X-Ray item. In the Maximum Draw Type slot, under the Display subpanel, select Textured.
- Go to the Properties 3D view sidepanel (press N if not already present); if necessary, enter Edit Mode and under the Shading subpanel, check the Hidden Wire item.
- In both ways (I used the second one), if you want to enable the Display modifier in Edit mode and Adjust edit cage to modifier result buttons for the Subdivision Surface modifier to see its effect in Edit Mode, it is better to move the Shrinkwrap modifier after the Subdivision Surface modifier in the stack, to have a better looking result.

The second wireframe visualization method
We can now start to add the missing parts, by extruding and moving the vertices to better fit the sculpted features and also adding, if necessary, new edge-loops to better define these features:
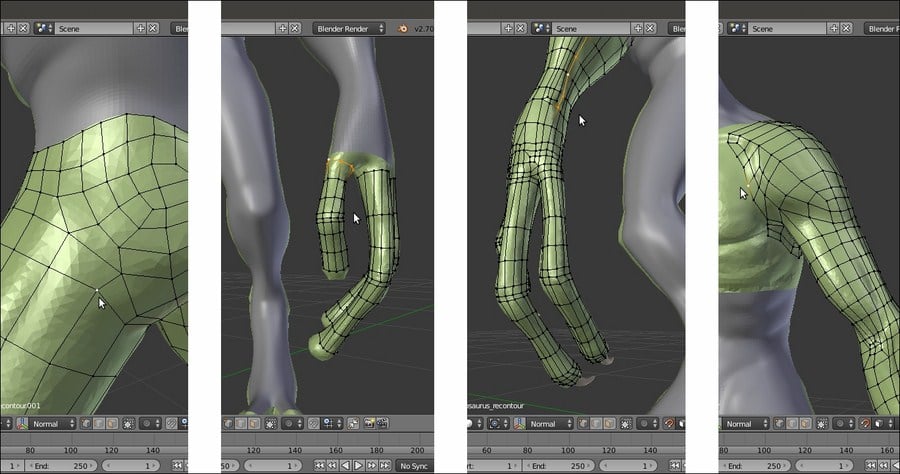
Refining and completing the remaining features
After the wireframe setup, it's easy to tweak the low resolution geometry to better fit the character's anatomy:
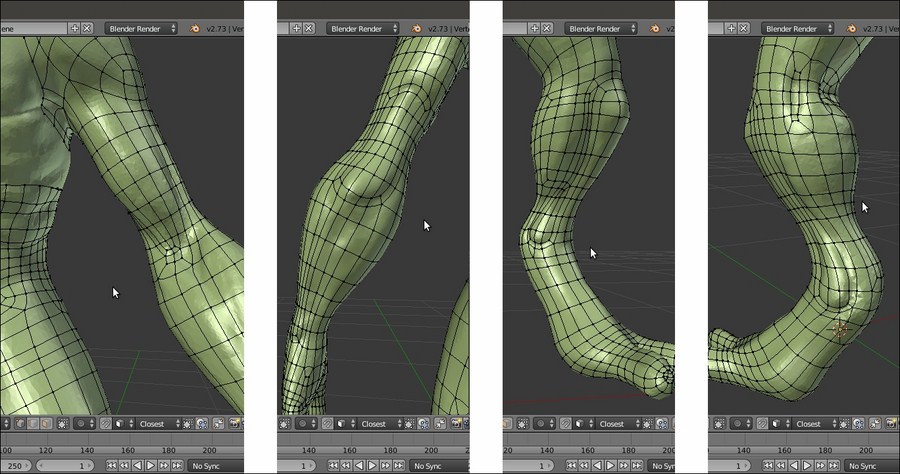
The character's anatomy
The still missing parts are modeled at this stage, such as the inside of the nostrils or the eyelids, again with the aid of the Shrinkwrap modifier; this time, targeted to the Cornea object to project the eyelids geometry onto it with an Offset value of 0.0035:
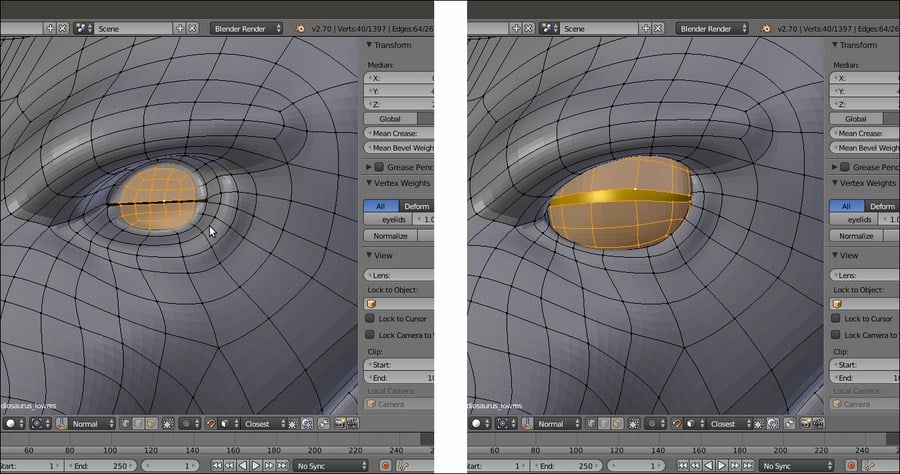
The character's eyelids
Also, we built the inner mouth and the tongue of our character and refined the dental alveoli:
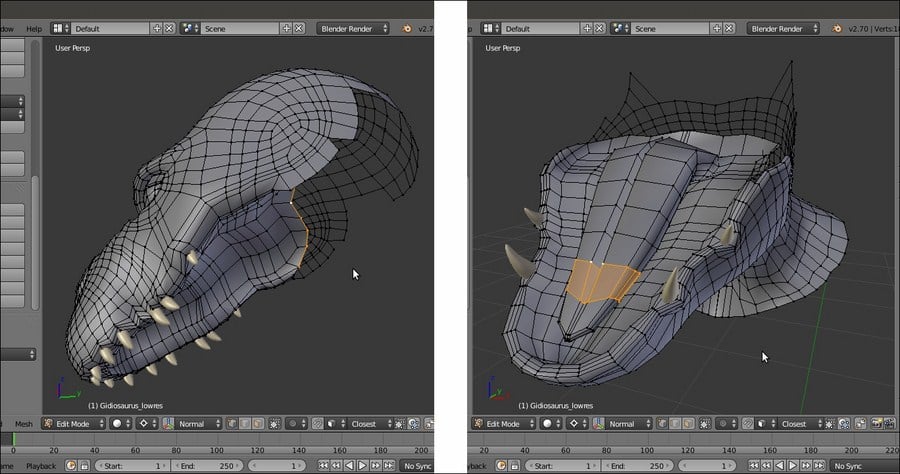
The character's alveoli and tongue
As in every project, we can go on with the refining, adding edge-loops, and so on, and this would seem a never-ending work; instead, at this point, we can consider the Gidiosaurus re-topology at the end, so it's time to apply the Shrinkwrap modifiers and, if this is the case, select the Gidiosaurus body's still separated objects and join them together to have a single mesh.
It's time to do the same with the armor that is still waiting on the 13th scene layer:
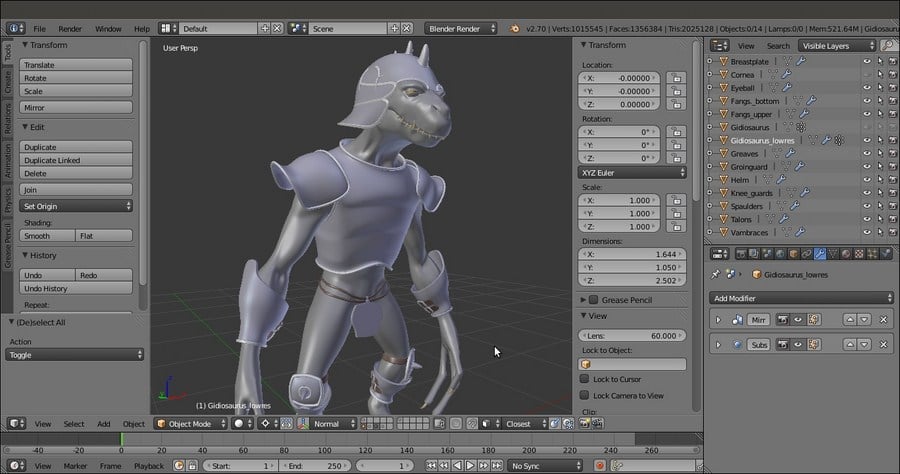
The totally completed re-topologized character with the armor
How it works…
First, we have to quickly build the geometry using the Shrinkwrap modifier technique and then set the visibility of this geometry to wireframe (Wire), to make the underlying sculpted mesh visible.
The Shrinkwrap modifier, in the first case with the Offset value set high enough to allow the wireframe visibility over the sculpted surface, ensured that all the moved vertices and the new added geometry are automatically wrapped around the target mesh to preserve the volume.
At the end, we took back the Offset value to 0.000 anyway and we applied the Shrinkwrap modifier; then, we joined the re-topologized arm and leg objects together to the Gidiosaurus_lowres one.
As you have probably noticed, we haven't applied the Mirror modifiers yet. This is because it will still be useful in the next chapter.
Getting ready
If necessary, repeat the steps to set up the Shrinkwrap modifier technique:
- Assign the Shrinkwrap modifier to the Gidiosaurus_lowres mesh and in the modifier stack, move it before the Subdivision Surface modifier.
- Click on the Target field to select the Gidiosaurus mesh item and leave Mode to Nearest Surface Point.
- Enable the Display modifier in Edit mode and Adjust edit cage to modifier result buttons and the Keep Above Surface item.
- In Edit Mode, to make the low resolution mesh more easily visible against the high resolution one, change the Offset value to 0.001.
- Having the X-Ray item still active, go to the Shading subpanel under the Properties 3D view sidepanel and check the Backface Culling item.
- Then, to conclude the re-topology, we also need to enable the Copy Attributes Menu add-on; go to Blender User Preferences | Addons | 3D View | 3D View: Copy Attributes Menu.
How to do it…
Let's go on by building the geometry of the neck:
- While still in Edit Mode, just select the head's last edge loop on the neck and extrude it (E key) towards the shoulders.
- Press the Ctrl + R keys and add at least 7 or 8 widthwise edge-loops:

Extruding the neck
- Also, with the aid of the Snap tool, tweak the position of the bottom row of vertices, extrude them to add an edge-loop of faces, and tweak again. Go out of Edit Mode.

The re-topology of the neck
We can use the same technique as in steps 1, 2, and 3 to quickly re-topologize the left arm and leg of the character. Instead of extruding the new geometry from the Gidiosaurus_lowres mesh, in this case, it's better to add a new simple primitive: a Circle or also a Plane; whatever the primitive, when you add it, be sure that the 3D Cursor is at the character's origin pivot point.
As you can see in the following screenshot, at first we just created the geometry only for the main cylindrical sections of the limbs:

Arms and legs re-topologized
Do the same for the body: just a couple of edge-loops placed at the waist to extrude the geometry from; remember that the chest is covered with the armor breastplate, so only the exposed area needs to be re-topologized.
One Mirror and one Subdivision Surface modifier has been assigned to the three objects (head/neck, arm, and hips/leg). Also, because of the Mirror modifier, the vertices of the half side of the abdomen's edge-loops have been deleted.
There's more…
After the main parts have been re-topologized, we can start to tweak the position of the vertices on the arm and leg, to better fit the flow and shapes of the muscles and tendons in the sculpted mesh.
Thanks to the aid of the Shrinkwrap modifier, we can do it quite freely; however, before we start with the tweaking, we require a little bit of preparation for a better visibility of the working objects, to affect and modify the new geometry (visible as a wireframe) and have the underlying sculpted mesh visible at the same time.
To do this, we have two ways:
The first way is as follows:
- Go to the Shrinkwrap modifier panel and set the Offset value to 0.002.
- Go to the Object window and disable the X-Ray item; in the Maximum Draw Type slot, under the Display subpanel, select Wire:

The mesh visualized in wireframe mode
The second way is as follows:
- Go to the Shrinkwrap modifier and set the Offset value back to 0.000.
- If this is the case, go to the Object window and, under the Display subpanel, enable the X-Ray item. In the Maximum Draw Type slot, under the Display subpanel, select Textured.
- Go to the Properties 3D view sidepanel (press N if not already present); if necessary, enter Edit Mode and under the Shading subpanel, check the Hidden Wire item.
- In both ways (I used the second one), if you want to enable the Display modifier in Edit mode and Adjust edit cage to modifier result buttons for the Subdivision Surface modifier to see its effect in Edit Mode, it is better to move the Shrinkwrap modifier after the Subdivision Surface modifier in the stack, to have a better looking result.

The second wireframe visualization method
We can now start to add the missing parts, by extruding and moving the vertices to better fit the sculpted features and also adding, if necessary, new edge-loops to better define these features:

Refining and completing the remaining features
After the wireframe setup, it's easy to tweak the low resolution geometry to better fit the character's anatomy:

The character's anatomy
The still missing parts are modeled at this stage, such as the inside of the nostrils or the eyelids, again with the aid of the Shrinkwrap modifier; this time, targeted to the Cornea object to project the eyelids geometry onto it with an Offset value of 0.0035:

The character's eyelids
Also, we built the inner mouth and the tongue of our character and refined the dental alveoli:

The character's alveoli and tongue
As in every project, we can go on with the refining, adding edge-loops, and so on, and this would seem a never-ending work; instead, at this point, we can consider the Gidiosaurus re-topology at the end, so it's time to apply the Shrinkwrap modifiers and, if this is the case, select the Gidiosaurus body's still separated objects and join them together to have a single mesh.
It's time to do the same with the armor that is still waiting on the 13th scene layer:

The totally completed re-topologized character with the armor
How it works…
First, we have to quickly build the geometry using the Shrinkwrap modifier technique and then set the visibility of this geometry to wireframe (Wire), to make the underlying sculpted mesh visible.
The Shrinkwrap modifier, in the first case with the Offset value set high enough to allow the wireframe visibility over the sculpted surface, ensured that all the moved vertices and the new added geometry are automatically wrapped around the target mesh to preserve the volume.
At the end, we took back the Offset value to 0.000 anyway and we applied the Shrinkwrap modifier; then, we joined the re-topologized arm and leg objects together to the Gidiosaurus_lowres one.
As you have probably noticed, we haven't applied the Mirror modifiers yet. This is because it will still be useful in the next chapter.
How to do it…
Let's go on by building the geometry of the neck:
- While still in Edit Mode, just select the head's last edge loop on the neck and extrude it (E key) towards the shoulders.
- Press the Ctrl + R keys and add at least 7 or 8 widthwise edge-loops:

Extruding the neck
- Also, with the aid of the Snap tool, tweak the position of the bottom row of vertices, extrude them to add an edge-loop of faces, and tweak again. Go out of Edit Mode.

The re-topology of the neck
We can use the same technique as in steps 1, 2, and 3 to quickly re-topologize the left arm and leg of the character. Instead of extruding the new geometry from the Gidiosaurus_lowres mesh, in this case, it's better to add a new simple primitive: a Circle or also a Plane; whatever the primitive, when you add it, be sure that the 3D Cursor is at the character's origin pivot point.
As you can see in the following screenshot, at first we just created the geometry only for the main cylindrical sections of the limbs:

Arms and legs re-topologized
Do the same for the body: just a couple of edge-loops placed at the waist to extrude the geometry from; remember that the chest is covered with the armor breastplate, so only the exposed area needs to be re-topologized.
One Mirror and one Subdivision Surface modifier has been assigned to the three objects (head/neck, arm, and hips/leg). Also, because of the Mirror modifier, the vertices of the half side of the abdomen's edge-loops have been deleted.
There's more…
After the main parts have been re-topologized, we can start to tweak the position of the vertices on the arm and leg, to better fit the flow and shapes of the muscles and tendons in the sculpted mesh.
Thanks to the aid of the Shrinkwrap modifier, we can do it quite freely; however, before we start with the tweaking, we require a little bit of preparation for a better visibility of the working objects, to affect and modify the new geometry (visible as a wireframe) and have the underlying sculpted mesh visible at the same time.
To do this, we have two ways:
The first way is as follows:
- Go to the Shrinkwrap modifier panel and set the Offset value to 0.002.
- Go to the Object window and disable the X-Ray item; in the Maximum Draw Type slot, under the Display subpanel, select Wire:

The mesh visualized in wireframe mode
The second way is as follows:
- Go to the Shrinkwrap modifier and set the Offset value back to 0.000.
- If this is the case, go to the Object window and, under the Display subpanel, enable the X-Ray item. In the Maximum Draw Type slot, under the Display subpanel, select Textured.
- Go to the Properties 3D view sidepanel (press N if not already present); if necessary, enter Edit Mode and under the Shading subpanel, check the Hidden Wire item.
- In both ways (I used the second one), if you want to enable the Display modifier in Edit mode and Adjust edit cage to modifier result buttons for the Subdivision Surface modifier to see its effect in Edit Mode, it is better to move the Shrinkwrap modifier after the Subdivision Surface modifier in the stack, to have a better looking result.

The second wireframe visualization method
We can now start to add the missing parts, by extruding and moving the vertices to better fit the sculpted features and also adding, if necessary, new edge-loops to better define these features:

Refining and completing the remaining features
After the wireframe setup, it's easy to tweak the low resolution geometry to better fit the character's anatomy:

The character's anatomy
The still missing parts are modeled at this stage, such as the inside of the nostrils or the eyelids, again with the aid of the Shrinkwrap modifier; this time, targeted to the Cornea object to project the eyelids geometry onto it with an Offset value of 0.0035:

The character's eyelids
Also, we built the inner mouth and the tongue of our character and refined the dental alveoli:

The character's alveoli and tongue
As in every project, we can go on with the refining, adding edge-loops, and so on, and this would seem a never-ending work; instead, at this point, we can consider the Gidiosaurus re-topology at the end, so it's time to apply the Shrinkwrap modifiers and, if this is the case, select the Gidiosaurus body's still separated objects and join them together to have a single mesh.
It's time to do the same with the armor that is still waiting on the 13th scene layer:

The totally completed re-topologized character with the armor
How it works…
First, we have to quickly build the geometry using the Shrinkwrap modifier technique and then set the visibility of this geometry to wireframe (Wire), to make the underlying sculpted mesh visible.
The Shrinkwrap modifier, in the first case with the Offset value set high enough to allow the wireframe visibility over the sculpted surface, ensured that all the moved vertices and the new added geometry are automatically wrapped around the target mesh to preserve the volume.
At the end, we took back the Offset value to 0.000 anyway and we applied the Shrinkwrap modifier; then, we joined the re-topologized arm and leg objects together to the Gidiosaurus_lowres one.
As you have probably noticed, we haven't applied the Mirror modifiers yet. This is because it will still be useful in the next chapter.
There's more…
After the main parts have been re-topologized, we can start to tweak the position of the vertices on the arm and leg, to better fit the flow and shapes of the muscles and tendons in the sculpted mesh.
Thanks to the aid of the Shrinkwrap modifier, we can do it quite freely; however, before we start with the tweaking, we require a little bit of preparation for a better visibility of the working objects, to affect and modify the new geometry (visible as a wireframe) and have the underlying sculpted mesh visible at the same time.
To do this, we have two ways:
The first way is as follows:
- Go to the Shrinkwrap modifier panel and set the Offset value to 0.002.
- Go to the Object window and disable the X-Ray item; in the Maximum Draw Type slot, under the Display subpanel, select Wire:

The mesh visualized in wireframe mode
The second way is as follows:
- Go to the Shrinkwrap modifier and set the Offset value back to 0.000.
- If this is the case, go to the Object window and, under the Display subpanel, enable the X-Ray item. In the Maximum Draw Type slot, under the Display subpanel, select Textured.
- Go to the Properties 3D view sidepanel (press N if not already present); if necessary, enter Edit Mode and under the Shading subpanel, check the Hidden Wire item.
- In both ways (I used the second one), if you want to enable the Display modifier in Edit mode and Adjust edit cage to modifier result buttons for the Subdivision Surface modifier to see its effect in Edit Mode, it is better to move the Shrinkwrap modifier after the Subdivision Surface modifier in the stack, to have a better looking result.

The second wireframe visualization method
We can now start to add the missing parts, by extruding and moving the vertices to better fit the sculpted features and also adding, if necessary, new edge-loops to better define these features:

Refining and completing the remaining features
After the wireframe setup, it's easy to tweak the low resolution geometry to better fit the character's anatomy:

The character's anatomy
The still missing parts are modeled at this stage, such as the inside of the nostrils or the eyelids, again with the aid of the Shrinkwrap modifier; this time, targeted to the Cornea object to project the eyelids geometry onto it with an Offset value of 0.0035:

The character's eyelids
Also, we built the inner mouth and the tongue of our character and refined the dental alveoli:

The character's alveoli and tongue
As in every project, we can go on with the refining, adding edge-loops, and so on, and this would seem a never-ending work; instead, at this point, we can consider the Gidiosaurus re-topology at the end, so it's time to apply the Shrinkwrap modifiers and, if this is the case, select the Gidiosaurus body's still separated objects and join them together to have a single mesh.
It's time to do the same with the armor that is still waiting on the 13th scene layer:

The totally completed re-topologized character with the armor
How it works…
First, we have to quickly build the geometry using the Shrinkwrap modifier technique and then set the visibility of this geometry to wireframe (Wire), to make the underlying sculpted mesh visible.
The Shrinkwrap modifier, in the first case with the Offset value set high enough to allow the wireframe visibility over the sculpted surface, ensured that all the moved vertices and the new added geometry are automatically wrapped around the target mesh to preserve the volume.
At the end, we took back the Offset value to 0.000 anyway and we applied the Shrinkwrap modifier; then, we joined the re-topologized arm and leg objects together to the Gidiosaurus_lowres one.
As you have probably noticed, we haven't applied the Mirror modifiers yet. This is because it will still be useful in the next chapter.


