Search icon CANCEL
Subscription
0
Cart icon
Your Cart (0 item)
Close icon
You have no products in your basket yet
Save more on your purchases! discount-offer-chevron-icon
Savings automatically calculated. No voucher code required.
Arrow left icon
Explore Products
Best Sellers
New Releases
Books
Videos
Audiobooks
Learning Hub
Free Learning
Arrow right icon
Arrow up icon
GO TO TOP
3D Character Rigging in Blender

You're reading from   3D Character Rigging in Blender Bring your characters to life through rigging and make them animation-ready

Arrow left icon
Product type Paperback
Published in Apr 2024
Publisher Packt
ISBN-13 9781803238807
Length 164 pages
Edition 1st Edition
Tools
Concepts
Arrow right icon
Author (1):
Arrow left icon
Jaime Kelly Jaime Kelly
Author Profile Icon Jaime Kelly
Jaime Kelly
Arrow right icon
View More author details
Toc

Table of Contents (14) Chapters Close

Preface 1. Part 1: An Introduction
2. Chapter 1: Introduction to Rigs and Terminologies FREE CHAPTER 3. Chapter 2: Starting with Bones 4. Part 2: Rigging
5. Chapter 3: Using Weighting Tools to Give Life to a Mesh 6. Chapter 4: Beginning the Rigging Process 7. Chapter 5: Getting Started with Weight Painting 8. Part 3: Advanced Techniques
9. Chapter 6: Using IK and Rig Controls 10. Chapter 7: Getting Started with Shape Keys 11. Chapter 8: Beyond the Basics 12. Index 13. Other Books You May Enjoy

Creating a mesh

We can’t do any weight painting without a mesh; that much should be clear to anyone. There are, however, some important steps to take that will prevent headaches in the future, such as placing vertices in optimal places to support quality deformation. If the mesh is constructed poorly, no matter how perfect your weight painting, it will be impossible to get a good result.

To start, we need to add some mesh to our scene. We will go over some terminology once we have done this. Follow these steps:

  1. To start, make sure you are in Object Mode (Tab, or dropdown), go ahead and bring up the Add object menu with Shift + A, then navigate to Mesh | Cube and add a cube. Your scene should look as follows:
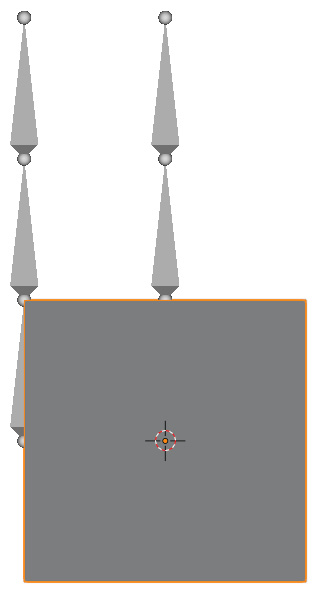
Figure 3.1 – Cube added to our scene

Figure 3.1 – Cube added to our scene

  1. We want this cube to be a tower in between our bones. To do this, we’re going to go into Edit Mode and make sure we have selected Vertice mode. The blue icon next to the...
lock icon The rest of the chapter is locked
Register for a free Packt account to unlock a world of extra content!
A free Packt account unlocks extra newsletters, articles, discounted offers, and much more. Start advancing your knowledge today.
Unlock this book and the full library FREE for 7 days
Get unlimited access to 7000+ expert-authored eBooks and videos courses covering every tech area you can think of
Renews at $19.99/month. Cancel anytime
Banner background image