Search icon CANCEL
Subscription
0
Cart icon
Your Cart (0 item)
Close icon
You have no products in your basket yet
Arrow left icon
Explore Products
Best Sellers
New Releases
Books
Videos
Audiobooks
Learning Hub
Conferences
Free Learning
Arrow right icon
Arrow up icon
GO TO TOP
The Ins and Outs of Azure VMware Solution

You're reading from   The Ins and Outs of Azure VMware Solution Deploy, configure, and manage an Azure VMware Solution environment

Arrow left icon
Product type Paperback
Published in Jan 2023
Publisher Packt
ISBN-13 9781801814317
Length 328 pages
Edition 1st Edition
Tools
Arrow right icon
Author (1):
Arrow left icon
Kevin Jellow Kevin Jellow
Author Profile Icon Kevin Jellow
Kevin Jellow
Arrow right icon
View More author details
Toc

Table of Contents (20) Chapters Close

Preface 1. Part 1: Getting Started with Azure VMware Solution (AVS)
2. Chapter 1: Introduction to Azure VMware Solution FREE CHAPTER 3. Chapter 2: Enterprise-Scale for AVS 4. Part 2: Planning and Deploying AVS
5. Chapter 3: Planning for an Azure VMware Solution Deployment 6. Chapter 4: Deploying an Azure VMware Solution Cluster 7. Chapter 5: Deploying and Configuring HCX in Azure VMware Solution 8. Chapter 6: Networking in AVS using NSX-T 9. Part 3: Configuring Your AVS
10. Chapter 7: Creating and Configuring a Secure vWAN Hub for Internet Connectivity 11. Chapter 8: Inspecting Traffic for AVS 12. Chapter 9: Storage Concepts in AVS 13. Chapter 10: Working with VMware Site Recovery Manager 14. Part 4: Governance and Management for AVS
15. Chapter 11: Managing an Azure VMware Solution Environment 16. Chapter 12: Leveraging Governance for Azure VMware Solution 17. Chapter 13: Summary of Azure VMware Solution, Roadmap, and Best Practices 18. Index 19. Other Books You May Enjoy

Configuring the Route Server peering

The steps are as follows:

  1. Go to the Azure Route Server you created earlier.
  2. Under Settings, select Peers and select + Add to add a new peer:
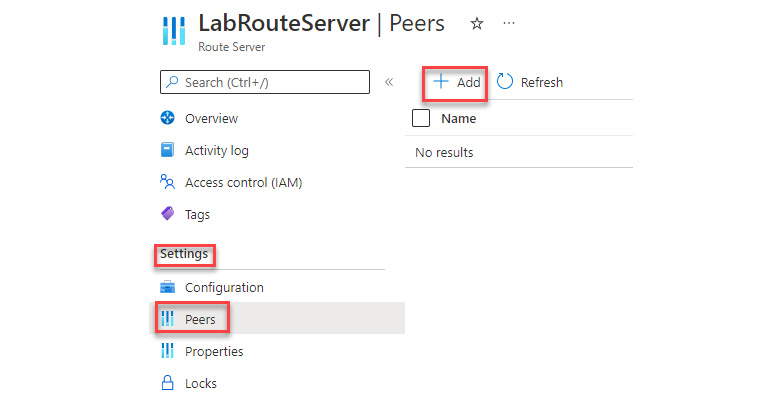
Figure 8.13 – Adding a Route Server peer

Figure 8.13 – Adding a Route Server peer

  1. On the Add Peer page, enter the following information, and then click on Add to save the changes:

    Setting

    Value

    Name

    Use Quagga as the name.

    ASN

    Enter the ASN of the Quagga NVA. It is 65001.

    Ipv4 Address

    Enter the private IP address of the Quagga NVA virtual machine.

Table 8.5 – Adding a peer to the Route Server for the NVA VM

The screenshot for reference is as follows:
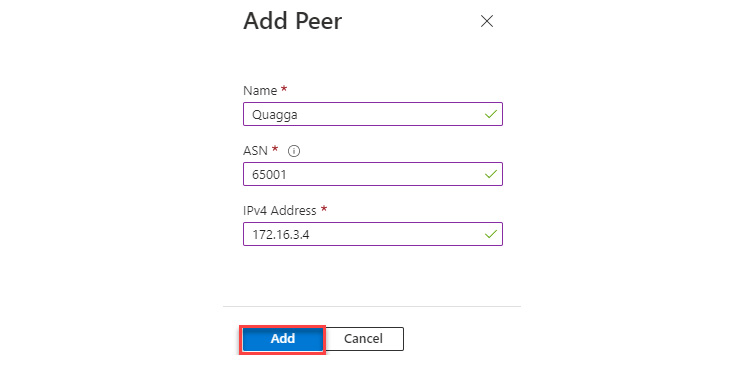
Figure 8.14 – Route Server peering information

Figure 8.14 – Route Server peering information

After the peering has been added to the Route Server, you should see it in the Peers section of the Router Server:
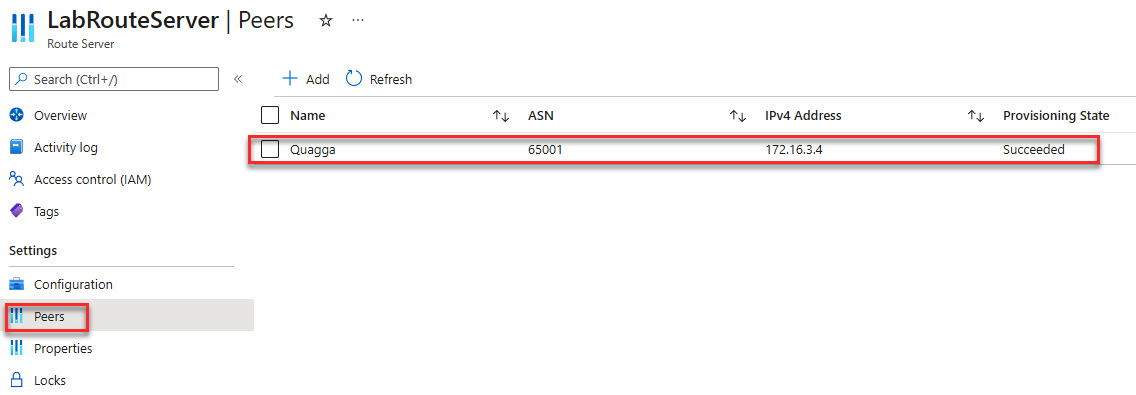
Figure 8.15 – Route Server new peering information

Figure 8.15 – Route Server new peering information

Now that the Route Server is in place and peering...

lock icon The rest of the chapter is locked
Register for a free Packt account to unlock a world of extra content!
A free Packt account unlocks extra newsletters, articles, discounted offers, and much more. Start advancing your knowledge today.
Unlock this book and the full library FREE for 7 days
Get unlimited access to 7000+ expert-authored eBooks and videos courses covering every tech area you can think of
Renews at $19.99/month. Cancel anytime
Banner background image