Creating TCP server and client communication
Sockets allow machines and devices to communicate. Sockets are also used to coordinate I/O across networks. The term socket is used to refer to one endpoint of a two-way network communication link. Sockets enable us to build real-time web applications, such as instant messaging applications.
In this recipe, we will create a TCP server and a TCP client and allow them to communicate. TCP stands for Transmission Control Protocol. TCP provides a standard that allows devices to communicate over a network.
Getting ready
First, let's create a directory to work in:
$ mkdir communicating-with-sockets
$ cd communicating-with-sockets
We'll also need two separate files, one for the server and one for the client:
$ touch server.js
$ touch client.js
How to do it
First, we're going to create a TCP server using the net Node.js core module:
- We need to import the
netmodule inserver.js:const net = require("net"); - Now let's set up some variables to store the hostname and port that we want our server to run on:
const HOSTNAME = "localhost";
const PORT = 3000;
- Now, we can create the server, passing the
HOSTNAMEandPORTvariables into thelisten()function:net .createServer((socket) => { console.log("Client connected."); }) .listen(PORT, HOSTNAME); - Now we should add some socket event listeners. Add the following two event listeners below the
console.log("Client connected.");line:socket.on("data", (name) => { socket.write(`Hello ${name}!`); }); - Now let's create the client. Again, we need to start by importing the
netmodule inclient.js:const net = require("net"); - Next, we can try and connect to the server we configured in
server.js. We'll define theHOSTNAMEandPORTvariables again in this file:const HOSTNAME = "localhost"; const PORT = 3000; const socket = net.connect(PORT, HOSTNAME);
- Now that we've connected to that socket, we can write to it:
socket.write("World"); - We also need to add a function that will listen for data returned by the socket:
socket.on("data", (data) => { console.log(data.toString()); }); - Run your server with the following command:
$ node server.js
- In a second shell, run
client.js:$ node client.js
- In the shell where you're running
server.js, you should see the output,Client connected:$ node server.js Client connected.
- And in the shell where you're running
client.js, you should see that the socket has responded withHello World!:$ node client.js Hello World!
We've successfully set up a TCP server and client and allowed them to communicate via sockets.
How it works
The first half of the recipe focused on creating a TCP server.
The recipe used the createServer() function from the core Node.js to http module and the net function to create the server. The function passed to createServer() accepts a function, and this function is executed each time a new connection is made to the server. The Node.js API documentation describes this function as a connectionListener function.
socket is passed as an argument to this connection listener function. It is possible to listen for events on the socket object. In the recipe, we listened for the data event and registered a function to execute each time data was received.
We then called the listen() function on createServer()—this function starts the server listening for connections. In the recipe, we passed the listen() function the hostname and port that we wanted the server to be accessible at. Note that it is also possible to listen on a Unix socket such as the following:
const socket = net.connect("/tmp/my.socket");
Similarly, we also registered a data listener in client.js, which was listening for data written back from the server.
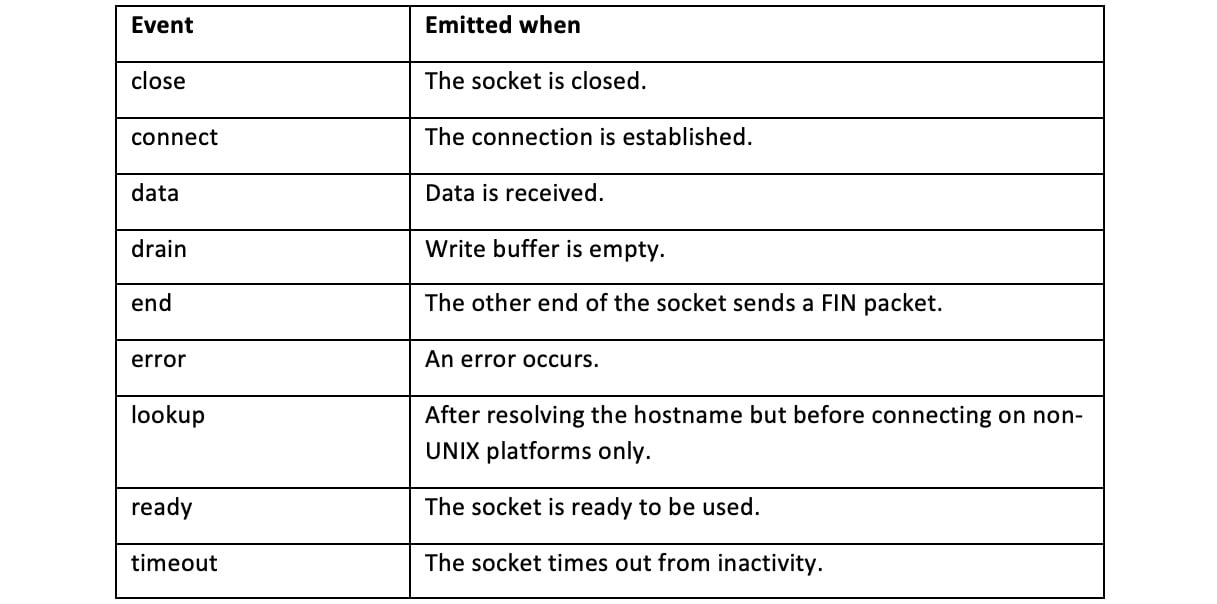
There are many other events that can be listened for on socket objects:

Figure 2.2 – Table listing socket events
There's more
For some communications, UDP is more appropriate than TCP. Let's take a look at what UDP sockets are, what they're used for, and how to implement a UDP socket.
UDP stands for User Datagram Protocol and is an alternative to TCP. UDP is a connectionless protocol. Unlike TCP, the protocol does not establish a connection before sending data. UDP also doesn't guarantee delivery of packets—some can be lost. UDP is most often used in cases where speed is considered more important than reliability. UDP is typically used for video calling, gaming, or streaming—because in these cases, minimizing delay is important.
Node.js provides a core module named dgram that provides APIs to interact with UDP sockets. As with the other core modules, it can be imported with the following:
const dgram = require("dgram");
To create a socket, the dgram module exposes a createSocket() API:
const socket = dgram.createSocket("udp6");
We pass the udp6 function to instruct that we'd like the socket to interface over both IPv4 and IPv6.
To instruct the socket to start listening for connections, you use the bind function:
socket.bind(PORT);
Note that it is not necessary to provide a port. If none is provided (or you provide 0); the operating system will bind to a random free port.


