Search icon CANCEL
Arrow left icon
Explore Products
Best Sellers
New Releases
Books
Videos
Audiobooks
Learning Hub
Conferences
Free Learning
Arrow right icon
Arrow up icon
GO TO TOP
Learn Clip Studio Paint

You're reading from   Learn Clip Studio Paint Create impressive comics and Manga art in world-class graphics software

Arrow left icon
Product type Paperback
Published in Dec 2018
Publisher
ISBN-13 9781789347036
Length 448 pages
Edition 2nd Edition
Arrow right icon
Author (1):
Arrow left icon
Liz Staley Liz Staley
Author Profile Icon Liz Staley
Liz Staley
Arrow right icon
View More author details
Toc

Table of Contents (21) Chapters Close

Preface 1. Installing Clip Studio Paint, Recommended Systems, and Interface Basics FREE CHAPTER 2. Preferences, Shortcuts, and Other Commands 3. Clip Studio Paint Brushes: an Introduction 4. Pencilling: Layer Properties 5. Erasers, Selections, and the Subview Palette 6. All About Rulers 7. Using 3D Figures and Objects 8. Vector Layers and the Material Palette 9. Using Text and Balloon Tools 10. Creating Sound Effects 11. Making Layer Masks and Screentones 12. Making Comic Panels 13. Auto Actions and Your Workflow 14. Inking Tools 15. Inking Special Effects 16. Color Palettes 17. Using CSP to Color Your Comics 18. Exporting and Printing Your Comic 19. What Is the Clip Studio App and Getting Animated 20. Other Books You May Enjoy

Introduction to the Layer Palette

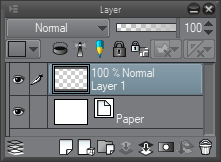
Just like most options in Clip Studio Paint, Layers has a palette that acts as a Command Center for managing and creating the layers. When we look at the Layer palette in the following screenshot, we see that there are many icons and options that apply to the layers themselves:
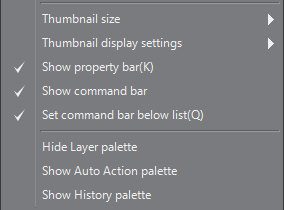
If you cannot locate the Layer palette on your Clip Studio Paint interface, go to Window in the File Menu and click on Layer to display it. At the very top left-hand corner of the Layer palette is a menu icon (shaped like a right-facing triangle next to three horizontal lines). Clicking on this icon brings up a menu similar to the Layer menu under the File Menu, but with a few options that are unique to the Layer palette. Those options are shown in the following screenshot:
Next to each layer name, there is a thumbnail of the layer contents. Under the Thumbnail size in...

lock icon The rest of the chapter is locked
Register for a free Packt account to unlock a world of extra content!
A free Packt account unlocks extra newsletters, articles, discounted offers, and much more. Start advancing your knowledge today.
Unlock this book and the full library FREE for 7 days
Get unlimited access to 7000+ expert-authored eBooks and videos courses covering every tech area you can think of
Renews at $19.99/month. Cancel anytime