In this recipe, we will install Keras on Ubuntu 16.04 with NVIDIA GPU enabled.
Installing Keras on Ubuntu 16.04 with GPU enabled
Getting ready
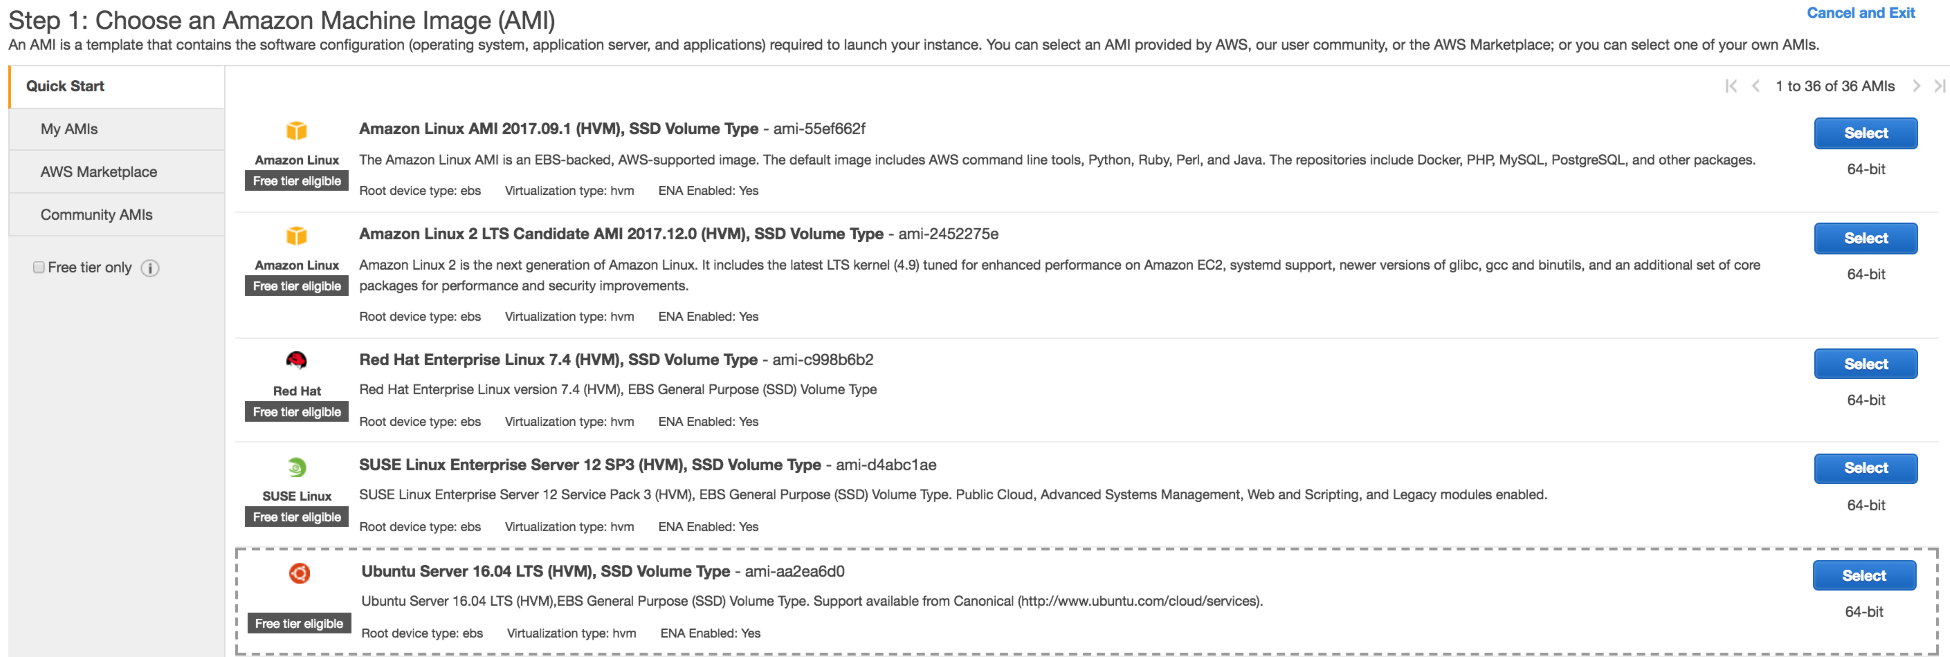
We are going to launch a GPU-enabled AWS EC2 instance and prepare it for the installed TensorFlow with the GPU and Keras. Launch the following AMI: Ubuntu Server 16.04 LTS (HVM), SSD Volume Type - ami-aa2ea6d0:

This is an AMI with Ubuntu 16.04 64 bit pre-installed, and it has the SSD volume type.
Choose the appropriate instance type: g3.4xlarge:

Once the VM is launched, assign the appropriate key that you will use to SSH into it. In our case, we used a pre-existing key:

SSH into the instance:
ssh -i aws/rd_app.pem ubuntu@34.201.110.131
How to do it...
- Run the following commands to update and upgrade the OS:
sudo apt-get update
sudo apt-get upgrade
- Install the gcc compiler and make the tool:
sudo apt install gcc
sudo apt install make
Installing cuda
- Execute the following command to execute cuda:
sudo apt-get install -y cuda
- Check that cuda is installed and run a basic program:
ls /usr/local/cuda-8.0
bin extras lib64 libnvvp nvml README share targets version.txt
doc include libnsight LICENSE nvvm samples src tools
- Let's run one of the cuda samples after compiling it locally:
export PATH=/usr/local/cuda-8.0/bin${PATH:+:${PATH}}
export LD_LIBRARY_PATH=/usr/local/cuda-8.0/lib64\${LD_LIBRARY_PATH:+:${LD_LIBRARY_PATH}}
cd /usr/local/cuda-8.0/samples/5_Simulations/nbody
- Compile the sample and run it as follows:
sudo make

./nbody
You will see output similar to the following listing:
Run "nbody -benchmark [-numbodies=<numBodies>]" to measure performance.
 -fullscreen (run n-body simulation in fullscreen mode)
 -fp64 (use double precision floating point values for simulation)
 -hostmem (stores simulation data in host memory)
 -benchmark (run benchmark to measure performance)
 -numbodies=<N> (number of bodies (>= 1) to run in simulation)
 -device=<d> (where d=0,1,2.... for the CUDA device to use)
 -numdevices=<i> (where i=(number of CUDA devices > 0) to use for simulation)
 -compare (compares simulation results running once on the default GPU and once on the CPU)
 -cpu (run n-body simulation on the CPU)
 -tipsy=<file.bin> (load a tipsy model file for simulation)
- Next we install cudnn, which is a deep learning library from NVIDIA. You can find more information at https://developer.nvidia.com/cudnn.
Installing cudnn
- Download cudnn from the NVIDIA site (https://developer.nvidia.com/rdp/assets/cudnn-8.0-linux-x64-v5.0-ga-tgz) and decompress the binary:
tar xvf cudnn-8.0-linux-x64-v5.1.tgz
We obtain the following output after decompressing the .tgz file:
cuda/include/cudnn.h
cuda/lib64/libcudnn.so
cuda/lib64/libcudnn.so.5
cuda/lib64/libcudnn.so.5.1.10
cuda/lib64/libcudnn_static.a
- Copy these files to the /usr/local folder, as follows:
sudo cp cuda/include/cudnn.h /usr/local/cuda/include
sudo cp cuda/lib64/libcudnn* /usr/local/cuda/lib64

sudo chmod a+r /usr/local/cuda/include/cudnn.h /usr/local/cuda/lib64/libcudnn*
Installing NVIDIA CUDA profiler tools interface development files
Install the NVIDIA CUDA profiler tools interface development files that are needed for TensorFlow GPU installation with the following code:
sudo apt-get install libcupti-dev
Installing the TensorFlow GPU version
Execute the following command to install the TensorFlow GPU version:
sudo pip install tensorflow-gpu
Installing Keras
For Keras, use the sample command, as used for the installation with GPUs:
sudo pip install keras
In this recipe, we learned how to install Keras on top of the TensorFlow GPU hooked to cuDNN and CUDA.


