Widgets, widgets, everywhere
Flutter widgets are a core part of the framework and are used constantly throughout your code. You will hear the saying “Everything is a widget,” and that is almost true in Flutter. In this section, we will see how Flutter renders the user interface and then how Flutter applies the widgets idea to app development to create awesome UIs.
Widgets can be understood as the visual (but not only that) representation of parts of the application. Many widgets are put together to compose the UI of an application. Imagine it as a puzzle in which you define the pieces.
Widgets intend to provide a way for your application to be modular, scalable, and expressive with less code and without imposing limitations. The main characteristics of the widgets UI in Flutter are composability and immutability.
Flutter rendering
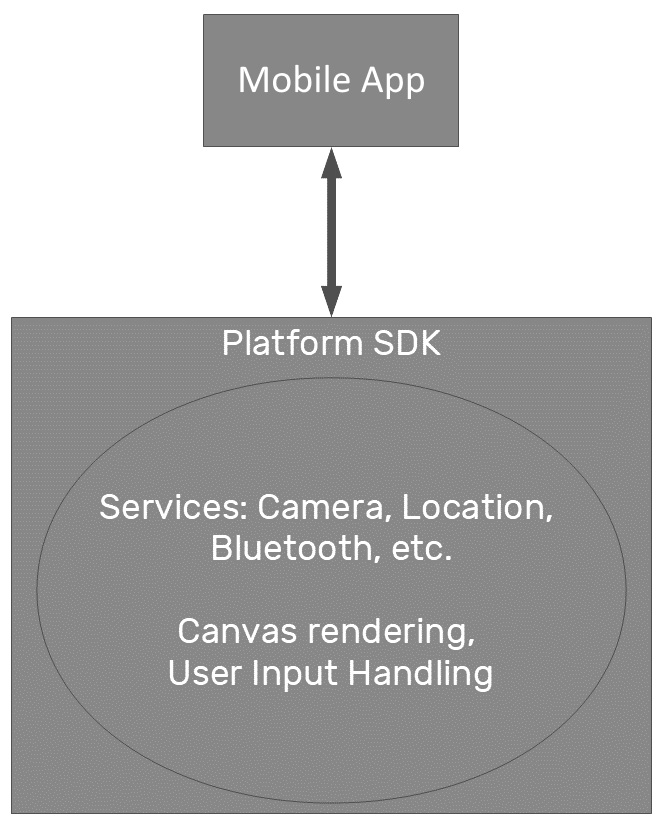
One of the main aspects that makes Flutter unique is the way that it draws the visual components to the screen. A key differentiator to existing frameworks is how the application communicates with the platform’s SDK, what it asks the SDK to do, and what it does by itself:

Figure 1.4 – How Flutter communicates with the platform’s SDK
The platform SDK can be seen as the interface between applications and the OS and services. Each system provides its own SDK with capabilities and is based on a programming language (that is, Kotlin/Java for the Android SDK and Swift/Objective C for the iOS SDK).
Flutter – rendering by itself
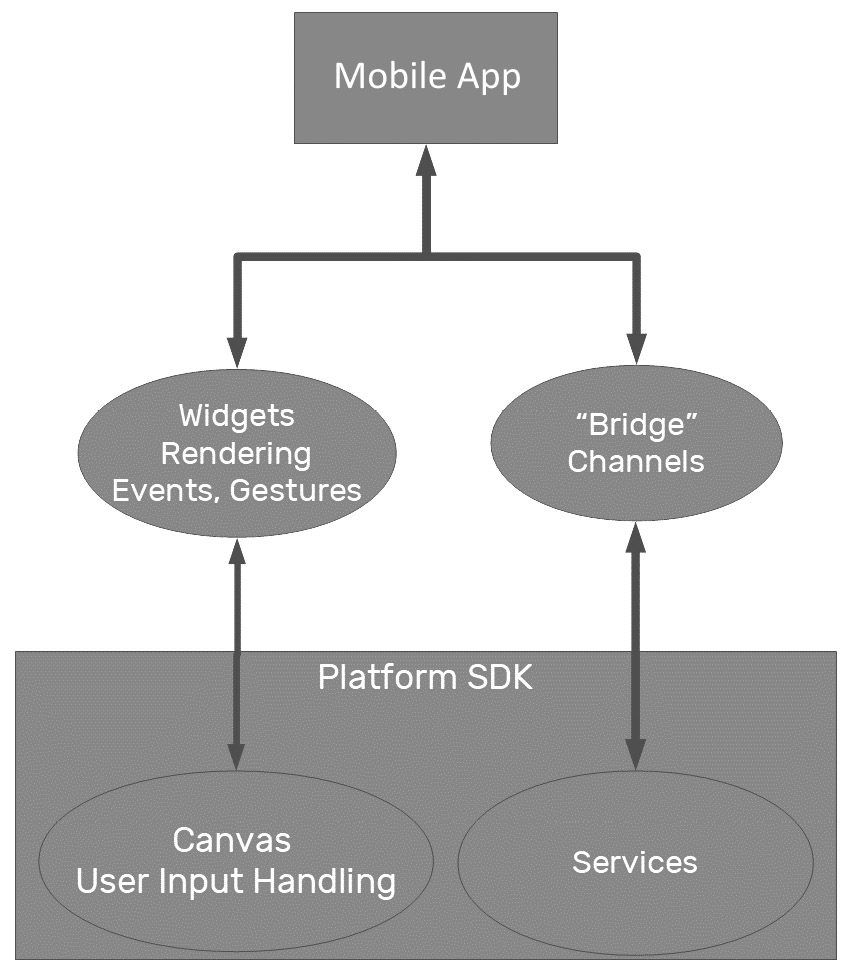
Flutter chooses to do all the rendering work by itself. The only thing it needs from the platform’s SDK is access to Services APIs and a canvas to draw the UI on:

Figure 1.5 – Flutter access to services and the canvas
Flutter moves the widgets and rendering to the app, from where it gets its customization and extensibility. Through a canvas, it can draw anything and also access events to handle user inputs and gestures by itself.
Composability
For the widget user interface structures, Flutter chooses composition over inheritance, intending to keep each widget simple and with a well-defined purpose. Meeting one of the framework’s goals, flexibility, Flutter allows the developer to make many combinations to achieve incredible results.
Composition versus inheritance
Inheritance derives one class from another. For example, you may have a class such as Vehicle and subclasses of Car and Motorbike. The Car and Motorbike classes would inherit the abilities of the Vehicle class and then add their own specializations. In this instance, Car is a Vehicle and Motorbike is a Vehicle.
Composition defines a class as the sum of its parts. For example, you may have an Engine class and a Wheel class. In this model, a Car is composed of an Engine, four Wheels, and other specializations; a Car has an Engine and a Car has Wheels. Composability is less rigid than inheritance and allows for things such as dependency injection and modifications at runtime.
Immutability
Flutter is based on the reactive style of programming, where the widget instances are short-lived and change their descriptions (whether visually or not) based on configuration changes, so it reacts to changes and propagates these changes to its composing widgets, and so on.
A Flutter widget may have a state associated with it, and when the associated state changes, it can be rebuilt to match the representation.
The terms state and reactive are well known in the React style of programming, disseminated by Facebook’s famous React library.
Don’t worry if this is a concept you have not experienced. It is surprisingly intuitive and we will explore it via many examples throughout this book.
Everything is a widget
Flutter widgets are everywhere in an application. Maybe not everything is a widget, but almost everything is. Even an app is a widget in Flutter, and that’s why this concept is so important. A widget represents a part of a UI, but it does not mean it’s just visible. It can be any of the following:
- A visual/structural element that is a basic structural element, such as the
ButtonorTextwidgets - A layout-specific element that may define the position, margins, or padding, such as the
Paddingwidget - A style element that may help colorize and theme a visual/structural element, such as the
Themewidget - An interaction element that helps respond to user interactions in different ways, such as the
GestureDetectorwidget
An example widget
OK, enough theory – let’s have a quick look at a widget so that you can get a feel for what we are referring to. Open your IDE and take a look at that mysterious lib/main.dart file we mentioned earlier. Around line 7, you will see a section like this:
class MyApp extends StatelessWidget {
  @override
  Widget build(BuildContext context) {
    return MaterialApp(
      title: 'Flutter Demo',
      theme: ThemeData(
        primarySwatch: Colors.blue,
      ),
      home: const MyHomePage(title: 'Flutter Demo Home
        Page'),
    );
  }
}
Not only is this your first example of a Flutter widget, but it is also your first chance to see Dart. If you are from a Java, C++, or Objective-C background, then it should look relatively familiar to you. Components of code are held in class definitions that describe fields and methods, with inheritance through the extends keyword:
class MyApp extends StatelessWidget { We will explore this syntax in a lot more detail in later chapters, but it is easiest to think of a class as a blueprint. This class blueprint says what information or data can be stored and how it can be accessed and manipulated. Extending another class, or blueprint, simply overlays the blueprint you are extending onto your new blueprint. If this is all new to you, then it is highly recommended that you explore object-oriented programming concepts after you complete this chapter as that will give you a strong foundation on which to build your Flutter knowledge.
The MyApp class runs the whole show and is itself a widget. In this instance, it is StatelessWidget, as you can see from the extends section. We will explore StatelessWidget (and its alter ego, StatefulWidget) in more detail later on, but for the moment, it’s sufficient to know that StatelessWidget holds no state – it exists to compose other widgets that may or may not hold their own state.
You can see this composition in the build method, as defined by this piece of code:
Widget build(BuildContext context) { In this build method, the MyApp widget simply returns another widget, MaterialApp, which itself will have a build method that may also return widgets. Ultimately, you will reach leaf widgets that will render graphics to the display. The build method updates the display and is called when some external activity happens – for example, the user interacts with the device, some data is sent from a database, or a timer is triggered at a set time.
Widgets are the basic building blocks of an interface. To build a UI properly, Flutter organizes the widgets in a widget tree.
The widget tree
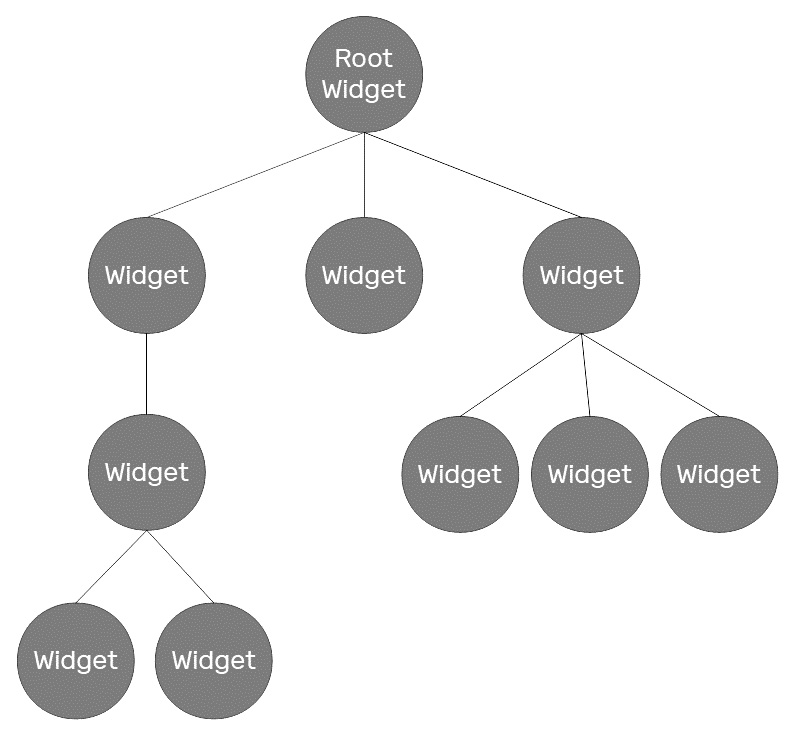
This is another important concept in Flutter layouts. It’s where widgets come to life. The widget tree is the logical representation of all the UI’s widgets. It is computed during layout (measurements and structural information) and used during rendering (frame to screen) and hit testing (touch interactions), and this is the thing Flutter does best. By using a lot of optimization algorithms, it tries to manipulate the tree as little as possible, reducing the total amount of work spent on rendering, aiming for greater efficiency:

Figure 1.6 – Example widget tree
Widgets are represented in the tree as nodes. Each widget may have a state associated with it; every change to its state results in rebuilding the widget and the child involved.
As you can see, the tree’s child structure is not static, and it’s defined by the widget’s description. The children relations in widgets are what makes the UI tree; it exists by composition, so it’s common to see Flutter’s built-in widgets exposing child or children properties, depending on the purpose of the widget.
The element tree
The widget tree does not work alone in the framework. It has the help of the element tree – a tree that relates to the widget tree by representing the built widget on the screen. This means every widget will have a corresponding element in the element tree after it is built.
The element tree has an important task in Flutter. It helps map onscreen elements to the widget tree. It also determines how widget rebuilding is done in update scenarios. When a widget changes and needs to be rebuilt, this will cause an update on the corresponding element. The element stores the type of the corresponding widget and a reference to its children elements. In the case of repositioning, for example, a widget, the element will check the type of the corresponding new widget, and if there is a match, it will update itself with the new widget description.
You have now learned the basics of how to put a Flutter app together. Before you learn how to run our hello_world Flutter app, let’s look at the build process and options in some more detail.


