Creating the Maven Web Application project
A NetBeans project encapsulates all the source code and related components required to maintain and develop an application. Navigate to File | New Project from the menu to start the process:
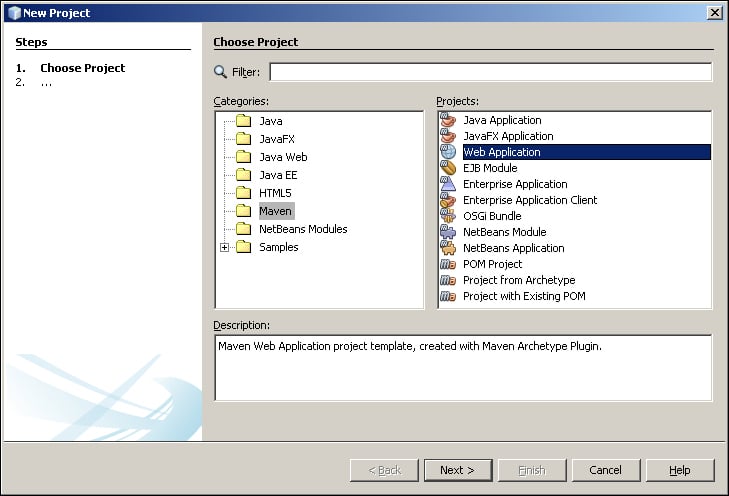
Select Maven in the Categories listing and Web Application from the Projects listing, as shown in the preceding screenshot, before selecting the Next button. This will present you with the project configuration screen with the following fields:
- Project Name: This specifies the display name of the project in the project window. This name is also used to create the project folder and must not contain spaces.
Note
Our project is called Task Time Tracker. This tool will allow users to manage the time spent on different tasks for different projects. The project name field is the lowercase, nonspaced translation of the name of the project:
task-time-tracker. - Project Location: This specifies the filesystem root folder where you want to store the project metadata and source code. We normally create a project-specific folder at the root level of a drive, rather than burying it deep within a folder structure under NetBeans. This makes it easier to find and copy files into the project.
Note
Windows users should create a project folder under
c:\projects. Mac users may wish to replace this with/Users/{username}/projectsand Unix users with/home/{username}/projects. The rest of the book will refer to this location in all examples as the project folder. - Project Folder: The project folder is read-only and generated based on the name of the project and the project location.
- Artifact Id: This is a read-only Maven-specific property to identify the project and is based on the project name.
- Group Id: This is another Maven property that represents a top-level container for multiple artifacts. It usually represents the Top-Level Domain (TLD) of the organization owning the project.
Note
The Group Id for the project is
com.gieman, the company of the author. - Version: This is another Maven property that represents the version of the artifact. The default version is 1.0-SNAPSHOT, which we will change to
1.0. As projects evolve and new versions are released, Maven will keep track of the different builds based on their versions. - Package: The IDE will automatically create a Java source package structure based on this field. We will use the package
com.gieman.tttracker.
You should now have entered the following project details:
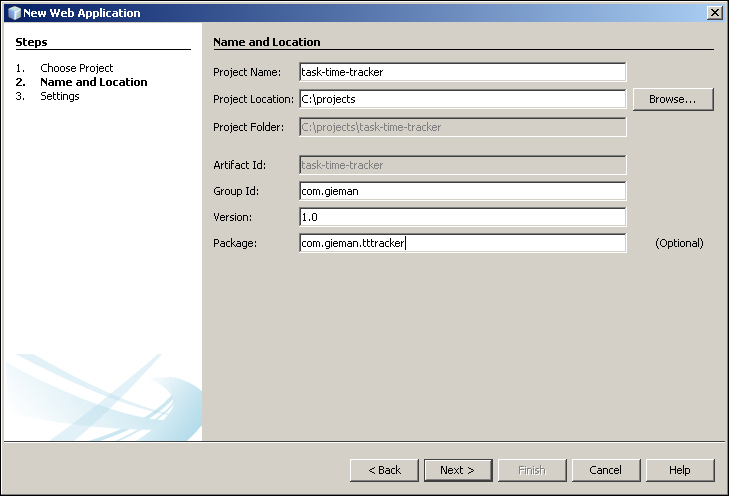
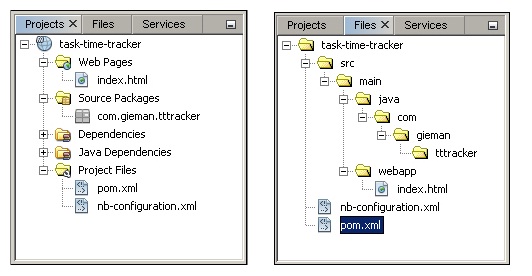
Click on the Next button to view the final screen. Do not change the default GlassFish Server 4.0 and Java EE 7 settings before clicking on the Finish button. You will now see activity in the Project Creation output tab as the project is created and configured. Opening the Project and Files panels will allow you to see the project structure:
Tip
Downloading the example code
You can download the example code files for all Packt books you have purchased from your account at http://www.packtpub.com. If you purchased this book elsewhere, you can visit http://www.packtpub.com/support and register to have the files e-mailed directly to you.
Right-clicking on the project name in either tab will allow you to select the Properties for the project. This will display all properties and paths relevant to the project under different categories:
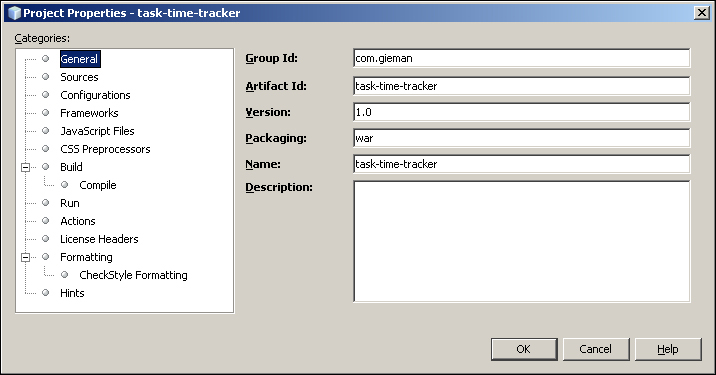
You should not need to change these properties for the remainder of the book.
Understanding the POM and dependency management
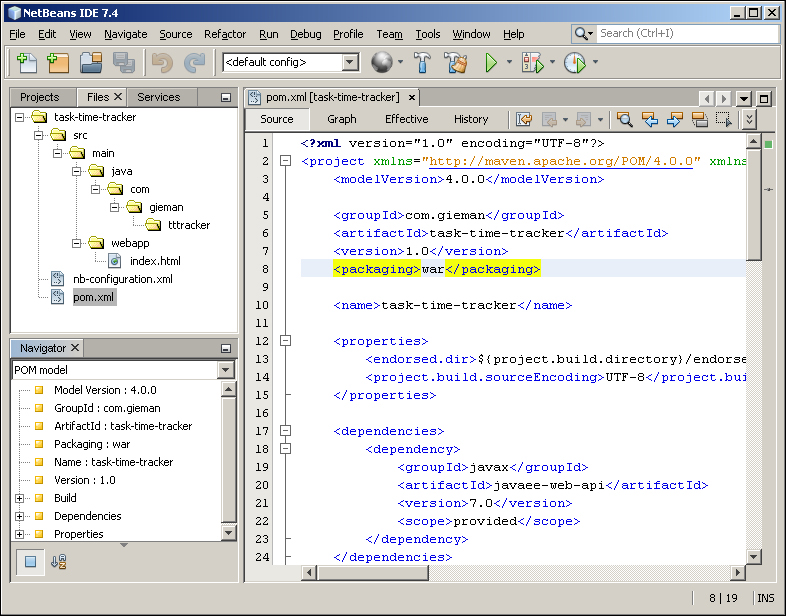
Each Maven project has a pom.xml configuration file at the root level of the NetBeans project. Click on the Files view and double-click on the pom.xml file to open it in the editor:
Note
You should see the Navigator window open in the bottom-left panel. This displays an outline of the file being edited and is very helpful when navigating through large files. Double-clicking on a node in the Navigator will position the cursor at the appropriate line in the editor.
If the Navigator window does not open (or has been closed), you can open it manually by navigating to Window | Navigating | Navigator from the menu.
The Project Object Model (POM) fully defines the project and all required Maven properties and build behaviors. There is only one dependency shown in pom.xml:
<dependencies>
  <dependency>
    <groupId>javax</groupId>
    <artifactId>javaee-web-api</artifactId>
    <version>7.0</version>
    <scope>provided</scope>
  </dependency>
</dependencies>
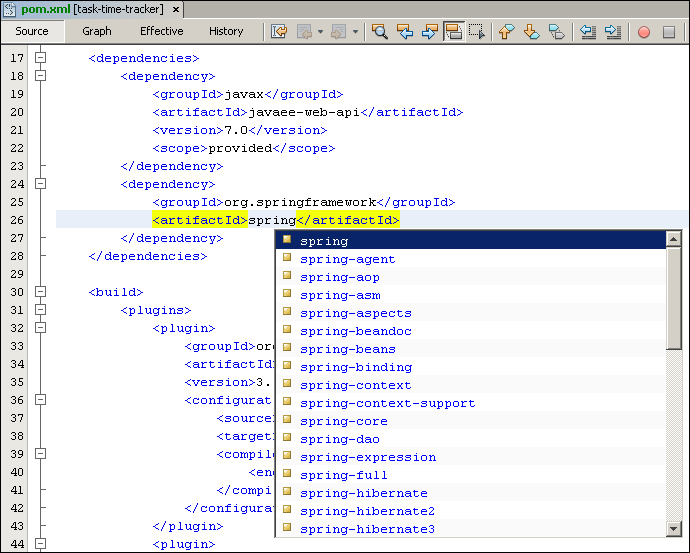
This dependency identifies that the project requires Java EE 7 for building. This entry ensures the full Java EE 7 APIs are available for Java coding in the Task Time Tracker project. Our project also requires the Spring Framework, which must now be added as additional dependencies. Typing in the editor will result in autocompletion help to determine the correct dependencies. After adding the Spring Framework groupId and artifactId entries, as shown in the following screenshot, the Ctrl + Space bar keyboard shortcut will open the available matching entries for the artifactId starting with the text spring:
If this autocomplete list is not available, it may be due to the Maven repository being indexed for the first time. In this situation you will then see the following screenshot at the bottom of the editor:

Be patient and in a few minutes the indexing will be finished and the autocomplete will become available. Indexing is required to download available entries from the Maven repository.
The required Spring Framework components are as follows:
spring-context: This is the central artifact required for Spring's dependency injection containerspring-tx: This is the transaction management abstraction required for implementing transactional behaviorspring-context-support: These are various application context utilities, including Ehcache, JavaMail, Quartz, and FreeMarker integrationspring-jdbc: This is the JDBC data access libraryspring-orm: This is the Object-to-Relation-Mapping (ORM) integration for JPA developmentspring-instrument: This is for the weaving of classesspring-webmvc: This is the Spring Model-View-Controller (MVC) for Servlet environmentsspring-test: This is the support for testing Spring applications with JUnit
To add these dependencies using the latest Spring release version (3.2.4) requires the following additions to the pom.xml file:
<dependency>
  <groupId>org.springframework</groupId>
  <artifactId>spring-context</artifactId>
  <version>3.2.4.RELEASE</version>
</dependency>
<dependency>
  <groupId>org.springframework</groupId>
  <artifactId>spring-context-support</artifactId>
  <version>3.2.4.RELEASE</version>
</dependency>
<dependency>
  <groupId>org.springframework</groupId>
  <artifactId>spring-tx</artifactId>
  <version>3.2.4.RELEASE</version>
</dependency>
<dependency>
  <groupId>org.springframework</groupId>
  <artifactId>spring-jdbc</artifactId>
  <version>3.2.4.RELEASE</version>
</dependency>
<dependency>
  <groupId>org.springframework</groupId>
  <artifactId>spring-orm</artifactId>
  <version>3.2.4.RELEASE</version>
</dependency>
<dependency>
  <groupId>org.springframework</groupId>
  <artifactId>spring-instrument</artifactId>
  <version>3.2.4.RELEASE</version>
</dependency>
<dependency>
  <groupId>org.springframework</groupId>
  <artifactId>spring-webmvc</artifactId>
  <version>3.2.4.RELEASE</version>
</dependency>
<dependency>
  <groupId>org.springframework</groupId>
  <artifactId>spring-test</artifactId>
  <version>3.2.4.RELEASE</version>
</dependency>
Understanding dependency scope
The final Spring Framework dependency is only required for testing. We can define this by adding a scope attribute with value test. This tells Maven that the dependency is only required when running the testing phase of the build and is not required for deployment.
<dependency>
  <groupId>org.springframework</groupId>
  <artifactId>spring-test</artifactId>
  <version>3.2.4.RELEASE</version>
  <scope>test</scope>
</dependency>
The javaee-web-api dependency that was automatically created by NetBeans has a scope of provided. This means the dependency is not required for deployment and is provided by the target server. The GlassFish 4 server itself is the provider of this dependency.
If the scope attribute has not been included, the dependency JAR will be included in the final build. This is the equivalent of providing a scope entry of compile. As a result, all the Spring Framework dependency JARs will be included in the final build file.
A full explanation of the Maven dependency mechanism and scoping can be found at http://maven.apache.org/guides/introduction/introduction-to-dependency-mechanism.html.
Defining Maven properties
The Spring Framework dependencies defined in pom.xml all have the same version (3.2.4.RELEASE). This duplication is not ideal, especially when we wish to upgrade to a newer version at a later time. Changes would be required in multiple places, one for each Spring dependency. A simple solution is to add a property to hold the release version value as shown in the following code:
<properties>
<endorsed.dir>${project.build.directory}/endorsed</endorsed.dir>
<project.build.sourceEncoding>UTF-8</project.build.sourceEncoding>
<spring.version>3.2.4.RELEASE</spring.version>
</properties>
This custom property, which we have named spring.version, can now be used to replace the multiple duplicates as follows:
<dependency>
<groupId>org.springframework</groupId>
  <artifactId>spring-context-support</artifactId>
  <version>${spring.version}</version>
</dependency>
The ${spring.version} placeholder will then be substituted with the properties value during the build process.
Understanding Maven-build plugins
The Maven build process executes each defined build plugin during the appropriate build phase. A full list of build plugins can be found at http://maven.apache.org/plugins/index.html. We will introduce plugins as needed in subsequent chapters, but the default plugins created by the NetBeans IDE are of interest now.
The maven-compiler-plugin controls and executes the compilation of Java source files. This plugin allows you to specify both the source and target Java versions for compilation as shown in the following code:
<plugin>
  <groupId>org.apache.maven.plugins</groupId>
  <artifactId>maven-compiler-plugin</artifactId>
  <version>3.1</version>
  <configuration>
    <source>1.7</source>
    <target>1.7</target>
    <compilerArguments>
      <endorseddirs>${endorsed.dir}</endorseddirs>
    </compilerArguments>
  </configuration>
</plugin>
Changing these values to 1.6 may be required when compiling projects for older Java servers running on the earlier versions of Java.
The maven-war-plugin builds a WAR file for the project as follows:
<plugin>
  <groupId>org.apache.maven.plugins</groupId>
  <artifactId>maven-war-plugin</artifactId>
  <version>2.3</version>
  <configuration>
    <failOnMissingWebXml>false</failOnMissingWebXml>
  </configuration>
</plugin>
The default generated WAR filename is {artifactId}-{version}.war, which can be changed by including the warName configuration property. We will be adding properties to this plugin when building the project for production release in the final chapter. A full list of maven-war-plugin options may be found at http://maven.apache.org/plugins/maven-war-plugin/war-mojo.html.
The maven-dependency-plugin copies dependency JAR files to the defined output directory as shown in the following code:
<plugin>
  <groupId>org.apache.maven.plugins</groupId>
  <artifactId>maven-dependency-plugin</artifactId>
  <version>2.6</version>
  <executions>
    <execution>
      <phase>validate</phase>
      <goals>
        <goal>copy</goal>
      </goals>
      <configuration>
        <outputDirectory>${endorsed.dir}</outputDirectory>
        <silent>true</silent>
        <artifactItems>
          <artifactItem>
            <groupId>javax</groupId>
            <artifactId>javaee-endorsed-api</artifactId>
            <version>7.0</version>
            <type>jar</type>
          </artifactItem>
        </artifactItems>
      </configuration>
    </execution>
  </executions>
</plugin>
This is useful to see which JARs are used by the project and to identify what transitive dependencies are required (dependencies of dependencies).
We will modify this plugin to copy all compile-time dependencies of the project to a directory in ${project.build.directory}. This special build directory is under the root folder of the project and is named target, the target destination of the build process. The updated entry will now look as follows:
<plugin>
  <groupId>org.apache.maven.plugins</groupId>
  <artifactId>maven-dependency-plugin</artifactId>
  <version>2.1</version>
  <executions>
    <execution>
      <id>copy-endorsed</id>
      <phase>validate</phase>
      <goals>
        <goal>copy</goal>
      </goals>
      <configuration>
        <outputDirectory>${endorsed.dir}</outputDirectory>
        <silent>true</silent>
        <artifactItems>
          <artifactItem>
            <groupId>javax</groupId>
            <artifactId>javaee-endorsed-api</artifactId>
            <version>7.0</version>
            <type>jar</type>
          </artifactItem>
        </artifactItems>
      </configuration>
    </execution>
    <execution>
      <id>copy-all-dependencies</id>
      <phase>compile</phase>
      <goals>
        <goal>copy-dependencies</goal>
      </goals>
      <configuration>
        <outputDirectory>${project.build.directory}/lib
        </outputDirectory>
        <includeScope>compile</includeScope>
      </configuration>
    </execution>
  </executions>
</plugin>
As we are now performing two executions in the single plugin, each execution needs its own <id>. The second execution, with ID copy-all-dependencies, will copy all dependent JARs with the scope compile to the target/lib directory.
Executing the Maven build
The simplest way to execute a build is to click on the Clean and Build Project button in the toolbar. You can also right-click on the project node in the Projects tab and select Clean and Build from the menu. The build process will then execute each defined phase in the POM, resulting in Java code compilation, dependency resolution (and copying), and finally, WAR file generation. Opening the target directory structure will display the build result as follows:
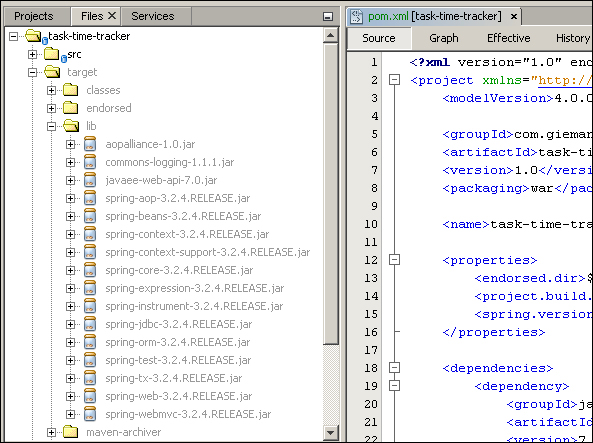
Even though we have not written a single line of code, the generated WAR file task-time-tracker-1.0.war can now be deployed to the GlassFish server.


