Creating an actionbar in Android
In Android 3.0, Google introduced the actionbar, a tab-style interface that sits under the title bar of an application. The actionbar behaves a lot like the tabgroup, which we're used to in iOS, and coincidently it can be created in the same way as we created a TabGroup previously, which makes it very easy to create one! All that we need to do is make some minor visual tweaks in our application to get it working on Android.
You will be running this recipe on Android 4.x, so make sure you're running an emulator or device that runs 4.x or higher. I'd recommend using GenyMotion, available at http://www.genymotion.com, to emulate Android. It's fast and way more flexible than, the built-in Android SDK emulators. It's also fully supported in Titanium and in Appcelerator Studio.
The complete source code for this chapter can be found in the /Chapter 1/LoanCalc folder.
How to do it...
There's not much to do to get the actionbar working, as we've already created a tabgroup for our main interface. We just need to do just a few tweaks to our app views, buttons, and labels.
First, let's make sure that all our labels are rendering correctly. Add the following attribute to any label that you've created:
color: '#000'
Now we need to fix our buttons. Let's add a tweak to them after we've created them (for Android only). Add the following code after your buttons. To do this, we're going to use .applyProperties, which allows us to make multiple changes to an element at the same time:
if (Ti.Platform.osname.toLowerCase() === 'android') {
  buttonCalculateRepayments.applyProperties({
    color : '#000',
    height : 45
  });

  buttonCalculateInterest.applyProperties({
    color : '#000',
    height : 45
  });
}
This block checks whether we're running Android and makes some changes to the buttons. Let's add some more code to the block to adjust the textfield height as well, as follows:
if (Ti.Platform.osname.toLowerCase() === 'android') {
  buttonCalculateRepayments.applyProperties({
    color : '#000',
    height : 45
  });

  buttonCalculateInterest.applyProperties({
    color : '#000',
    height : 45
  });

  tfAmount.applyProperties({
    color : '#000',
    height : 35
  });

  tfInterestRate.applyProperties({
    color : '#000',
    height : 35
  });
}
Finally, we're going to make a tweak to our settings window to make it play nicely on Android devices with different widths. Edit the window2.js file and remove the width of the view variable, changing it to the following:
var view = Ti.UI.createView({
    height : 70,
    left : 10,
right: 10,
    top : 10,
    backgroundColor : '#fff',
    borderRadius : 5
});
We'll need to update the labelSwitch variable too, by adding this line:
color: '#000'
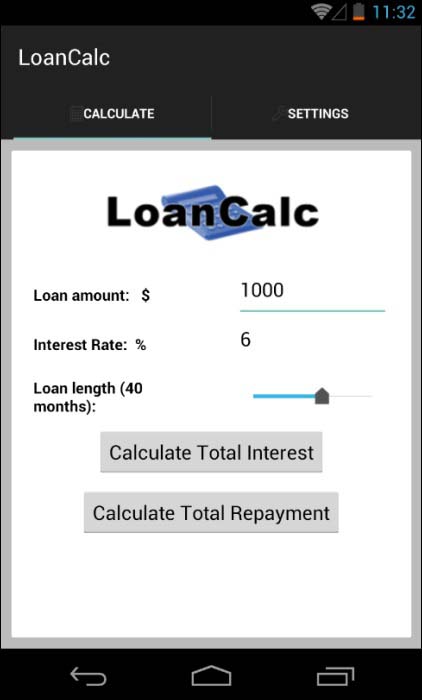
Now let's run the app in the Android emulator or on a device, and we should see the following:

How it works...
We've not done much here to get an actionbar working. That's because Titanium takes care of the heavy lifting for us. You must have noticed that the only changes we made were visual tweaks to the other elements on the screen; the actionbar just works!
This is a really nice feature of Titanium, wherein you can create one UI element, a tabgroup, and have it behave differently for iOS and Android using the same code.
Having said that, there are some additional tweaks that you can do to your actionbar using the Ti.Android.ActionBar API. This gives specific access to properties and events associated with the actionbar. More information can be found at http://docs.appcelerator.com/platform/latest/#!/api/Titanium.Android.ActionBar.
So, for example, you can change the properties of actionBar by accessing it via the current window:
actionBar = win.activity.actionBar;

if (actionBar) {
actionBar.backgroundImage = "/bg.png";
actionBar.title = "New Title";
}
As you can see, it's really easy to create an actionbar using a tabgroup and alter its properties in Android.


