Mission Briefing
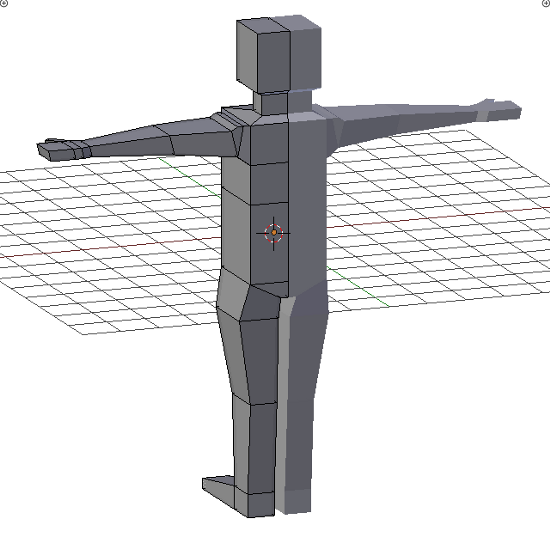
Our objective is to create a basic model of a humanoid, with all the major parts included and correctly shaped: head, arms, torso, legs, and feet will be defined. We won't be creating fine details of the model, but we will definitely pay attention to the process and the mindset necessary to achieve our goal.
What Does It Do?
We'll start by creating a very simple (and ugly) base mesh that we can tweak later to get a nice finished model. From a single cube, we will be creating an entire model of a basic humanoid character, and take the opportunity to follow our own "feelings" to create the finished model.
Why Is It Awesome?
This project will help you learn some good points that will be handy when working on future projects (even in complex projects). First of all, we'll learn a basic procedure for applying the box modeling technique to create a base mesh. We'll then learn that our models don't have to look nice all the time to ensure a proper result, instead we must have a proper understanding of where we are heading to avoid getting lost along the way. Finally, we'll learn to separate the complexity of a modeling task into two different parts, using the best tools for the job each time (thus having a more enjoyable time and very good freedom to creative).
The brighter side of this project will be working with the sculpting tools, since they give us a very cool way of tweaking meshes without having to handle individual vertices, edges, or faces. This advantage constitutes an added value for our workflow: we can separate the boring technical parts of modeling (mostly extruding and defining topology) from the actual fine tweaking of the form. Moreover, if we have the possibility of using the sculpt tools with a pen tablet, the modeling experience will be greatly improved and will feel extremely intuitive.
Your Hotshot Objectives
Although this project is not really complex, we will separate it into seven tasks, to make it easier to follow. They are:
- Creating the base mesh
- Head
- Arms
- Torso
- Legs
- Feet and final tweaks
- Scene setup
Creating the Base Mesh
Let's begin our project by creating the mesh that will be further tweaked to get our final model.
For this project we'll apply a methodology (avoiding overly complicated, unintelligible, written descriptions) that will give us some freedom and allow us to explore our creativity without the rigidity of having a strict blueprint to follow.
There's a warning, though: our model will look ugly most of the time. This is because in the initial building process we're not going to put so much emphasis on how it looks but on the structure of the mesh. Having said that, let's start with the first task of the project.
Prepare for Lift Off
Fire up Blender, delete the default lamp, set the name of the default cube to character(from the Item panel, Properties sidebar) and save the file as character.blend in the project's directory.
Engage Thrusters
- First, we need to set the character object with a Mirror modifier, so that we only need to work on one side of the character while the other side gets created automatically as we work. Select the character object, switch to Edit Mode and then switch to Front View (View | Front), then add a new edge loop running vertically by using the Loop Cut and Slide tool. Make sure that the new edge loop is not moved from the center of the cube, so that it separates the cube into two mirrored sides. Now set the viewport shading to wireframe (press the Z key), select the vertices on the left-hand side of the cube, and delete them (press the X key).
- Now let's switch back to Object Mode, then go to the Modifiers tab in the Properties Editor and add a new Mirror Modifier to the character object. On the settings panel for the Mirror Modifier, let's enable the Clipping option. This will leave us with the object set up according to our needs.
- Switch to Edit Mode for the character object and then to Face Select mode. Select the upper face of the mesh, extrude it (E key) and then move the extrusion 1 unit upwards, along the Z axis. Now perform a second extrusion, this time on the face that remains selected from the previous one, and move it 1 unit upwards too; this will leave us with three sections (the lowest one is the biggest).
- Follow along by switching to Right View (View | Right), extrude again, press Escape, and then move the extrusion 0.2 units upwards (press the G key, Z key, then type 0.2). With the upper face selected, let's scale it down by a factor of 0.3 (S key, then type 0.3) and then move it by 0.6 units along the Y axis (G key, Y key, then type 0.6).
- Continue by extruding again and moving the extrusion 0.5 units upwards (G key, Z key, then type 0.5). Then add another extrusion, moving it up by 0.1 units (G key, Z key, then type 0.1). With the last extrusion selected, perform a scale operation, by a factor of 1.5 (S key, then type 1.5).
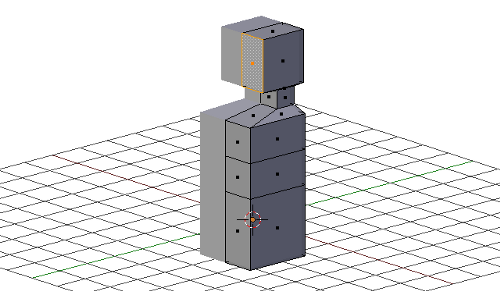
- Right after that, extrude again and move the extrusion 1.5 units upwards (G key, Z key, then type 1.5). Now let's rotate the view freely, so that the face of the last extrusion that faces the front is selectable, select it and move it -0.5 units along the Y axis (press the G key, Y key, then type -0.5).Let's take a look at a screenshot to make sure that we are on the right path:

Note the (fairly noticeable) shapes showing the neck area, the head, and the torso of our model. Take a look at the face on the model's side from where we'll later extrude the arm.
- Now let's switch to Front View (View | Front), then select the upper face on the side of the torso of the model, extrude it, press Escape, and move it 0.16 units along the X axis (G key, X key, then type 0.16). Continue by scaling it down by a factor of 0.75 (S key, then type 0.75) and move it up by 0.07 units (press the G key, Z key, then type 0.07). Then switch to Right View (View | Right) and move it 0.2 units along the Y axis (press the G key, Y key, then type 0.2). This will give us the starting point to extrude the arm.
- Switch to Front View (View | Front) and perform another extrusion (having selected the face that remains selected by the previous extrusion), press Escape, and then move it 0.45 units along the X axis (press the G key, X key, then type 0.45). Then let's switch to Edge Select Mode, deselect all the edges that could be selected (Select | Select/Deselect All), rotate the view to be able to select any of the horizontal edges of the last extrusion, and then select the upper horizontal edge of the last extrusion; then move it -0.16 units along the X axis (G key, X key, then type -0.16).
Unlock access to the largest independent learning library in Tech for FREE!
Get unlimited access to 7500+ expert-authored eBooks and video courses covering every tech area you can think of.
Renews at $19.99/month. Cancel anytime
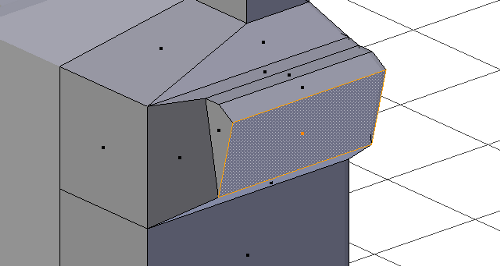
- Right after that, let's select the lower horizontal edge of the last extrusion and move it 0.66 units upwards (G key, Z key, then type 0.66). Finalize this tweak by selecting the last two edges that we worked with and move them -0.15 units along the X axis (press the G key, X key, then type -0.15). Let's also select the lower edge of the first extrusion that we made for the arm and move it 0.14 units along the X axis (press the G key, X key, then type 0.14). Since this process is a bit tricky, let's use a screenshot, to help us ensure that we are performing it correctly:

The only reason to perform this weird tweaking of the base mesh is to ensure a proper topology (internal mesh structure) for the shoulder when the model is finished. Let's remember to take a look at the shoulder of the finished model and compare it with the previous screenshot to understand it.
- Make sure to only select the face shown selected in the previous screenshot and switch back to Front View (View | Front) to work on the arms.
- Extrude the selected face, press Escape, and then move it by 1.6 units along the X axis (press the G key, X key, then type 1.6). Then scale it down by a factor of 0.75 (press the S key, then type 0.75) and move it up 0.07 units (press the G key, Z key, then type 0.07). Continue by performing a second extrusion, press Escape and then move it 1.9 units along the X axis (press the G key, X key, then type 1.9). Then let's perform a scale constrained to the Y axis, this time by a factor of 0.5 (press the S key, Y key, then type 0.5). To perform some tweaks, let's switch to Top View (View | Top) and move the selected face 0.17 units along the Y axis (press the G key, Y key, then type 0.17).
- To model the simple shape that we will create for the hand, let's make sure that we have selected the rightmost face from the last extrusion, extrude it, and move it 0.25 units along the X axis (press the G key, X key, then type 0.25). Then perform a second extrusion and move it 0.25 units along the X axis as well, and finish the extrusions by adding a last one, this time moving it 0.6 units along the X axis (press the G key, X key, then type 0.6).
- For the thumb, let's select the face pointing forwards in the second-last extrusion, extrude it, and move the extruded face to the right and down (remember we are in Top View) so that it looks well shaped with the rest of the hand. For this we can perform a rotation of the selected face to orient it better.
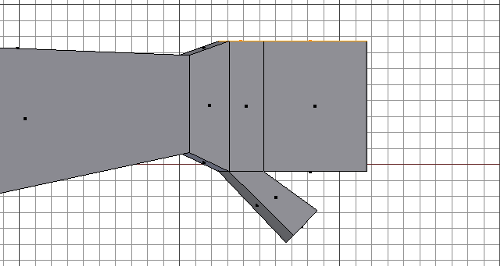
- To finish the hand, let's select the faces forming the thumb and the one between the thumb and the other "fingers", and move them -0.12 units along the Y axis (press the G key, Y key, then type -0.12). Also select the two faces on the other side of the face and move them 0.08 units along the Y axis (press the G key, Y key, then type 0.08). The following screenshot should be very helpful to follow the process:

- Now it's time to model the legs of our character. For that, let's pan the 3D View to get the lower face visible, select it, extrude it, and move it -0.4 units (press the G key, Z key, then type -0.4). Now switch to Edge Select Mode, select the rightmost edge of the face we just extruded down, and move it -0.85 units along the X axis (G key, X key, then type -0.85).
- To extrude the thigh, let's first switch to Face Select Mode, select the face that runs diagonally after we moved the edge in the previous step, then switch to Front View (View | Front), extrude the face, press Escape, and then apply a scale operation along the Z axis by a factor of 0 (press the S key, Z key, then type 0), to get it looking entirely flat.
- With the face from the last extrusion selected, let's move it -0.8 units along the Z axis (press the G key, Z key, then type -0.8). Right after that, let's scale the selected face by a factor of 1.28 along the X axis (press the S key, X key, then type 1.28) and move it 0.06 units along the X axis (press the G key, X key, then type 0.06). Now switch to Right View (View | Right), scale it by a factor of 0.8 (press the S key, Y key, then type 0.8), and then move it -0.12 units along the Y axis (press the G key, Y key, then type -0.12).
- Perform another extrusion, then press Escape and move it -2.2 units along the Z axis (press the G key, Z key, then type -2.2). To give it a better form, let's now scale the selected face by a factor of 0.8 along the Y axis (press the S key, Y key, then type 0.8) and move it 0.05 units along the Y axis (press the G key, Y key, then type 0.05). To complete the thigh, let's switch to Front View (View | Front), scale it by a factor of 0.7 along the X axis (press the S key, X key, then type 0.7), and then move it -0.18 units along the X axis (press the G key, X key, then type -0.18).
- Right after the thigh, let's continue working on the leg. Make sure that the face from the tip of the previous extrusion is selected, extrude it, press Escape, then move it -2.3 units along the Z axis (press the G key, Z key, then type -2.3). Then let's switch to Right View (View | Right), scale it by a factor of 0.7 along the Y axis (press the S key, Y key, then type 0.7), and move it -0.02 units along the Y axis (press the G key, Y key, then type -0.02).
- Now we just need to create the feet by extruding the face selected previously and moving it -0.6 units along the Z axis (press the G key, Z key, then type -0.6). Then select the face of the last extrusion that faces the front, extrude it, press Escape, and move it -1.9 units along the Y axis. As a final touch, let's switch to Edge Select mode, then select the upper horizontal edge of the last extrusion and move it -0.3 units along the Z axis (press the G key, Z key, then type -0.3).
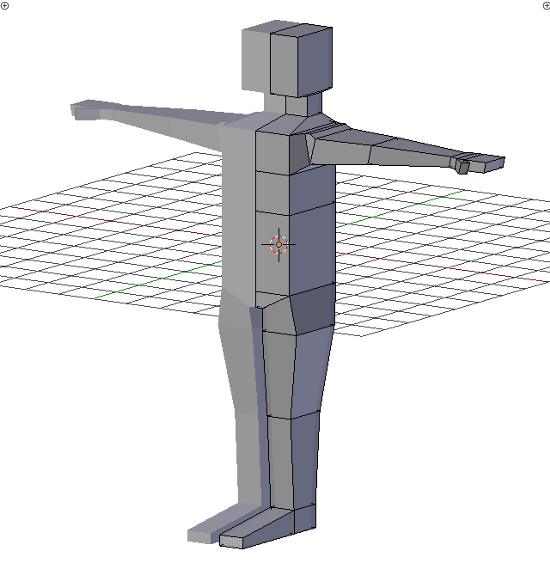
Let's take a look at a couple of screenshots showing us how our model should look by now:

In the previous screenshot, we can see the front part, whereas the back side of the model is seen in the next one.

Let's take a couple of minutes to inspect the screenshots and compare them to our actual model, to be entirely sure that we have the correct mesh now.
Notice that our model isn't looking especially nice yet; that's because we've just worked on creating the mesh, the actual form will be worked in the coming tasks.
Objective Complete - Mini Debriefing
In this task we just performed the very initial step of our modeling process: creating the base mesh to work with. In order to avoid overly complicated written explanations we are using a modeling process that leaves the actual "shaping" for later, so we only worked out the topology of our mesh and laid out some simple foundations such as general proportions. The good thing about this approach is that we put in effort where it is really required, saving some time and enjoying the process a lot more.
Classified Intel
There are two main methods for modeling: poly-to-poly modeling and box modeling. The poly-to-poly method is about working with very localized (often detailed) geometry, paying attention to how each polygon is laid out in the model. The box modeling method is about constructing the general form very fast, by using the extrude operation, while paying attention to general aspects such as proportions, deferring the detailed tweaks for later.
In this project we apply the box modeling method. We just worked out a very simple mesh, mostly by performing extrusions and very simple tweaks. Our main concern while doing this task was to keep proportions correct, forgetting about the fine details of the "form" that we are working out. The next tasks of this project will be about using Blender's sculpting tools to ease the tweaking job a lot, getting a very nice model in the end without having to tweak individual vertices!
 United States
 Great Britain
 India
India
 Germany
 France
 Canada
 Russia
 Spain
Spain
 Brazil
 Australia
 Singapore
 Hungary
 Ukraine
 Luxembourg
 Estonia
 Lithuania
 South Korea
 Turkey
 Switzerland
 Colombia
 Taiwan
 Chile
Chile
 Norway
 Ecuador
 Indonesia
 New Zealand
 Cyprus
 Denmark
 Finland
 Poland
 Malta
Malta
 Czechia
 Austria
 Sweden
 Italy
Italy
 Egypt
Egypt
 Belgium
 Portugal
 Slovenia
 Ireland
 Romania
 Greece
 Argentina
 Netherlands
 Bulgaria
 Latvia
 South Africa
 Malaysia
 Japan
Japan
 Slovakia
 Philippines
 Mexico
 Thailand

