This recipe describes how to set up a Virtual LAN (VLAN) from the pfSense web GUI. For example, we could set up a VLAN for developers.
Configuring VLANs
Getting ready
In order to complete this recipe, you must have at least one unassigned interface to use as the parent interface.
How to do it...
- Navigate to Interfaces | Assignments, and click on the VLANs tab.
- Click on the Add button.
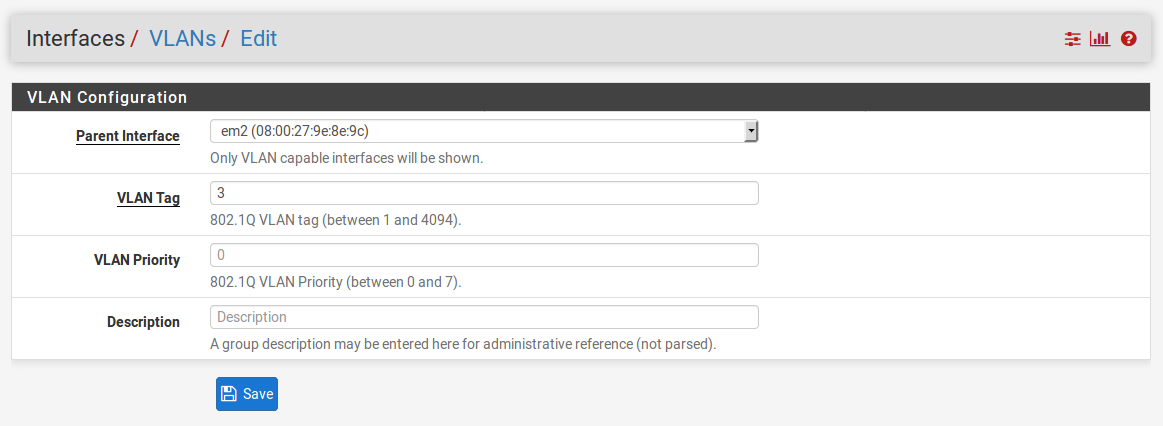
- Choose a Parent Interface from the drop-down menu; this should be a currently unassigned interface:

- Enter a VLAN Tag from 2 to 4094 (1 is reserved as the default VLAN tag and should not be used).
- Enter a VLAN Priority level from 0 to 7 (or just leave it at the default value of 0).
- Enter a brief Description.
- When you are done, click on the Save button.
- Click on the Interface Assignments tab.
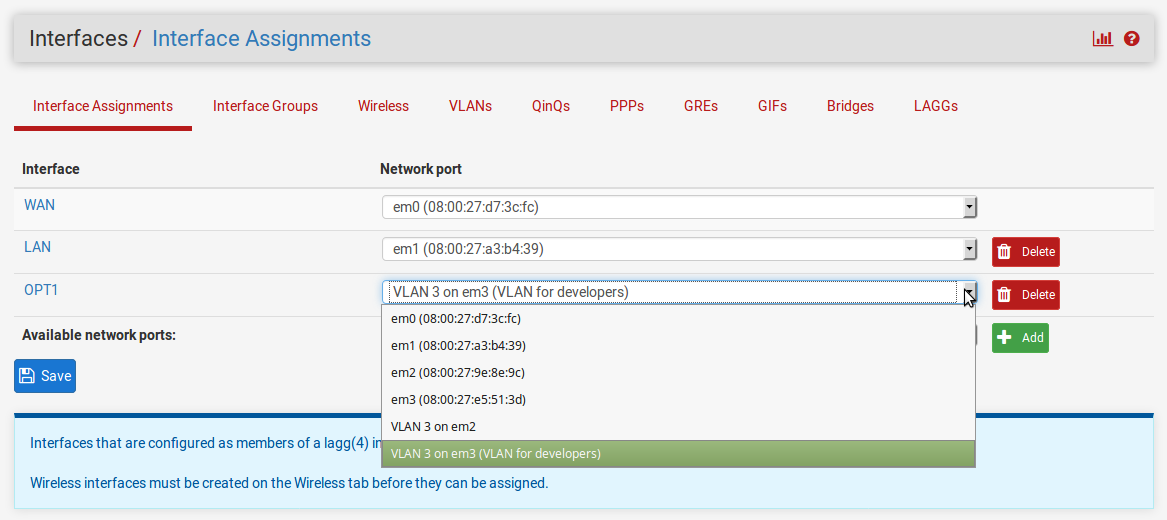
- In the Available network ports column, select the newly created VLAN in the drop-down box, and click on the Add button:

- To configure the VLAN, click on the interface name in the Interface column.
- On the Interfaces configuration page, check the Enable Interface checkbox.
- Change the Description to an appropriate one for the VLAN (for example, DEV).
- Set the IPv4 Configuration Type to an appropriate value (usually Static IPv4).
- Set the IPv6 Configuration Type, or leave it set to None.
- If you set the IPv4 Configuration Type to Static IPv4, you must enter the IPv4 Address and CIDR for the new VLAN. Use a subnet that has not yet been used (for example, 192.168.10.1/24).
- Leave the IPv4 Upstream gateway set to None.
- If you set the IPv6 Configuration Type to Static IPv6, you must enter the IPv6 Address and CIDR for the new VLAN.
- Leave the IPv6 Upstream gateway set to none.
- Leave the Block private networks and Block bogon networks checkboxes unchecked.
- When you are done making changes, click on the Save button, and then, when the page reloads, click on the Apply Changes button.
How it works...
Up to now, we have contemplated networks that correspond to a single network interface. Sometimes, however, we want to decouple logical network groupings from physical interfaces. We may want to have more than one network on a single interface—or, less commonly, have a network span multiple interfaces. We can accomplish this with virtual LANs, or VLANs. By attaching a special header to an Ethernet frame, known as an 802.1Q tag, we can have VLANs. Since the VLAN tag is an integer from 1 to 4094, it would seem that we are limited to 4094 VLANs (or 4093, since we are not supposed to use 1 as a tag), but by using QinQ tagging, we can nest VLAN tags, making it possible to have a much greater number of VLANs on our private network (in fact, a much greater number of VLANs than we would probably ever need).
In step 5 of this recipe, we referenced the VLAN priority level. This is a feature added to pfSense with version 2.3 that allows you to define a class of service for your VLAN. It is a 3 bit field from 0 to 7. Somewhat counter-intuitively, 1 is the lowest priority level (background), while 7 is the highest, and 0 is best effort treatment, which is one step above the lowest priority level.
There's more...
In order to utilize VLANs on your network, you need one or more managed switches. These are switches that recognize 802.1Q tags placed in the Ethernet frame by pfSense, and which will forward the frames to the correct port. Managed switches are never plug and play, they always involve some configuration, so consult your switch’s documentation for details on how to configure it.
See also
-
The Configuring VLANs from the console recipe


