For GPU-powered hardware, DL4J comes with a different API implementation. This is to ensure the GPU hardware is utilized effectively without wasting hardware resources. Resource optimization is a major concern for expensive GPU-powered applications in production. In this recipe, we will add a GPU-specific Maven configuration to pom.xml.
Configuring DL4J for a GPU-accelerated environment
Getting ready
You will need the following in order to complete this recipe:
- JDK version 1.7, or higher, installed and added to the PATH variable
- Maven installed and added to the PATH variable
- NVIDIA-compatible hardware
- CUDA v9.2+ installed and configured
- cuDNN (short for CUDA Deep Neural Network) installed and configured
How to do it...
- Download and install CUDA v9.2+ from the NVIDIA developer website URL: https://developer.nvidia.com/cuda-downloads.
- Configure the CUDA dependencies. For Linux, go to a Terminal and edit the .bashrc file. Run the following commands and make sure you replace username and the CUDA version number as per your downloaded version:
nano /home/username/.bashrc
 export PATH=/usr/local/cuda-9.2/bin${PATH:+:${PATH}}$

 export LD_LIBRARY_PATH=/usr/local/cuda-9.2/lib64${LD_LIBRARY_PATH:+:${LD_LIBRARY_PATH}}

 source .bashrc
- Add the lib64 directory to PATH for older DL4J versions.
- Run the nvcc --version command to verify the CUDA installation.
- Add Maven dependencies for the ND4J CUDA backend:
<dependency>
 <groupId>org.nd4j</groupId>
 <artifactId>nd4j-cuda-9.2</artifactId>
 <version>1.0.0-beta3</version>
 </dependency>
- Add the DL4J CUDA Maven dependency:
<dependency>
 <groupId>org.deeplearning4j</groupId>
 <artifactId>deeplearning4j-cuda-9.2</artifactId>
 <version>1.0.0-beta3</version>
 </dependency>
- Add cuDNN dependencies to use bundled CUDA and cuDNN:
<dependency>
 <groupId>org.bytedeco.javacpp-presets</groupId>
 <artifactId>cuda</artifactId>
 <version>9.2-7.1-1.4.2</version>
 <classifier>linux-x86_64-redist</classifier> //system specific
 </dependency>
How it works...
We configured NVIDIA CUDA using steps 1 to 4. For more detailed OS-specific instructions, refer to the official NVIDIA CUDA website at https://developer.nvidia.com/cuda-downloads.
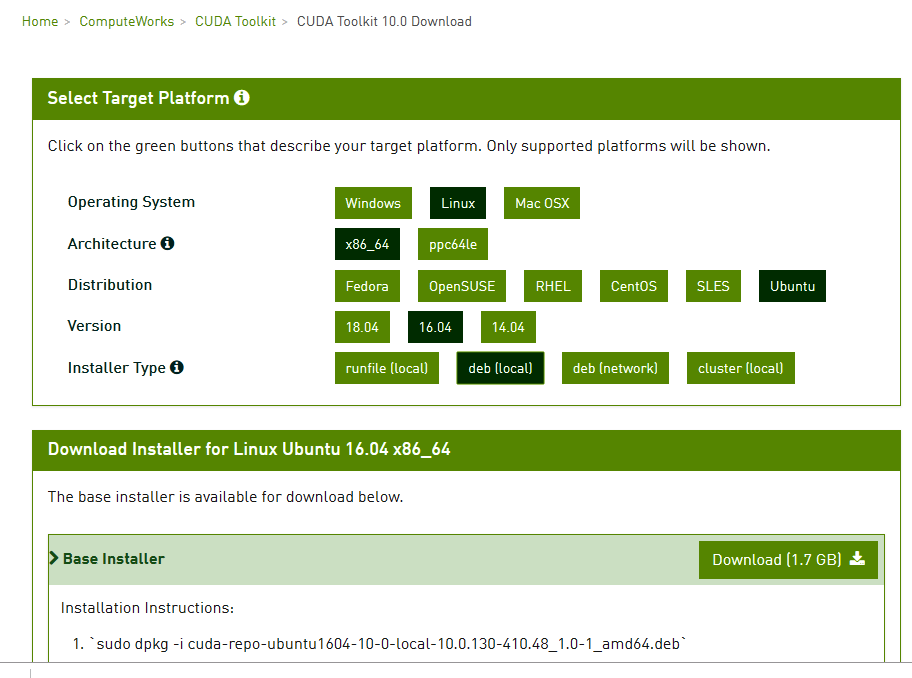
Depending on your OS, installation instructions will be displayed on the website. DL4J version 1.0.0-beta 3 currently supports CUDA installation versions 9.0, 9.2, and 10.0. For instance, if you need to install CUDA v10.0 for Ubuntu 16.04, you should navigate the CUDA website as shown here:

Note that step 3 is not applicable to newer versions of DL4J. For of 1.0.0-beta and later versions, the necessary CUDA libraries are bundled with DL4J. However, this is not applicable for step 7.
Additionally, before proceeding with steps 5 and 6, make sure that there are no redundant dependencies (such as CPU-specific dependencies) present in pom.xml.
DL4J supports CUDA, but performance can be further accelerated by adding a cuDNN library. cuDNN does not show up as a bundled package in DL4J. Hence, make sure you download and install NVIDIA cuDNN from the NVIDIA developer website. Once cuDNN is installed and configured, we can follow step 7 to add support for cuDNN in the DL4J application.
There's more...
For multi-GPU systems, you can consume all GPU resources by placing the following code in the main method of your application:
CudaEnvironment.getInstance().getConfiguration().allowMultiGPU(true);
This is a temporary workaround for initializing the ND4J backend in the case of multi-GPU hardware. In this way, we will not be limited to only a few GPU resources if more are available.


