Mastering components for repeated elements
To level up using components, this section begins by reviewing what you should already know and addressing the commonly asked questions when differentiating a group from a component. From there, more advanced component knowledge will be discussed that references Building Information Modeling (BIM), data extraction, and object classification.
Groups in SketchUp are vital to modeling success. Groups are when all geometry of an object—whether shapes, lines/edges, or forms—are fused together so they cannot be modified accidentally or mess up another object. We must reiterate what was stated earlier in this chapter because of its importance: every single item in your model must be grouped. The most visible reason for this is so objects do not stick to other objects. The technical reasons include loose geometry slows down the modeling file, creating lags, and this can create glitches.
Now, what is a component? A component is a group of geometries that will be reused more than once in a model. Components possess additional capabilities that groups do not, allowing modelers to edit linked objects (i.e., copied components) simultaneously, whether adding materials, changing the scale, adding or removing geometry, and more. Components require us to think ahead when modeling and efficiently plan when objects will be reused. A component does not appear to be more than a group until it has been copied.
When learning components, the most often-asked question is this: are components groups? The answer is yes; components are groups! After that answer, the second question is this: Do you need to make an object into a group before making it a component? Technically speaking, no, because making loose geometry a component automatically forms a group. That said, sometimes software is glitchy. Every now and then, we create a component of nongrouped objects, but for whatever reason, SketchUp does not group the objects. To be extra cautious, make it a habit to group an object before making it a component. Doing this ensures all geometry is fused together, regardless of glitches.
Let’s look at some additional questions that arise when learning components:
- Can a group become a component?
Yes. A quick way to do this is to right-click on the group (not in edit mode) and choose Make Component.
- I created a component, but it is acting like a group. Why?
After creating the component, you will not see its functionality until it is copied and then edited.
- Can I just make everything a component so I don’t have to worry about what to make a group or what to make a component?
That is entirely up to your workflow. Some prefer making all objects components, while others use them sparingly.
- Can a component become just a group?
No, not without exploding the entities (which we should avoid).
A component can be made unique, by right-clicking on a component and selecting Make Unique so it is no longer tied to other components. However, it is still a component. To make it a group - which is something we only suggest doing once you have a thorough understanding of how components work - you can explode the component and regroup it.
We can also make multiple objects unique together by selecting them all at one time and choosing Make Unique. This is helpful when you want to break the link between a series of components, but a few items should still link to each other.
- Why do we not recommend exploding a component?
We are not fans of exploding any object unless it is necessary because the geometry becomes separated, leading to issues such as glitches, bug splats (crashes), slowing down the model, and more. Another major problem that occurs has to do with tags. When a tagged object is exploded, the entities inside the grouping will take on the tag name. That is why we love the Paste in Place function mentioned in the Creating keyboard shortcuts section of this chapter, because if any geometry needs to be moved from one group or component to another while remaining in the same location, Paste in Place saves us from exploding.
- I created a component of copied objects, but when I edit one, nothing happens to the rest of the copies. Why not?
This answer comes in the form of a question. Did you create the component after making the copies? 99% of the time, their answer is yes. A component must be created before copying the object, which is why we should plan ahead when modeling. In instances like this, all but one of the groups should be deleted; the remaining group becomes a component, and then the component should be copied (again).
- Do I need to name components? What about groups?
To answer the first question, yes, you should name components. We name components to find and edit them easily, and for data extraction (discussed later in this section). Naming components should happen when you generate them (when the dialog box for creating them appears). Always name components what they are, though you may have to be specific if your model has more than one type.
For example, we typically have more than one window size in a building. If you are creating a
38"x50"casement window component, name itWindow-5080or name it by window typeCSMT-5080. Another window size,28"x40", is created as a component namedWindow-2840orDH-2840(for double-hung).To answer the second question, no, you do not need to name groups.
Naming groups takes extra legwork, especially when everything in your model should be grouped. It is very rare that professional modelers will name every group due to the time it takes. Naming groups must happen either in the Outliner toolbar (right-click and choose Rename) or in the Entity Info toolbar (type the name in the Instance box).
Note that in the Outliner toolbar, we can change the name of one instance of a single component’s entity, but it will not change all components to that name.
- How do I know if a grouped object is a group or a component?
One of three ways, as follows:
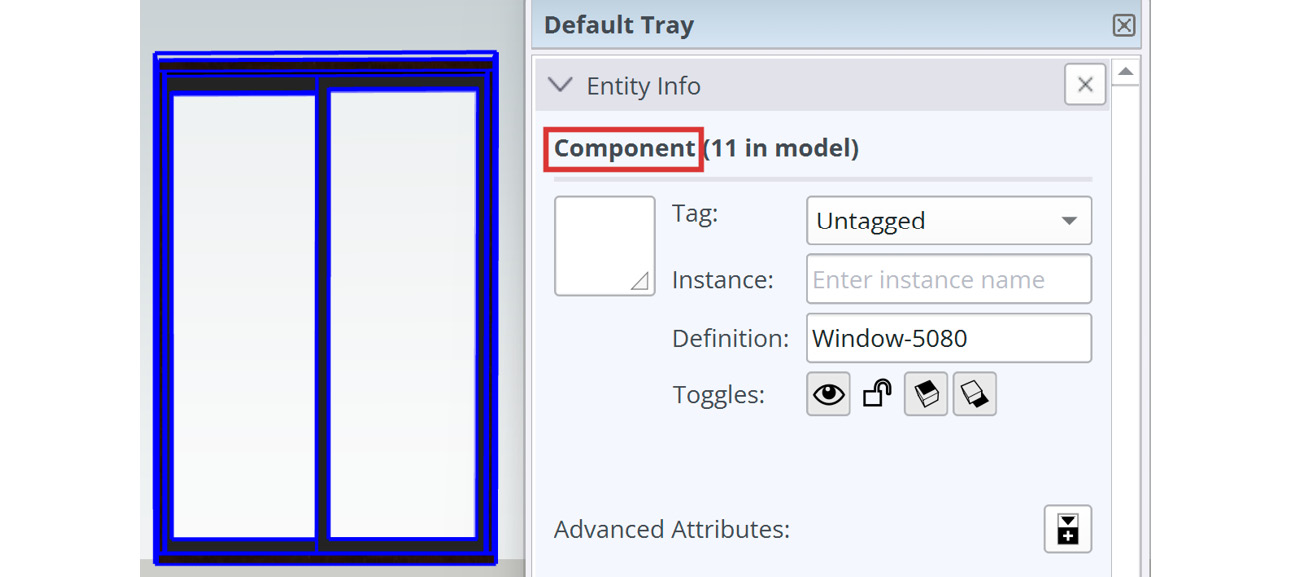
- Select the object and look at the Entity Info toolbar. The object type, whether Component, Group, Edges, or Faces, will be written at the top:

Figure 1.24: A selected component and its properties shown in the Entity Info toolbar
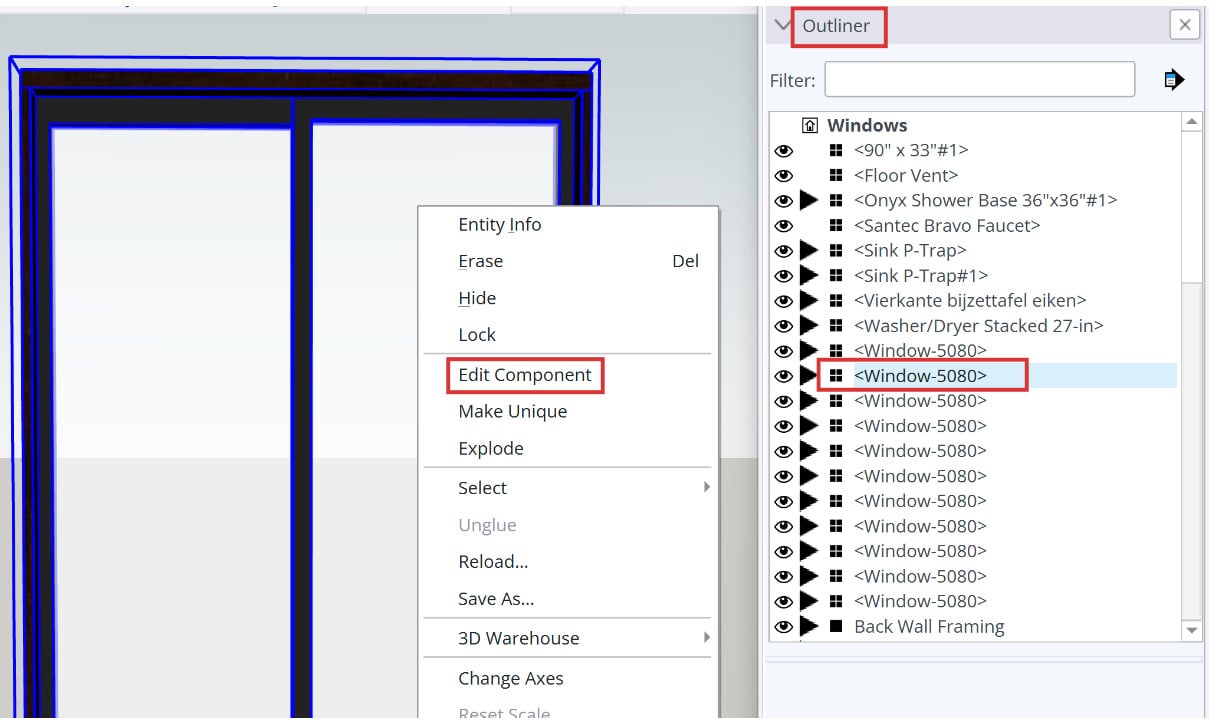
- Right-click on the object and see if you have the option to Edit Group or Edit Component. If Edit Group is shown, the object is a group, and if Edit Component is shown, the object is a component (Figure 1.25).
- In the Outliner toolbar, the name of the object you selected is highlighted (Figure 1.25). Alternatively, clicking on a line item in Outliner will show its location in the model with a selection box. An object is recognized as a component in Outliner by the presence of a specific graphic to its left, which consists of four small black boxes forming one square. Objects in the Outliner that are groups have only one solid black box to their left.

Figure 1.25: Edit component option when right-clicking on a component (left) and component shown in Outliner (right)
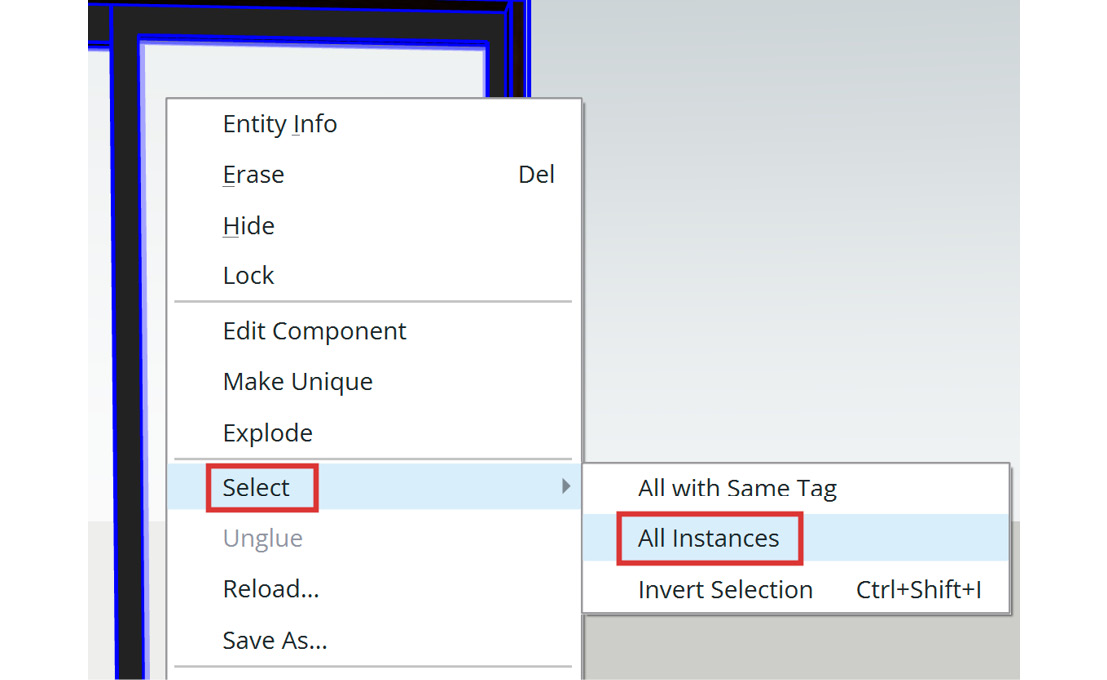
An additional (and awesome) capability of components emerges when you aim to select all instances of a component, meaning you want to simultaneously select every linked component. Right-click on the component, arrow down to Select, and click All Instances.

Figure 1.26: Right-click | Select | All Instances
Hopefully, the review of groups and components in this section has been helpful. Becca hears these questions each semester when beginner and intermediate students start to modify objects, and she wants to ensure you fully understand the differences (and similarities) between the two.


