Search icon CANCEL
Subscription
0
Cart icon
Your Cart (0 item)
Close icon
You have no products in your basket yet
Save more on your purchases! discount-offer-chevron-icon
Savings automatically calculated. No voucher code required.
Arrow left icon
Explore Products
Best Sellers
New Releases
Books
Videos
Audiobooks
Learning Hub
Free Learning
Arrow right icon
Arrow up icon
GO TO TOP
Splunk Essentials

You're reading from   Splunk Essentials Operational Intelligence at your fingertips

Arrow left icon
Product type Paperback
Published in Sep 2016
Publisher
ISBN-13 9781785889462
Length 236 pages
Edition 2nd Edition
Tools
Arrow right icon
Authors (3):
Arrow left icon
Somesh Soni Somesh Soni
Author Profile Icon Somesh Soni
Somesh Soni
Betsy Page Sigman Betsy Page Sigman
Author Profile Icon Betsy Page Sigman
Betsy Page Sigman
Erickson Delgado Erickson Delgado
Author Profile Icon Erickson Delgado
Erickson Delgado
Arrow right icon
View More author details
Toc

Table of Contents (10) Chapters Close

Preface 1. Splunk in Action FREE CHAPTER 2. Bringing in Data 3. Search Processing Language 4. Data Models and Pivot 5. Data Optimization, Reports, Alerts, and Accelerating Searches 6. Panes of Glass 7. Splunk SDK for JavaScript and D3.js 8. HTTP Event Collector 9. Best Practices and Advanced Queries

Creating a time range input


Let us change our input field into a time range field.

  1. Click on Add Input.

  2. On the list to the left, select Time.

  3. In the General section, type Select Time Range in the Label space.

  4. Click on the Search on Change checkbox.

  5. Set the Default time range to Last 24 Hours.

  6. Use the following screenshot as a guide.

  7. Click Apply when done:

  8. Before you save the dashboard changes, click the Autorun dashboard checkbox, as seen in the following screenshot:

You can now try to change the time range using the time input, but nothing will happen. This is because we have not yet configured the panels to react when the time input has been changed. Let us do that now:

  1. Go back to Edit | Edit Panels mode.

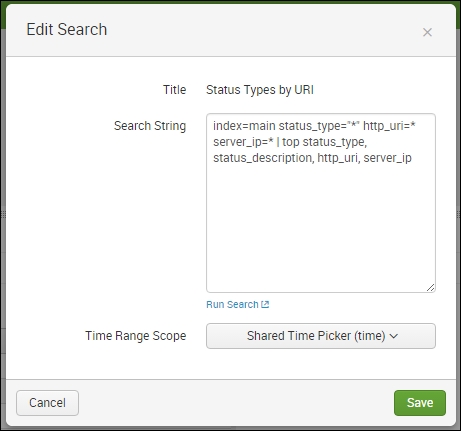
  2. Select Inline Search and edit  Search String on the first panel.

  3. Change Time Range Scope to Shared Time Picker (time).

  4. Click on Save :

Notice that the data on the first panel now reacts to the changes you make on the time range input. Perform the same steps on the other three panels and watch the data...

lock icon The rest of the chapter is locked
Register for a free Packt account to unlock a world of extra content!
A free Packt account unlocks extra newsletters, articles, discounted offers, and much more. Start advancing your knowledge today.
Unlock this book and the full library FREE for 7 days
Get unlimited access to 7000+ expert-authored eBooks and videos courses covering every tech area you can think of
Renews at $19.99/month. Cancel anytime
Banner background image