New script block categories
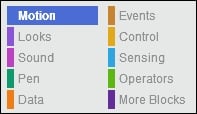
Scratch 1.4 contained eight distinct block categories. Scratch 2.0 contains ten. The new categories are called Events and More Blocks. Let's have a look at where these new categories come from and what they include.

Engage thrusters
The Events category doesn't contain anything new. It was split off from the Control category to better describe what the blocks contained within do. When we click on the Events category, we see that it contains most of the blocks with a curved top. These are the kinds of blocks a script always starts with. They are activated when something happens, or in other words, when an event occurs.
What's left in the Control category are loops and conditions. These are the logic blocks that can guide a script along different paths. They control what happens in the project and how it happens.
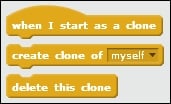
A new addition to the Control category is three blocks that are used to create clones of a sprite. This is a feature that was long missing from Scratch. A clone is a copy of a sprite that behaves the same as the original.

Perhaps you have seen projects with swarms of enemies. In the old version of Scratch, we had to manually copy each sprite. The Sprites view would quickly be filled up. This is no longer necessary. Now it's possible to create one basic enemy and then clone that enemy as many times as you want with a simple loop block. There can only be 300 clones on the Stage area at any given time, but in most cases, that will be plenty. Just keep in mind that any clones above the maximum amount won't be created.
The More Blocks category was introduced from a side project of Scratch. A group of students weren't satisfied with all the options Scratch had to offer already. They wanted to create their own function blocks. So they built an adapted version of Scratch called Build Your Own Blocks to include that feature. This feature has now been included in the main Scratch program. So now you can create your own blocks too.
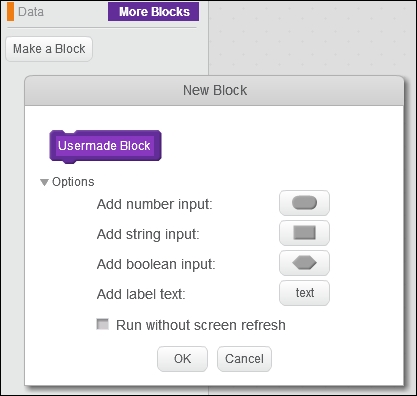
The way this works is quite similar to how you create and use variables. First we click on the Make a Block button. Then we can give the new block a descriptive name. We can also include options. These add familiar slot spaces to the block. In this way, we can get variables and other data into the block.

When we are done with this step, a new purple define block appears in the Scripts editor. To this block, we can add more script actions, similar to how we create a regular script. You'll also notice that a purple block with our chosen block name has been added to the More Blocks category. This block can be put anywhere in any script to trigger the definition block.
This feature is very useful for a combination of actions that is repeated often. Instead of copying whole rows of blocks, we only need to include the self-built function block. The definition has to be written only once, but can be executed many times.
Objective complete – mini debriefing
The new block additions may seem small at first, but they can be very powerful tools to create more impressive projects. Both the cloning and the Make a Block option simplify the creation of hordes of enemies. Of course, they can be used for other purposes as well.


