Search icon CANCEL
Subscription
0
Cart icon
Your Cart (0 item)
Close icon
You have no products in your basket yet
Arrow left icon
Explore Products
Best Sellers
New Releases
Books
Videos
Audiobooks
Learning Hub
Free Learning
Arrow right icon
Arrow up icon
GO TO TOP
Mastering Flask Web and API Development

You're reading from   Mastering Flask Web and API Development Build and deploy production-ready Flask apps seamlessly across web, APIs, and mobile platforms

Arrow left icon
Product type Paperback
Published in Aug 2024
Publisher Packt
ISBN-13 9781837633227
Length 494 pages
Edition 1st Edition
Languages
Tools
Concepts
Arrow right icon
Author (1):
Arrow left icon
Sherwin John C. Tragura Sherwin John C. Tragura
Author Profile Icon Sherwin John C. Tragura
Sherwin John C. Tragura
Arrow right icon
View More author details
Toc

Table of Contents (18) Chapters Close

Preface 1. Part 1:Learning the Flask 3.x Framework
2. Chapter 1: A Deep Dive into the Flask Framework FREE CHAPTER 3. Chapter 2: Adding Advanced Core Features 4. Chapter 3: Creating REST Web Services 5. Chapter 4: Utilizing Flask Extensions 6. Part 2:Building Advanced Flask 3.x Applications
7. Chapter 5: Building Asynchronous Transactions 8. Chapter 6: Developing Computational and Scientific Applications 9. Chapter 7: Using Non-Relational Data Storage 10. Chapter 8: Building Workflows with Flask 11. Chapter 9: Securing Flask Applications 12. Part 3:Testing, Deploying, and Building Enterprise-Grade Applications
13. Chapter 10: Creating Test Cases for Flask 14. Chapter 11: Deploying Flask Applications 15. Chapter 12: Integrating Flask with Other Tools and Frameworks 16. Index 17. Other Books You May Enjoy

Deploying the application on Kubernetes

Like Compose, Kubernetes or K8 manages multiple containers with or without dependencies on each other. Kubernetes can utilize volume storage for data persistence and has CLI commands to manage the life cycle of the containers. The only difference is that Kubernetes can run containers in a distributed setup and uses Pods to manage its containers.

Among the many ways to install Kubernetes, this chapter utilizes the Kubernetes feature in Docker Desktop’s Settings, as shown in Figure 11.16:
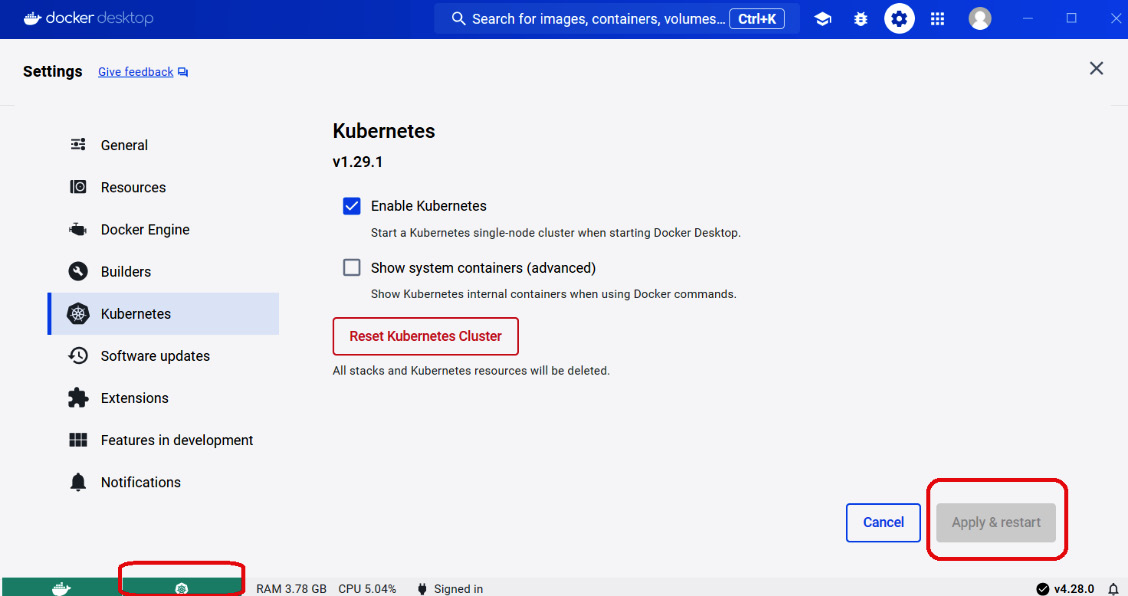
Figure 11.16 – Kubernetes in Desktop Docker

Figure 11.16 – Kubernetes in Desktop Docker

Check the Enable Kubernetes checkbox from the Settings area and click the Apply & restart button in the lower right portion of the dashboard. It will take a while for Kubernetes to appear running or green in the lower left corner of the dashboard, depending on the number of containers running on Docker Engine.

When the Kubernetes engine fails, click the Reset Kubernetes Cluster button to remove all containers and files of the Kubernetes stack. Additionally, for Windows users, delete the Docker fragment files in the C:\Users\alibatasys\AppData\Local\Temp folder before restarting Docker Desktop.

Kubernetes uses YAML files to define and create Kubernetes objects, such as Deployment, Pods, Services, and PersistentVolume, all of which are required to establish some container rules, manage the host resources, and build containerized applications. An object definition in YAML format always consists of the following manifest fields:

  • apiVersion: The field that indicates the appropriate and stable Kubernetes API for a Kubernetes object creation. This field must always appear first in the file. Kubernetes has several APIs, such as batch/v1, apps/v1, v1, and rbac.authorization.k8s.io/v1, but the more common is v1 for PersistentVolume, PersistentVolumeClaims, Service, Secret, and Pod object creation and apps/v1 for Deployment and ReplicaSets objects. So far, v1 is the first stable release of Kubernetes API.
  • kind: The field that identifies the Kubernetes object the file needs to create. Here, kind can be Secret, Service, Deployment, Role, or Pod.
  • metadata: This field specifies the properties of the Kubernetes object defined in the file. The properties may include the name, labels, and namespace.
  • spec: This field provides the specification of the object in key-value format. The same object type with a different apiVersion can have different specification details.

In this chapter, the Kubernetes deployment involves pulling our ch11-asgi file’s Docker image and the latest bitnami/postgresql image from the Docker registry hub. But before creating the deployment file, our first manifest focuses on containing the Secret object definition, which aims to store and secure the database PostgreSQL credentials. The following is our kub-secrets.yaml file, which contains our Secret object definition:

apiVersion: v1
kind: Secret
metadata:
  name: postgres-credentials
data:
  # replace this with your base4-encoded username
  user: cG9zdGdyZXM=
  # replace this with your base4-encoded password
  password: YWRtaW4yMjU1

A Secret object contains protected data such as a password, user token, or access key. Instead of hardcoding these confidential data in the applications, it is safe to store them in Pods so that they can be accessed by other Pods in the cluster.

Our second YAML file, kub-postgresql-pv.yaml, defines the object that will create persistent storage resources for our PostgreSQL, the PersistentVolume object. Since our Kubernetes runs on a single-node server, the default storage class is hostpath. This storage will hold the data of the PostgreSQL permanently, even after the removal of our containerized application. The following kub-postgresql-pv.yaml file defines the PersistentVolume object that will manage our application’s data storage:

apiVersion: v1
kind: PersistentVolume
metadata:
   name: postgres-pv-volume
   labels:
      type: local
spec:
   storageClassName: manual
   capacity:
      storage: 5Gi
   accessModes:
       - ReadWriteOnce
   hostPath:
      path: "/mnt/data"

In Kubernetes, utilizing storage from the PersistentVolume object requires a PersistentVolumeClaims object. This object requests a portion of the cluster storage that Kubernetes Pods will use for the application’s read and write. The following kub-postgresql-pvc.yaml file creates an PersistentVolumeClaims object for the deployment’s storage:

kind: PersistentVolumeClaim
apiVersion: v1
metadata:
  name: postgresql-db-claim
spec:
  accessModes:
    - ReadWriteOnce
  resources:
    requests:
      storage: 5Gi

The PersistentVolumeClaims and PersistentVolume objects work together to dynamically claim a new volume storage for the bitnami/postgresql container. The manual StorageClass type indicates that there is a binding from PersistentVolumeClaims to PersistentVolume for the request of the storage.

After creating the configuration files for the Secret, PersistentVolume, and PersistentVolumeClaims objects, the next crucial step is to create the deployment configuration files that will connect the ch11-asgi and bitnami/postgresql Docker images with database configuration details from the Secret object, utilize the volume claims for PostgreSQL data persistency, and deploy and run them all together with Kubernetes Services and Pods. Here, Deployment manages a set of Pods to run an application workload. A Pod, as Kubernetes’ fundamental building block, represents a single running process within the Kubernetes cluster. The following kub-postgresql-deployment.yaml file tells Kubernetes to manage an instance that will hold the PostgreSQL container:

apiVersion: apps/v1
kind: Deployment
metadata:
  name: ch11-postgresql

For this deployment configuration, v1 or apps/v1 is the proper choice for the apiVersion metadata. The kub-postgresql-deployment.yaml file is a Deployment type of Kubernetes document, as indicated in the kind metadata, which will generate a container named ch11-postgresql:

spec:
  replicas: 1
  selector:
    matchLabels:
      app: ch11-postgresql
  template:
    metadata:
      labels:
        app: ch11-postgresql
    spec:
      terminationGracePeriodSeconds: 180
      containers:
        - name: ch11-postgresql
          image: bitnami/postgresql:latest
          imagePullPolicy: IfNotPresent
          ports:
            - name: tcp-5432
              containerPort: 5432

From the overall state indicated in the spec metadata, the deployment will create 1 replica in a Kubernetes pod, with ch11-postgresql as its label, to run the PostgreSQL server. Moreover, the deployment will pull the bitnami/postgresql:latest image to create the PostgreSQL container, bearing the ch11-postgresql label also. The configuration also includes a terminationGracePeriodSeconds value of 180 to shut down the database server safely:

          env:
          - name: POSTGRES_USER
            valueFrom:
              secretKeyRef:
                name: postgres-credentials
                key: user
          - name: POSTGRES_PASSWORD
            valueFrom:
              secretKeyRef:
                name: postgres-credentials
                key: password
          - name: POSTGRES_DB
            value: ogs
          - name: PGDATA
            value: /var/lib/postgresql/data/pgdata

The env or environment variables portion provides the database credentials, POSTGRES_USER and POSTGRES_DB, to the database, which are base64-encoded values from the previously created Secret object, postgres-credentials. Note that this deployment will also auto-generate the database with the name ogs:

          volumeMounts:
            - name: data-storage-volume
              mountPath: /var/lib/postgresql/data
          resources:
            requests:
              cpu: "50m"
              memory: "256Mi"
            limits:
              cpu: "500m"
              memory: "256Mi"
      volumes:
        - name: data-storage-volume
          persistentVolumeClaim:
            claimName: postgresql-db-claim

The deployment will also allow us to save all data files in the /var/lib/postgresql/data file of the generated container in the ch11-postgresql pod, as indicated in the volumeMounts metadata. Specifying the volumeMounts metadata avoids data loss when the database shuts down and makes the database and tables accessible across the network. The pod will access the volume storage created by the postgres-pv-volume and postgresql-db-claim objects.

Aside from the Deployment object, this document defines a Service type that will expose our PostgreSQL container to other Pods within the cluster at port 5432 through a ClusterIP:

---
apiVersion: v1
kind: Service
metadata:
  name: ch11-postgresql-service
  labels:
    name: ch11-postgresql
spec:
  ports:
    - port: 5432
  selector:
    app: ch11-postgresql

The --- symbol is a valid separator syntax separating the Deployment and Service definitions.

Our last deployment file, kub-app-deployment.yaml, pulls the ch11-asgi Docker image and assigns the generated container to the Pods:

apiVersion: apps/v1
kind: Deployment
metadata:
  name: ch11-app
  labels:
      name: ch11-app

The apiVersion field of our deployment configuration file is v1, an appropriate Kubernetes version for deployment. In this case, our container will be labeled ch11-app, as indicated in the metadata/name configuration:

spec:
  replicas: 1
  selector:
    matchLabels:
      app: ch11-app

The spec field describes the overall state of the deployment, starting with the number of replicas the deployment will create, how many containers the Pods will run, the environment variables – namely username, password, and SERVICE_POSTGRES_SERVICE_HOST – that ch11-app will use to connect to the PostgreSQL container, and the containerPort variable the container will listen to:

  template:
    metadata:
      labels:
        app: ch11-app
    spec:
      containers:
      - name: ch11-app
        image: sjctrags/ch11-app:latest
        env:
            - name: SERVICE_POSTGRES_SERVICE_HOST
              value: ch11-postgresql-service. default.svc.cluster.local
            - name: POSTGRES_DB_USER
              valueFrom:
                secretKeyRef:
                  name: postgres-credentials
                  key: user
            - name: POSTGRES_DB_PSW
              valueFrom:
                secretKeyRef:
                  name: postgres-credentials
                  key: password
        ports:
        - containerPort: 8000

Also included in the YAML file is the Service type that will make the application to the users:

---
apiVersion: v1
kind: Service
metadata:
  name: ch11-app-service
spec:
  type: LoadBalancer
  selector:
    app: ch11-app
  ports:
    - protocol: TCP
      port: 8000
      targetPort: 8000

The definition links the postgres-credentials object to the pod’s environment variables that refer to the database credentials. It also defines a LoadBalancer Service to expose our containerized Flask[async] to the HTTP client at port 8000.

To apply these configuration files, Kubernetes has a kubectl client command to communicate with Kubernetes and run its APIs defined in the manifest files. Here is the order of applying the given YAML files:

  1. kubectl apply -f kub-secrets.yaml.
  2. kubectl apply -f kub-postgresql-pv.yaml.
  3. kubectl apply -f kub-postgresql-pvc.yaml.
  4. kubectl apply -f kub-postgresql-deployment.yaml.
  5. kubectl apply -f kub-app-deployment.

To learn about the status and instances that run the applications, run kubectl get pods. To view the Services that have been created, run kubectl get services. Figure 11.17 shows the list of Services after applying all our deployment files:

Figure 11.17 – Listing all Kubernetes Services with their details

Figure 11.17 – Listing all Kubernetes Services with their details

To learn all the details about the Services and Pods that have been deployed and the status of each pod, run kubectl get all. The result will be similar to what’s shown in Figure 11.18:

Figure 11.18 – Listing all the Kubernetes cluster details

Figure 11.18 – Listing all the Kubernetes cluster details

All the Pods and the containerized applications can be viewed on Docker Desktop, as shown in Figure 11.19:

Figure 11.19 – Docker Desktop view of all Pods and applications

Figure 11.19 – Docker Desktop view of all Pods and applications

Before accessing the ch11-asgi container, populate the empty PostgreSQL database with the .sql dump file from the local database. Use the Pod name (for example, ch11-postgresql-b7fc578f4-6g4nc) of the deployed PostgreSQL container and copy the .sql file to the /temp directory of the container (for example, ch11-postgresql-b7fc578f4-6g4nc:/temp/ogs.sql) using the kubectl cp command and the pod. Be sure to run the command in the location of the .sql file:

kubectl cp ogs.sql ch11-postgresql-b7fc578f4-6g4nc:/tmp/ogs.sql

Run the .sql file in the /temp folder of the container using the kubectl exec command and the pod:

kubectl exec -it ch11-postgresql-b7fc578f4-6g4nc -- psql -U postgres -d ogs -f /tmp/ogs.sql

Also, replace the user, password, port, and host parameters of Peewee’s Pooled PostgresqlDatabase with the environment variables declared in the kub-app-deployment.yaml file. The following snippet shows the changes in the driver class configuration found in the app/models/config module:

from peewee_async import PooledPostgresqlDatabase
import os
database = PooledPostgresqlDatabase(
        'ogs',
        user=os.environ.get('POSTGRES_DB_USER'),
        password=os.environ.get('POSTGRES_DB_PSW'),
        host=os.environ.get( 'SERVICE_POSTGRES_SERVICE_HOST'),
        port='5432',
        max_connections = 3,
        connect_timeout = 3
    )

After migrating the tables and the data, the client application can now access the API endpoints of our Online Grocery application (ch11-asgi).

A Kubernetes pod undergoes Running, Waiting, and Terminated states. The goal is for the Pods to stay Running. But when problems arise, such as encountering database configuration errors, binding to existing ports, lack of Kubernetes objects, lack of permission on files, and applications throwing memory and runtime errors, Pods emit CrashLoopBackOff and stay in Awaiting mode. To avoid Pods crashing, always carefully review the definitions files before applying them and monitor the logs of running Pods from time to time.

Sometimes, a Docker or Kubernetes deployment requires adding a reverse proxy server to manage all the incoming requests of the deployed applications. In the next section, we’ll add the NGINX gateway server to our containerized ch11-asgi application.

lock icon The rest of the chapter is locked
Register for a free Packt account to unlock a world of extra content!
A free Packt account unlocks extra newsletters, articles, discounted offers, and much more. Start advancing your knowledge today.
Unlock this book and the full library FREE for 7 days
Get unlimited access to 7000+ expert-authored eBooks and videos courses covering every tech area you can think of
Renews at $19.99/month. Cancel anytime
Banner background image