42. Adding code snippets in Java API documentation
I’m sure that you are familiar with generating Java API documentation (Javadoc) for your projects. We can do it via the javadoc tool from the command line, via IDE support, via the Maven plugin (maven-javadoc-plugin), and so on.
A common case in writing the Javadoc consists of adding snippets of code to exemplify the usage of a non-trivial class or method. Before JDK 18, adding snippets of code in documentation can be done via {@code...} or the <pre> tag. The added code is treated as plain text, is not validated for correctness, and is not discoverable by other tools. Let’s quickly see an example:
/**
 * A telemeter with laser ranging from 0 to 60 ft including
 * calculation of surfaces and volumes with high-precision
 *
 * <pre>{@code
 *     Telemeter.Calibrate.at(0.00001);
 *     Telemeter telemeter = new Telemeter(0.15, 2, "IP54");
 * }</pre>
 */
public class Telemeter {
   ...
In the bundled code, you can see the full example. The Javadoc is generated at build time via the Maven plugin (maven-javadoc-plugin), so simply trigger a build.
Starting with JDK 18 (JEP 413 - Code Snippets in Java API Documentation), we have brand new support for adding snippets of code in documentation via the {@snippet...} tag. The code added via @snippet can be discovered and validated by third-party tools (not by the javadoc tool itself).
For instance, the previous snippet can be added via @snippet as follows:
/**
 * A telemeter with laser ranging from 0 to 60 ft including
 * calculation of surfaces and volumes with high-precision
 *
 * {@snippet :
 *     Telemeter.Calibrate.at(0.00001);
 *     Telemeter telemeter = new Telemeter(0.15, 2, "IP54");
 * }
 */
public class Telemeter {
   ...
A screenshot of the output is in the following figure:

Figure 2.13: Simple output from @snippet
The effective code starts from the newline placed after the colon (:) and ends before the closing right curly bracket (}). The code indentation is treated as in code blocks, so the compiler removes the incidental white spaces and we can indent the code with respect to the closing right curly bracket (}). Check out the following figure:
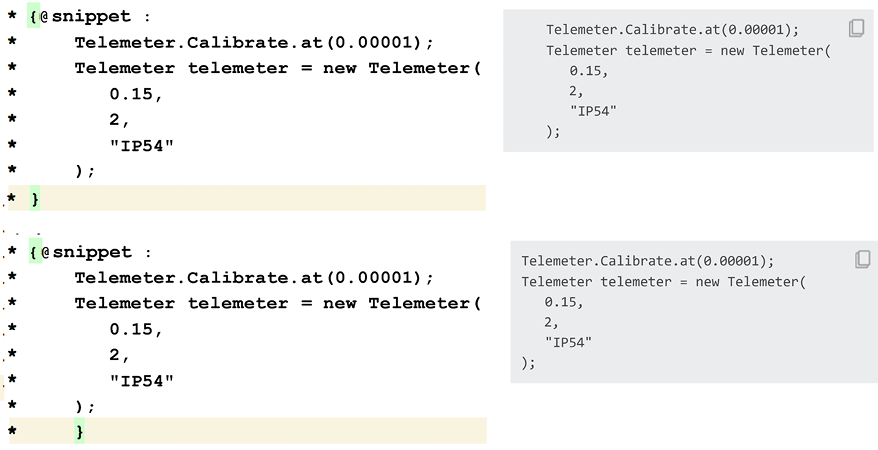
Figure 2.14: Indentation of code snippets
In the top example, the closing right curly bracket is aligned under the opening left curly bracket, while in the bottom example, we shifted the closing right curly bracket to the right.
Adding attributes
We can specify attributes for a @snippet via name=value pairs. For instance, we can provide a tip about the programming language of our snippet via the lang attribute. The value of the attribute is available to external tools and is present in the generated HTML. Here are two examples:
 * {@snippet lang="java" :
 *     Telemeter.Calibrate.at(0.00001);
 *     Telemeter telemeter = new Telemeter(0.15, 2, "IP54");
 * }
In the generated HTML, you’ll easily identify this attribute as:
<code class="language-java"> … </code>
If the code is a structured text such as a properties file, then you can follow this example:
 * {@snippet lang="properties" :
 *   telemeter.precision.default=42
 *   telemeter.clazz.default=2
 * }
In the generated HTML, you’ll have:
<code class="language-properties"></code>
Next, let’s see how can we alter what is displayed in a snippet.
Using markup comments and regions
We can visually alter a snippet of code via markup comments. A markup comment occurs at the end of the line and it contains one or more markup tags of the form @name args, where args are commonly name=value pairs. Common markup comments include highlighting, linking, and content (text) modifications.
Highlighting
Highlighting a whole line can be done via @highlight without arguments, as in the following figure:

Figure 2.15: Highlighting a whole line of code
As you can see in this figure, the first line of code was bolded.
If we want to highlight multiple lines, then we can define regions. A region can be treated as anonymous or have an explicit name. An anonymous region is demarcated by the word region placed as an argument of the markup tag and the @end tag placed at the end of the region. Here is an example for highlighting two regions (an anonymous one and a named one (R1)):
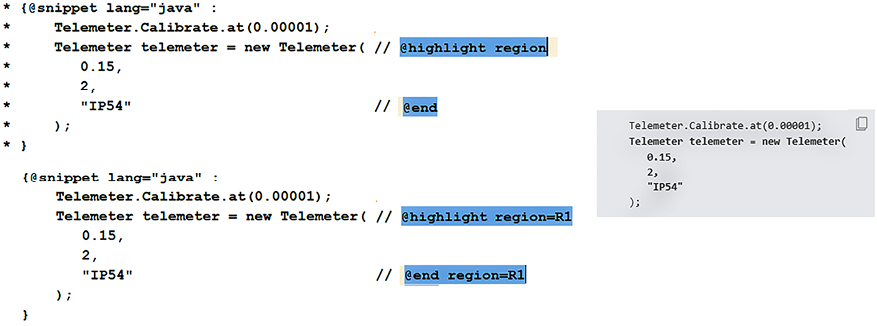
Figure 2.16: Highlighting a block of code using regions
Regular expressions allow us to highlight a certain part of the code. For instance, highlighting everything that occurs between quotes can be done via @highlight regex='".*"'. Or, highlighting only the word Calibrate can be done via the substring="Calibrate" argument, as in the following figure:

Figure 2.17: Highlighting only the word “Calibrate”
Next, let’s talk about adding links in code.
Linking
Adding links in code can be done via the @link tag. The common arguments are substring="…" and target="…". For instance, the following snippet provides a link for the text Calibrate that navigates in documentation to the description of the Calibrate.at() method:

Figure 2.18: Adding links in code
Next, let’s see how we can modify the code’s text.
Modifying the code’s text
Sometimes we may need to alter the code’s text. For instance, instead of Telemeter.Calibrate.at(0.00001, "HIGH");, we want to render in documentation Telemeter.Calibrate.at(eps, "HIGH");. So, we need to replace 0.00001 with eps. This is the perfect job for the @replace tag. Common arguments include substring="…" (or, regex="…") and replacement="...". Here is the snippet:

Figure 2.19: Replacing the code’s text
If you need to perform multiple replacements in a block of code, then rely on regions. In the following example, we apply a regular expression to a block of code:

Figure 2.20: Applying multiple replacements via a simple regex and an anonymous region
If you need to perform more replacements on the same line, then just chain multiple @replace tags (this statement applies to all tags such as @highlight, @link, and so on).
Using external snippets
So far, we have used only inlined snippets. But, there are scenarios when using inlined snippets is not a convenient approach (for instance, if we need to repeat some parts of the documentation) or it is not possible to use them (for instance, if we want to embed /*…*/ comments, which cannot be added in inlined snippets).
For such cases, we can use external snippets. Without any further configurations, JDK automatically recognizes external snippets if they are placed in a subfolder of the package (folder) containing the snippet tag. This subfolder should be named snippet-files and it can contain external snippets as Java sources, plain text files, or properties files. In the following figure, we have a single external file named MainSnippet.txt:
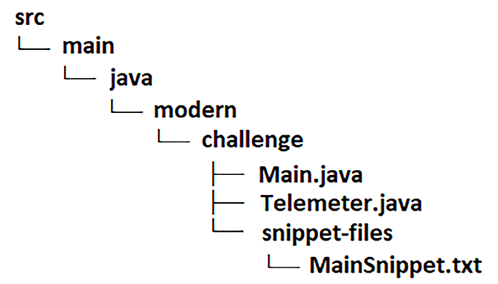
Figure 2.21: External snippets in snippet-files
If the external snippet is not a Java file, then it can be loaded via {@snippet file …} as follows:
{@snippet file = MainSnippet.txt}
{@snippet file = "MainSnippet.txt"}
{@snippet file = 'MainSnippet.txt'}
But, we can also customize the place and folder name of external snippets. For instance, let’s place the external snippets in a folder named snippet-src, as follows:
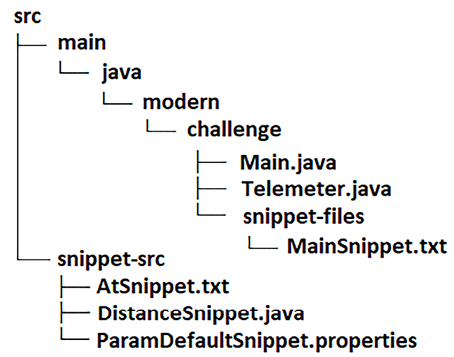
Figure 2.22: External snippets in a custom folder and place
This time, we have to instruct the compiler where to find the external snippets. This is done by passing the --snippet-path option to javadoc. Of course, you can pass it via the command line, via your IDE, or via maven-javadoc-plugin, as follows:
<additionalJOption>
  --snippet-path C:\...\src\snippet-src
</additionalJOption>
This path is relative to your machine, so feel free to adjust it accordingly in pom.xml.
Next, AtSnippet.txt and ParamDefaultSnippet.properties can be loaded exactly as you saw earlier for MainSnippet.txt. However, loading Java sources, such as DistanceSnippet.java, can be done via {@snippet class…}, as follows:
{@snippet class = DistanceSnippet}
{@snippet class = "DistanceSnippet"}
{@snippet class = 'DistanceSnippet'}
But, do not add explicitly the .java extension because you’ll get an error such as file not found on source path or snippet path: DistanceSnippet/java.java:
{@snippet class = DistanceSnippet.java}
When using Java sources as external snippets, pay attention to the following note.
Important note
Even if the predefined snippet-files name is an invalid name for a Java package, some systems may treat this folder as being part of the package hierarchy. In such cases, if you place Java sources in this folder, you’ll get an error such as Illegal package name: “foo.buzz.snippet-files”. If you find yourself in this scenario, then simply use another folder name and location for the documentation external snippets written in Java sources.
Regions in external snippets
The external snippets support regions via @start region=… and @end region=…. For instance, in AtSnippet.txt, we have the following region:
// This is an example used in the documentation
// @start region=only-code
   Telemeter.Calibrate.at(0.00001, "HIGH");
// @end region=only-code
Now, if we load the region as:
{@snippet file = AtSnippet.txt region=only-code}
We obtain only the code from the region without the text, // This is an example used in the documentation.
Here is another example of a properties file with two regions:
# @start region=dist
sc=[0,0]
ec=[0,0]
interpolation=false
# @end region=dist
# @start region=at
eps=0.1
type=null
# @end region=at
The region dist is used to show the default values for the arguments of the distance() method in the documentation:
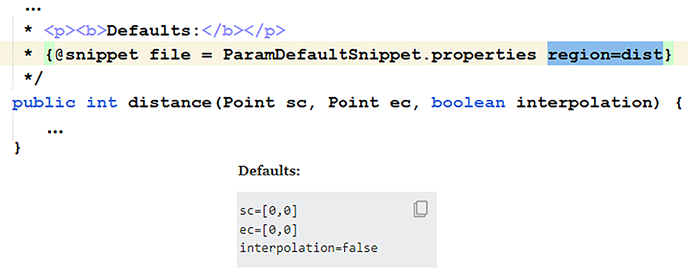
Figure 2.23: Using the dist region
And, the at region is used to show the default values for the arguments of the at() method in the documentation:
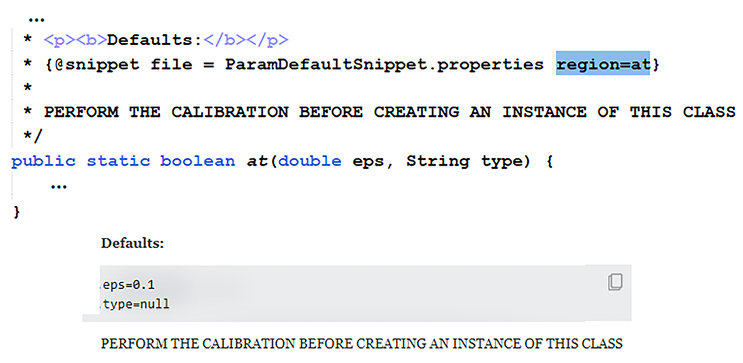
Figure 2.24: Using the “at” region
In external snippets, we can use the same tags as in the inlined snippets. For instance, in the following figure, you can see the complete source of AtSnippet.txt:

Figure 2.25: Source of AtSnippet.txt
Notice the presence of @highlight and @replace.
Important note
Starting with JDK 19, the Javadoc search feature was also improved. In other words, JDK 19+ can generate a standalone search page for searching in the Javadoc API documentation. Moreover, the search syntax has been enhanced to support multiple search words.
You can practice these examples in the bundled code.


