Search icon CANCEL
Subscription
0
Cart icon
Your Cart (0 item)
Close icon
You have no products in your basket yet
Save more on your purchases! discount-offer-chevron-icon
Savings automatically calculated. No voucher code required.
Arrow left icon
Explore Products
Best Sellers
New Releases
Books
Videos
Audiobooks
Learning Hub
Free Learning
Arrow right icon
Arrow up icon
GO TO TOP
Hands-on ESP32 with Arduino IDE

You're reading from   Hands-on ESP32 with Arduino IDE Unleash the power of IoT with ESP32 and build exciting projects with this practical guide

Arrow left icon
Product type Paperback
Published in Jan 2024
Publisher Packt
ISBN-13 9781837638031
Length 294 pages
Edition 1st Edition
Tools
Arrow right icon
Author (1):
Arrow left icon
Asim Zulfiqar Asim Zulfiqar
Author Profile Icon Asim Zulfiqar
Asim Zulfiqar
Arrow right icon
View More author details
Toc

Table of Contents (15) Chapters Close

Preface 1. Part 1 – Introduction: Getting Familiar with ESP32
2. Chapter 1: IoT with ESP32 using Arduino IDE FREE CHAPTER 3. Chapter 2: Connecting Sensors and Actuators with ESP32 4. Chapter 3: Interfacing Cameras and Displays with ESP32 5. Part 2 – IoT Protocols and ESP32
6. Chapter 4: Implementing Network-Based Protocols with ESP32 7. Chapter 5: Choosing the Right Data-Based Protocols for Your ESP32 Projects 8. Part 3 – Practical Implementation
9. Chapter 6: Project 1 – Smart Plant Monitoring System Using ESP32, Messaging Services, and the Twitter API 10. Chapter 7: Project 2 – Rent Out Your Parking Space 11. Chapter 8: Project 3 – Logging, Monitoring, and Controlling using ESP32 12. Chapter 9: From Arduino IDE to Advanced IoT Development – Taking the Next Steps 13. Index 14. Other Books You May Enjoy

Integrating the PayPal API

In this section, we will set up the Webhooks that will enable us to receive a notification related to the payment in the ESP32. To set up the Webhooks, we will complete the following steps:

  1. Firstly, we will go to https://www.webhook.site and get a unique URL, as highlighted in the following figure:
Figure 7.4 – A unique URL on Webhook.site

Figure 7.4 – A unique URL on Webhook.site

  1. Then, to test our Webhook, we will use the PayPal Instant Payment Notification (IPN) simulator. It will help us to simulate the payment notification for testing. To access the IPN simulator, go to https://developer.paypal.com/dashboard/ipnsimulator using your web browser.
  2. Paste the unique URL into the IPL URL handler, and select Web Accept as the transaction type.
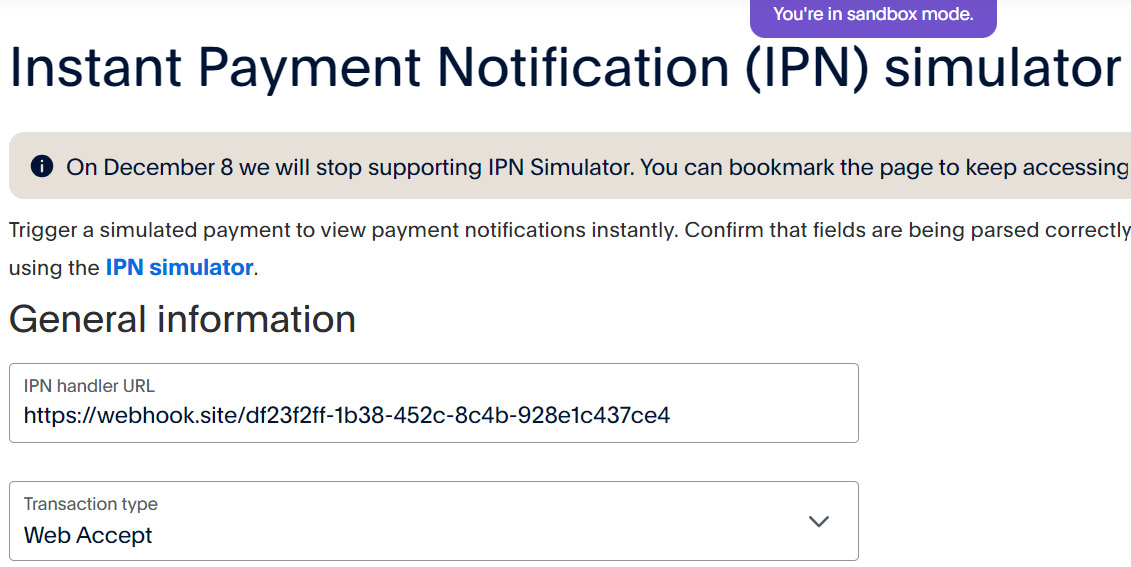
Figure 7.5 – The PayPal IPN simulator

Figure 7.5 – The PayPal IPN simulator

  1. For testing, leave all other values to default, and then go to the bottom of the page and click on Send IPN.
Figure 7.6 – Sending an IPN using the IPN simulator

Figure 7.6 – Sending an IPN using the IPN simulator

  1. You will receive the data at https://www.webhook.site, as shown in the following figure:
Figure 7.7 – The IPN received at Webhook.site

Figure 7.7 – The IPN received at Webhook.site

Now, we have set up the Webhook, and we have successfully received the data at Webhook.site but we will need to receive this data in ESP32 to decide whether the payment has been made or not.

Receiving PayPal notifications in ESP32

The notifications received from PayPal are in the JavaScript Object Notation (JSON) format. JSON is a lightweight data-interchange format that is easy for humans to read and write, and also straightforward for machines to parse and generate. It is primarily used to transmit data between a server and a web application as an alternative to XML. JSON employs a simple and clear structure, representing data as key-value pairs within objects, which can be nested to create complex structures. Arrays, which are ordered lists of values, also play a crucial role in JSON. The format supports various data types, including strings, numbers, Booleans, objects, arrays, and null values. Its simplicity, universality, and human-readable nature make JSON widely adopted in web development and data exchange scenarios.

To receive the PayPal notification in ESP32, we will upload the following code in the ESP32 using the Arduino IDE. The code is available on GitHub (https://github.com/PacktPublishing/Programming-ESP32-with-Arduino-IDE/tree/main/chapter%207/Reading_webhook_paypal):

#include <WiFi.h>
#include <HTTPClient.h>
#include <ArduinoJson.h>
#include <NTPClient.h>
#include <WiFiUdp.h>
#include <time.h>
WiFiUDP ntpUDP;
NTPClient timeClient(ntpUDP, "pool.ntp.org");
…
…
…
bool parseTimestamp(String timestampStr, struct tm &createdTime) {
  if (strptime(timestampStr.c_str(), "%Y-%m-%d %H:%M:%S", &createdTime)) {
    return true;
  } else {
    Serial.println("Failed to parse timestamp.");
    return false;
  }
}

Let’s review the code:

  • We have included the following libraries:
    • #include <WiFi.h>: This includes the Wi-Fi library to enable wireless network communication
    • #include <HTTPClient.h>: This imports the HTTPClient library to make HTTP requests
    • #include <ArduinoJson.h>: This includes the ArduinoJson library to parse JSON data
    • #include <NTPClient.h>: This imports the NTPClient library for time synchronization using the Network Time Protocol (NTP)
    • #include <WiFiUdp.h>: This includes the WiFiUdp library for UDP communication
    • #include <time.h>: This imports the time library for time-related functions
  • Global variables and constants:
    • WiFiUDP ntpUDP: This defines a UDP object for NTP time synchronization
    • NTPClient timeClient(ntpUDP, "pool.ntp.org"): This initializes the NTP client with the UDP object and NTP server address
    • ssid and password: Variables that store the Wi-Fi network SSID and password
    • apiKey: A variable that stores an API key used for authentication
    • url: The URL of the web service where payment data is retrieved
    • LastModifiedHeader: Stores the “Last-Modified” header received from the server

    Make sure to change apiKey, url, ssid, and password.

  • The setup() function:
    • Initializes serial communication with a baud rate of 115200
    • Connects to the specified Wi-Fi network (ssid and password)
    • Uses a while loop to wait until the ESP32 successfully connects to the Wi-Fi network
    • Prints a message to the serial monitor when the connection is established
  • The loop() function:
    • Repeatedly calls the checkPayment() function at a regular interval of 6 seconds (6,000 milliseconds)
  • The checkPayment() function:
    • Responsible for checking and processing payment data.
    • Declares a string variable, amountPaid, to store the payment amount.
    • Sets the timeLimitMinutes to 2, which is the time limit for processing payment data. Data older than two minutes will be considered old.
    • Updates the time using NTP and gets the current epoch time.
    • Checks whether the ESP32 is connected to the Wi-Fi network.
    • Creates an HTTPClient object called http to make an HTTP GET request to the specified URL.
    • Adds headers to the HTTP request, including "accept," "api-key," and “If-Modified-Since” if lastModifiedHeader is not empty.
    • Executes the HTTP GET request and stores the HTTP response code in httpCode.
    • If the request is successful (HTTP_CODE_OK), it parses the JSON response using the parseJsonData() function.
    • If the response indicates that there is no new data (HTTP_CODE_NOT_MODIFIED), it prints a message.
    • If there is an HTTP error, it prints the error code.
    • If the request fails to connect, it prints a failure message.
    • The function ends by closing the HTTP connection and returning the payment amount as an integer.
  • The parseJsonData() function:
    • This parses the JSON response received from the server to extract payment data
    • The function takes the JSON payload, a reference to amountPaid, the current time, and the time limit as parameters
    • It uses the ArduinoJson library to deserialize the JSON data
    • It parses timestamp, calculates the time difference, and checks whether the data is within the time limit
    • If the data is within the time limit, it extracts and prints the payer’s name, email, and amount paid
    • If the data is too old, it prints a message and returns false
  • The parseTimestamp() function:
    • This parses a timestamp string and populates the createdTime structure
    • The function returns true if parsing is successful and false otherwise

After uploading the code, send an IPN notification using the IPN simulator, and you will see a similar output in the serial monitor. Test it a few times by changing the payer's name, email, and mc_gross (i.e., Amount paid):

Figure 7.8 – An IPN notification in the ESP32 serial monitor

Figure 7.8 – An IPN notification in the ESP32 serial monitor

Now that we have completed and understood the important parts of this project, we will combine everything to complete it.

lock icon The rest of the chapter is locked
Register for a free Packt account to unlock a world of extra content!
A free Packt account unlocks extra newsletters, articles, discounted offers, and much more. Start advancing your knowledge today.
Unlock this book and the full library FREE for 7 days
Get unlimited access to 7000+ expert-authored eBooks and videos courses covering every tech area you can think of
Renews at $19.99/month. Cancel anytime
Banner background image