Creating our first Blueprint
We now have a cylinder in the world, and the material we would like to apply to the cylinder when shot. The final piece of the interaction will be the game logic that evaluates that the cylinder has been hit, and then changes the material on the cylinder to our new red material. In order to create this behavior and add it to our cylinder, we will have to create a Blueprint. There are multiple ways of creating a Blueprint, but to save a couple of steps, we can create the Blueprint and directly attach it to the cylinder we created in a single click. To do so, make sure you have the CylinderTarget object selected in the Scene Outliner panel, and click on the blue Blueprint/Add Script button at the top of the Details panel. You will then see a path select window.
For this project, we will be storing all our Blueprints in the Blueprints folder, inside the FirstPersonBP folder. Since this is the Blueprint for our CylinderTarget actor, leaving the name of the Blueprint as the default, CylinderTarget_Blueprint, is appropriate.

CylinderTarget_Blueprint should now appear in your content browser, inside the Blueprints folder. Double-click on this Blueprint to open a new editor tab for the Blueprint. We will now be looking at the Viewport view of our cylinder. From here, we can manipulate some of the default properties of our actor, or add more components, each of which can contain their own logic to make the actor more complex. We will explore components more in the next chapter; for now, we want to create a simple Blueprint attached to the actor directly. To do so, click on the tab labeled Event Graph above the Viewport window.
Exploring the Event Graph panel
The Event Graph panel should look very familiar, as it shares most of the same visual and functional elements as the Material Editor we used earlier. By default, the event graph opens with three unlinked event nodes that are currently unused. An event refers to some action in the game that acts as a trigger for a Blueprint to do something. Most of the Blueprints you will create follow this structure: Event (when) | Conditionals (if) | Actions (do). This can be worded as follows: when something happens, check whether X, Y, and Z are true, and if so, do this sequence of actions. A real-world example of this might be a Blueprint that determines whether or not I have fired a gun. The flow is like this: WHEN the trigger is pulled, IF there is ammo left in the gun, DO fire the gun.
The three event nodes that are present in our graph by default are three of the most commonly used event triggers. Event Begin Play triggers actions when the player first begins playing the game. Event Actor Begin Overlap triggers actions when another actor begins touching or overlapping the space containing the existing actor controlled by the Blueprint. Event Tick triggers attached actions every time a new frame of visual content is displayed on the screen during gameplay. The number of frames that are shown on the screen within a second will vary depending on the power of the computer running the game, and this will in turn affect how often Event Tick triggers the actions.

We want to trigger a "change material" action on our target every time a projectile hits it. While we could do this by utilizing the Event Actor Begin Overlap node to detect when a projectile object was overlapping with the cylinder mesh of our target, we will simplify things by detecting only when another actor has hit our target actor. Let's start with a clean slate, by clicking and dragging a selection box over all the default events and hitting the Delete key on the keyboard to delete them.
Detecting a hit
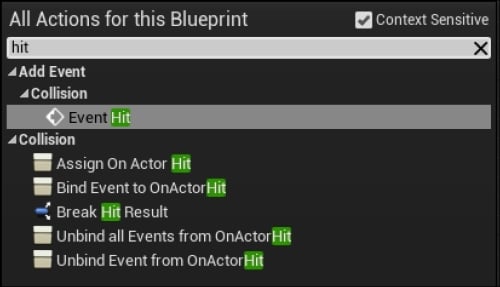
To create our hit detection event, right-click on empty graph space and type hit in the search box. The Event Hit node is what we are looking for, so select it when it appears in the search results. Event Hit triggers actions every time another actor hits the actor controlled by this Blueprint.

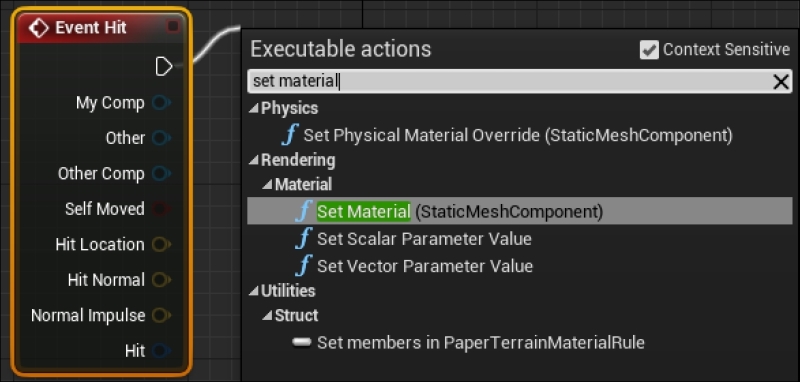
Once you have the Event Hit node on the graph, you will notice that Event Hit has a number of multicolored output pins originating from it. The first thing to notice is the white triangle pin that is in the top-right corner of the node. This is the execution pin, which determines the next action to be taken in a sequence. Linking the execution pins of different nodes together enables the basic functionality of all Blueprints. Now that we have the trigger, we need to find an action that will enable us to change the material of an actor. Click and drag a wire from the execution pin to empty space to the right of the node.
Dropping a wire into empty space like this will generate a search window, allowing you to create a node and attach it to the pin you are dragging from in a single operation. In the search window that appears, make sure that the Context Sensitive box is checked. This will limit the results in the search window to only those nodes that can actually be attached to the pin you dragged to generate the search window. With Context Sensitive checked, type set material in the search box. The node we want to select is called Set Material (StaticMeshComponent).
Tip
If you cannot find the node you are searching for in the context-sensitive search, try unchecking Context Sensitive to find it from the complete list of node options. Even if the node is not found in the context-sensitive search, there is still a possibility that the node can be used in conjunction with the node you are attempting to attach it to.
The actions in the Event Hit node can be set like this:

Swapping a material
Once you have placed the Set Material node, you will notice that it is already connected via its input execution pin to the Event Hit node's output execution pin. This Blueprint will now fire the Set Material action whenever the Blueprint's actor hits another actor. However, we haven't yet set up the material that will be called when the Set Material action is called. Without setting the material, the action will fire but not produce any observable effect on the cylinder target.
To set the material that will be called, click on the drop-down field labeled Select Asset underneath Material inside the Set Material node. In the asset finder window that appears, type red in the search box to find the TargetRed material we created earlier. Clicking on this asset will attach it to the Material field inside the Set Material node.

We have now done everything we need with this Blueprint to turn the target cylinder red, but before the Blueprint can be saved, it must be compiled. Compiling is the process used to convert the developer-friendly Blueprint language into machine instructions that tell the computer what operations to perform. This is a hands-off process, so we don't need to concern ourselves with it, except to ensure that we always compile our Blueprint scripts after we assemble them. To do so, hit the Compile button in the top-left corner of the editor toolbar, and then click on Save.
Now that we have set up a basic gameplay interaction, it is wise to test the game to ensure that everything is happening the way we expect. Click on the Play button, and a game window will appear directly above the Blueprint Editor. Try both shooting and running into the CylinderTarget actor you created.

Improving the Blueprint
When we run the game, we see that the cylinder target does change colors upon being hit by a projectile fired from the player's gun. This is the beginning of a framework of gameplay that can be used to get enemies to respond to the player's actions. However, you also might have noticed that the target cylinder changes color even when the player runs into it directly. Remember that we wanted the cylinder target to become red only when hit by a player projectile, and not because of any other object colliding with it. Unforeseen results like this are common whenever scripting is involved, and the best way to avoid them is to check your work by playing the game as you construct it as often as possible.
To fix our Blueprint so that the cylinder target changes color only in response to a player projectile, return to the CylinderTarget_Blueprint tab and look at the Event Hit node again.
The remaining output pins on the Event Hit node are variables that store data about the event that can be passed to other nodes. The color of the pins represents the kind of data variable it passes. Blue pins pass objects, such as actors, whereas red pins contain a Boolean (true or false) variable.
You will learn more about these pin types as we get into more complicated Blueprints; for now, we only need to concern ourselves with the blue output pin labeled Other, which contains the data about which other actor performed the hitting to fire this event. This will be useful in order for us to ensure that the cylinder target changes color only when hit by a projectile fired from the player, rather than changing color because of any other actors that might bump into it.
To ensure that we are only triggering in response to a player projectile hit, click and drag a wire from the Other output pin to empty space. In this search window, type projectile. You should see some results that look similar to the following screenshot. The node we are looking for is called Cast To FirstPersonProjectile:

FirstPersonProjectile is a Blueprint included in Unreal Engine 4's First Person template that controls the behavior of the projectiles that are fired from your gun. This node uses casting to ensure that the action attached to the execution pin of this node occurs only if the actor hitting the cylinder target matches the object referenced by the casting node.
When the node appears, you should already see a blue wire between the Other output pin of the Event Hit node and the Object pin of the casting node. If not, you can generate it manually by clicking and dragging from one pin to the other. You should also remove the connections between the Event Hit and Set Material node execution pins so that the casting node can be linked between them. Removing a wire between two pins can be done by holding down the Alt key and clicking on a pin.
Once you have linked the three nodes, the event graph should look like what is shown in the following screenshot:

Now compile, save, and click on the play button again to test. This time, you should notice that the cylinder target retains its default color when you walk up and touch it, but does turn red when fired upon by your gun.


